이래도 되는 건가?
비둘기에게 강냉이를 뿌렸나 보다

재네들은 파티(?)중
나는 산보 중...

앱을 만들다 보면 프로필 가져오기 기능을 구현해 보는 경우가 간혹 생긴 게 된다.
오늘은 compose을 이용한 구현을 하는 과정에서
갤러리에서 이미지를 불러와서 프로필 사진으로 저장하는 과정을 구현해 보고자 한다.
그림과 같이 구현해 볼 예정이다.
전체 소스의 일부는 아래와 같이 구현이 되었다.
    @Composable
    private fun mainContent(padding: Modifier) {

        Column(modifier = Modifier
            .fillMaxHeight()
            .fillMaxWidth()
            .padding(16.dp),
            verticalArrangement = Arrangement.Top,
            horizontalAlignment = Alignment.Start
        ) {
            var imageUri by remember {
                mutableStateOf<Uri?>(null)
            }
            var imageTy by remember {
                mutableStateOf<Boolean>(false)
            }
            val context = LocalContext.current
            val bitmap =  remember {
                mutableStateOf<Bitmap?>(null)
            }
            val launcher = rememberLauncherForActivityResult(contract =
            ActivityResultContracts.GetContent()) { uri: Uri? ->
                imageUri = uri
            }

            Card(modifier = Modifier
                .fillMaxWidth()
                .height(150.dp)
                .padding(8.dp)
                .border(1.dp, Color.Gray),
                content = {
                    Text(getString(R.string.profileImage))
                    Row (
                        verticalAlignment = Alignment.CenterVertically,
                        horizontalArrangement = Arrangement.End
                    )
                    {
                        imageUri?.let {
                            if (Build.VERSION.SDK_INT < 28) {
                                bitmap.value = MediaStore.Images
                                    .Media.getBitmap(context.contentResolver,it)
                            } else {
                                val source = ImageDecoder
                                    .createSource(context.contentResolver,it)
                                bitmap.value = ImageDecoder.decodeBitmap(source)
                            }
                            bitmap.value?.let {  btm ->
                                val baos = ByteArrayOutputStream()
                                btm.compress(
                                    Bitmap.CompressFormat.PNG,
                                    100,
                                    baos
                                )
                                val b: ByteArray = baos.toByteArray()
                                val encoded: String = Base64.encodeToString(b, Base64.DEFAULT)
                                editor.putString("profileImage", encoded)
                                editor.commit()
                                Image(bitmap = btm.asImageBitmap(),
                                    contentDescription = "profile",
                                    contentScale = ContentScale.Crop,
                                    modifier = Modifier
                                        .clip(shape = RoundedCornerShape(16.dp))
                                        .size(150.dp, 250.dp))
                            }
                        }
                        if (!"".equals(sp.getString("profileImage","")) && !imageTy) {
                            var encoded = sp.getString("profileImage","")
                            val imageAsBytes: ByteArray =
                                Base64.decode(encoded?.toByteArray(), Base64.DEFAULT)
                            var bitMap = BitmapFactory.decodeByteArray(imageAsBytes, 0, imageAsBytes.size)
                            Image(bitmap = bitMap.asImageBitmap(),
                                contentDescription = "profile",
                                contentScale = ContentScale.Crop,
                                modifier = Modifier
                                    .clip(shape = RoundedCornerShape(16.dp))
                                    .size(150.dp, 250.dp))
                        }
                        Spacer(modifier = Modifier.padding(10.dp))
                        IconButton(onClick = {
                            imageTy = true
                            launcher.launch("image/*")
                        }) {
                            Icon(imageVector = Icons.Default.PhotoAlbum, contentDescription = "Search Profile", tint = Color.Blue)
                        }
                    }
                })
            Text(getString(R.string.title_translate_ty))
            Spacer(modifier = Modifier.padding(10.dp))
            Card(modifier = Modifier
                .fillMaxWidth()
                .height(60.dp)
                .padding(8.dp)
                .border(1.dp, Color.Gray),
                content = {
                    Row (verticalAlignment = Alignment.CenterVertically)
                    {
                        if (isTranslate.value) {
                            Text(text = getString(R.string.msgAutoTranslate))
                        } else {
                            Text(text = getString(R.string.msgTranslateNo))
                        }
                        Switch(checked = isTranslate.value, onCheckedChange = {
                            isTranslate.value = it
                        })
                    }

                })
            Spacer(modifier = Modifier.padding(10.dp))
            Row (verticalAlignment = Alignment.CenterVertically)
            {
                Text(getString(R.string.title_master_language))
            }
            Spacer(modifier = Modifier.padding(10.dp))
            Card(modifier = Modifier
                .fillMaxWidth()
                .height(60.dp)
                .padding(8.dp)
                .border(1.dp, Color.Gray),
                content = {
                    if (languages.size > 0) {
                        DropdownDemo()
                    }
                })
        }
    }
여기서 살펴 보아야 하는 부분은 다음과 같다.
갤러리에 있는 이미지를 불러오는 실행은 launcher을 호출해서 실행을 하고 있고.
launcher.launch("image/*")
실행된 결과를 아래와 같은 코드 구현을 통해서 bitmap 이미지를 변환 하여 화면에 Image에 속성을 넣어주고 있는 것을 확인할 수 있었다.
                       imageUri?.let {
                            if (Build.VERSION.SDK_INT < 28) {
                                bitmap.value = MediaStore.Images
                                    .Media.getBitmap(context.contentResolver,it)
                            } else {
                                val source = ImageDecoder
                                    .createSource(context.contentResolver,it)
                                bitmap.value = ImageDecoder.decodeBitmap(source)
                            }
                            bitmap.value?.let {  btm ->
                                val baos = ByteArrayOutputStream()
                                btm.compress(
                                    Bitmap.CompressFormat.PNG,
                                    100,
                                    baos
                                )
                                val b: ByteArray = baos.toByteArray()
                                val encoded: String = Base64.encodeToString(b, Base64.DEFAULT)
                                editor.putString("profileImage", encoded)
                                editor.commit()
                                Image(bitmap = btm.asImageBitmap(),
                                    contentDescription = "profile",
                                    contentScale = ContentScale.Crop,
                                    modifier = Modifier
                                        .clip(shape = RoundedCornerShape(16.dp))
                                        .size(150.dp, 250.dp))
                            }
이런 코드를 Kotlin을 통해서 구현을 한다고 하면 아마 다음과 같은 구현이 될 것 같다.
intent을 통해서 갤러리에 있는 이미지를 열어 오는 구현을 하고...
Intent(Intent.ACTION_GET_CONTENT).apply {
            type = "image/*"
            startActivityForResult(
                Intent.createChooser(this, "Get Album"),
                REQ_SELECT_IMG
            )
        }
onActivityResult을 통해서 받아온 이미지를 처리하는 모양으로 구현이 될 것 같은데...
    override fun onActivityResult(requestCode: Int, resultCode: Int, intent: Intent?) {
        super.onActivityResult(requestCode, resultCode, intent)

        if (resultCode == Activity.RESULT_OK) {
            when (requestCode) {
                REQ_SELECT_IMG -> {

                    val currentImageUri = intent?.data ?: return //이미지 URL

                    val needAdjust = true
                    if (needAdjust) {
                        setAdjImgUri(currentImageUri) //방법 2
                    } else {
                        setImgUri(currentImageUri) //방법 1
                    }
                }

            }
        }
    }
위에서 구현된 코드와 비교를 해 보면 훨씬 간략해졌음을 느끼게 된다.
java 코드로 구현된 예시는 아래 링크를 참고해 보면 좋을 것 같다.
https://billcorea.tistory.com/40
안드로이드 앱 만들기 갤러리 에서 이미지 받아오기 (자동회전 방지)
앱을 만들다가... 갤러리에서 이미지 받아오는 와서 사용하는 것을 구현하고 있는 중인데... 사진이 돌아간다. 흑~ 그래서 구글링 신에서 질문을 했다... 답... Exif 을 구현해서 사진을 돌리는 코드
billcorea.tistory.com
또한 compose에서 구현은 아래 site에서 참고했음을 밝힌다.
https://yjyoon-dev.github.io/android/2022/04/09/android-05/
[Android] 서버에 이미지 업로드하기(feat. Android 10, Compose)
Android 10 이상에서 Jetpack Compose를 통해 기기의 이미지를 선택한 뒤 서버에 업로드해보는 과정을 알아보자
yjyoon-dev.github.io
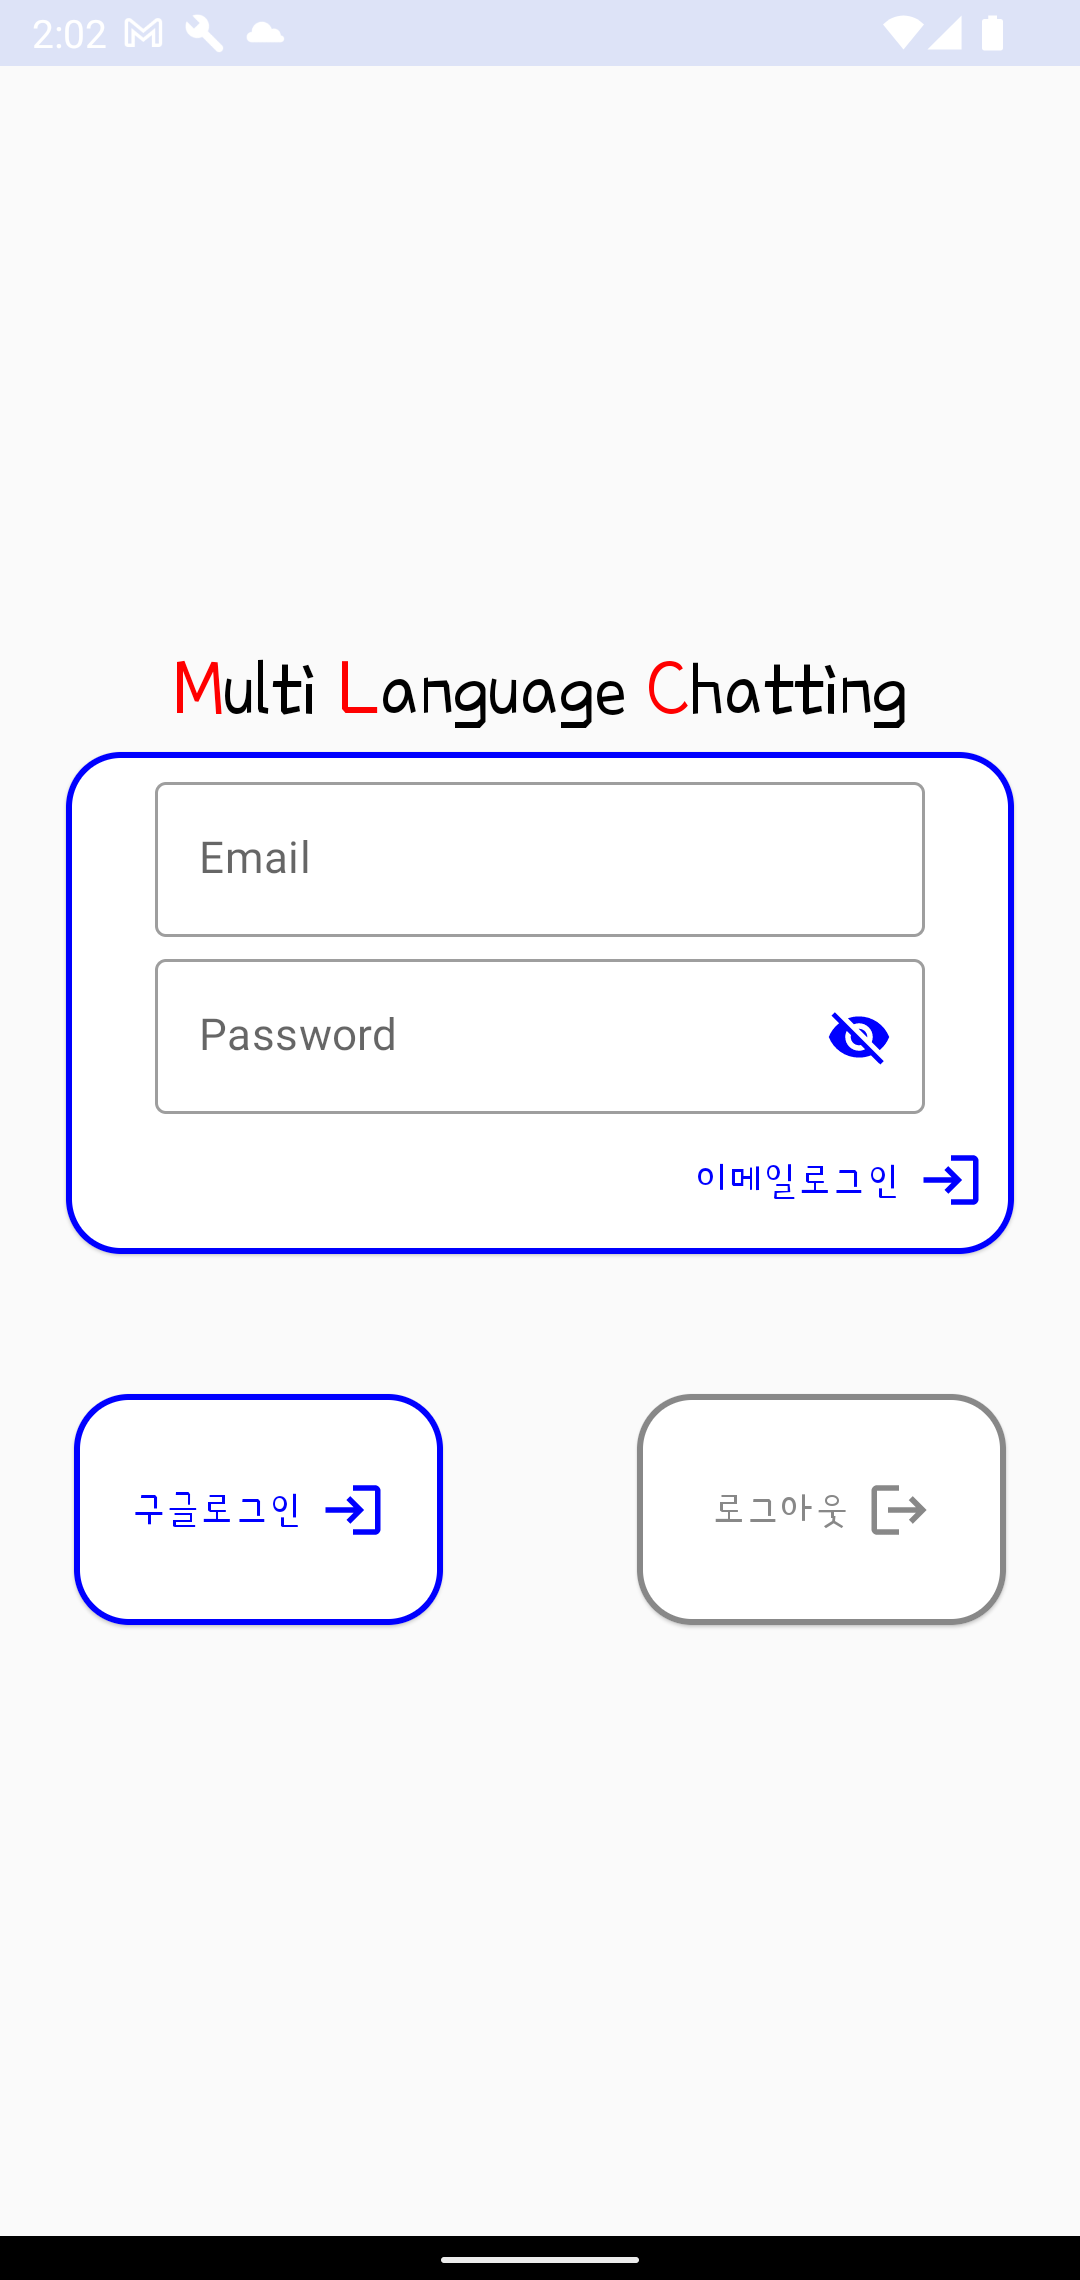
이 앱은 말 그대로 여러 나라 사람들이 자기 언어를 이용해서 채팅을 할 수 있는 기능을 지원합니다.
This app literally supports the ability to chat with people from different countries using their own language.
사용방법은 간단합니다.
How to use is simple.
1. 사용자 확인을 위해 구글 로그인이 필요합니다.
1. Google login is required for user verification.
2. 환경 설정에서 내가 사용하는 언어를 설정할 수 있습니다.
2. You can set the language I use in the preferences.
3. 사용자가 선택한 언어가 채팅 창에 입력되면, 내가 선택한 언어로 변환되어 표시됩니다.
3. When the language selected by the user is entered in the chat window, it is converted into the language of your choice and displayed.
4. 채팅 방에 배너 광고가 게시됩니다.
4. A admob banner advertisement is posted in the chat room.
5. 로그인을 위한 이메일 정보 이외에는 저장되는 정보는 없습니다.
5. No information is saved other than e-mail information for login.
6. 지원되는 언어는 다음과 같습니다.
6. The supported languages are:
한국어,
English,
日本語,
中文,
tiếng Việt,
bahasa Indonesia,
اللغة العربية,
বাংলা ভাষা,
Deutsch,
Español,
Français,
हिन्दी,
Italiano,
Malaysia,
Nederlands,
Português,
Русский,
ภาษาไทย,
Türkçe
이 앱에서 번역 기능은 기존 KAKAO Translate API가 사용이 중지 되어 Google ML Translate 을 이용 하고 있습니다. (2024.01.07 ~)
The translation function in this app uses Google ML Translate because the existing KAKAO Translate API has been discontinued. (2024.01.07 ~)
로그인은 그냥 구글 계정을 통한 로그인만 지원합니다. 안드로이드 폰에는 다들 하나씩의 계정은 있으니, 자동으로 선택하는 창이 나옵니다.
Login only supports login through Google account. Since everyone has one account on an Android phone, an automatic selection window appears.

로그인이 되고 나면 메인 화면으로 넘어갑니다. 사용하기 전에 설정을 선택해서 설정을 진행해야 합니다.
After logging in, you will be taken to the main screen. Before use, you need to select Settings to proceed with the settings.
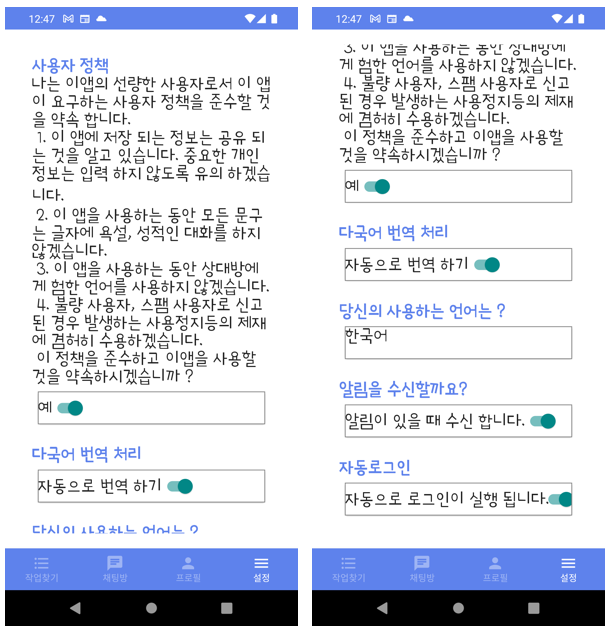
설정해야 하는 것은
what you need to set
1) 사용자 정책에 대한 허락이 필요합니다. 이 앱은 사용자의 스팸성 글 게시, 욕설 등의 게시가 반복될 경우 타인으로 부터 불량 사용자로 신고 될 수 있습니다. 신고가 반복 되는 경우 해당 게시글은 관리자에 의해 삭제 될 수 있습니다. 또한 사용자가 제재를 받을 수 있습니다.
Requires permission from user policy. This app may be reported as a bad user by others if the user's posting of spam or profanity is repeated. If the report is repeated, the post may be deleted by the administrator. Users may also be subject to sanctions.
2) 다국어 번역 처리
Multilingual translation processing
자동으로 번역하기 : 상대가 입력한 언어가 내가 사용하는 언어와 다른 경우 번역한 내용이 채팅창에 추가됩니다.
Translate automatically: If the language entered by the other person is different from the language you are using, the translated content is added to the chat window.
번역한 언어 보지 않기 : 상대가 입력한 내용을 그대로 채팅창에 보입니다.
Do not view translated language: The text entered by the other person is displayed in the chat window.
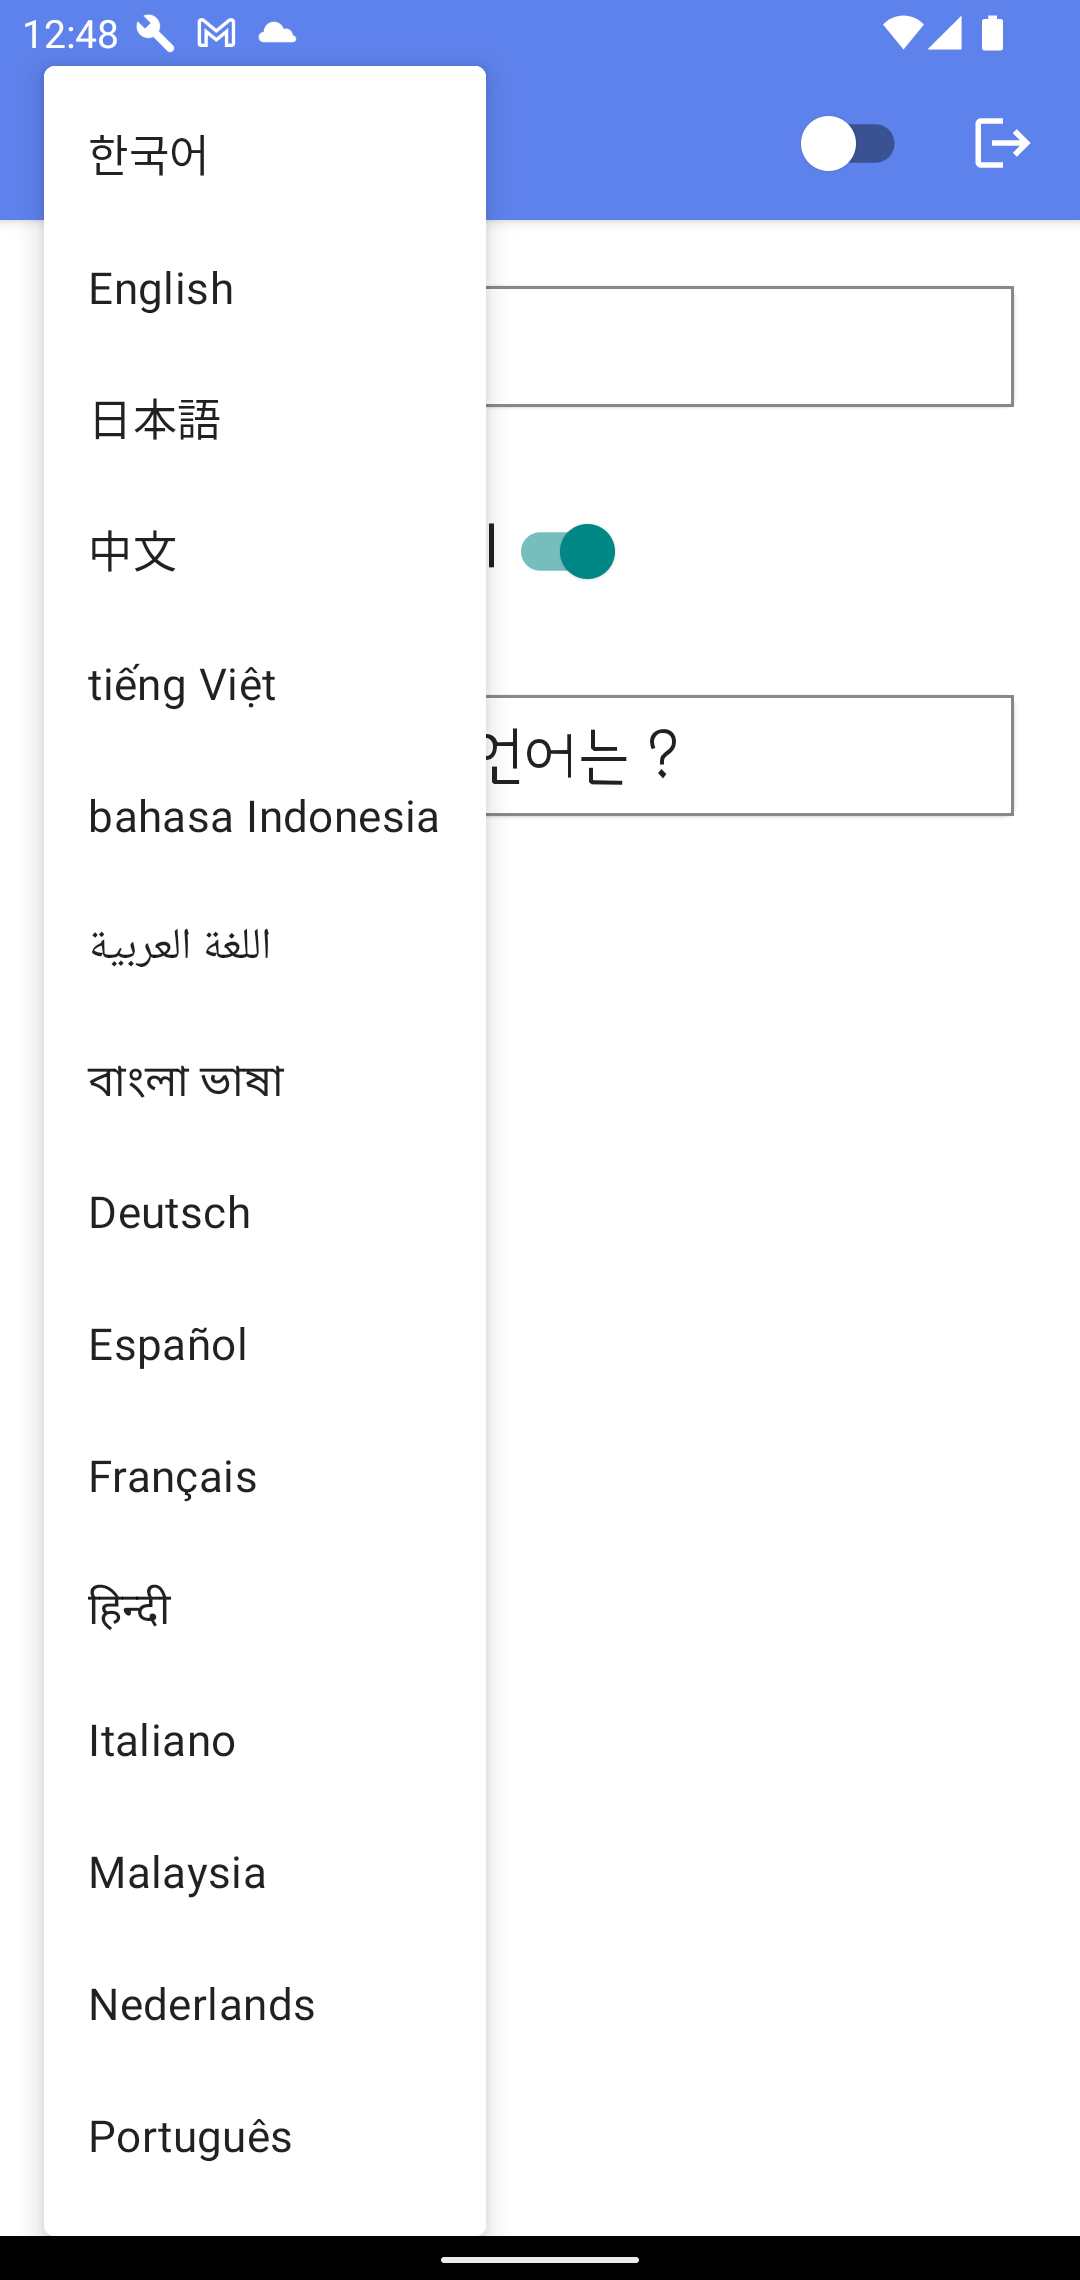
3) 당신의 사용하는 언어는?
What language do you speak?
한국어,영어,일본어,중국어,베트남어,인도네시아어,아랍어,뱅갈어,독일어,스페인어,프랑스어,힌디어,이탈리아어,말레이시아어,네덜란드어,포르투갈어,러시아어,태국어,터키어
중에서 선택할 수 있습니다.
You can choose from
("한국어","English","日本語","中文","tiếng Việt","bahasa Indonesia","اللغة العربية","বাংলা ভাষা",
"Deutsch","Español","Français","हिन्दी","Italiano","Malaysia","Nederlands","Português","Русский","ภาษาไทย","Türkçe")
4) 알림을 수신할까요?
알림을 수신 허용을 해야만 이 앱에서의 모든 알림을 수신할 수 있습니다.
You must accept notifications to receive all notifications from this app.
5) 자동 로그인 설정
이 앱에 접근하기 위한 사용자의 로그인을 자동으로 할 수 있도록 설정할 수 있습니다.
You can set to automatically log in users to access this app.

추가 되는 기능은 공개적으로 인력을 모집할 수 있도록 기능을 만들어 보고 있습니다. 지금은 작업안내 기능으로 예시을 만들어 보았는데,
공개적인 인력 모집을 위한 창으로 사용할 수 있도록 만들어갈 예정입니다.
추가적인 기능 구현이 필요하시면 메일로 알려 주세요.
The added function is trying to make the function to be able to recruit people publicly. Now, I made an example with the work guide function,
We plan to make it usable as a window for public recruitment.
If you need to implement additional features, please let us know by e-mail.
help@billcorea.com
이 화면도 설정에 따라 자동으로 번역이 지원 됩니다.
This screen is also automatically translated according to the settings.
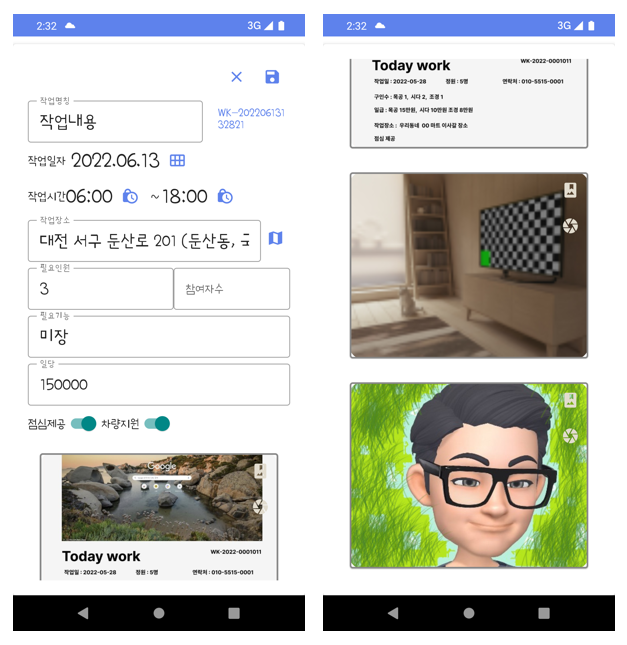
작업을 등록하여 구인 게시물을 등록할 수 있습니다. 긴략한 내용으로 등록을 지원하며, 이미지는 3개 까지만 등록할 수 있습니다. 등록된 구인게시물을 이용해서 구인시 참고할 수 있습니다.
You can register a job posting by registering a job. Registration is supported with brief content, and up to 3 images can be registered. You can refer to the registered job postings when hiring.
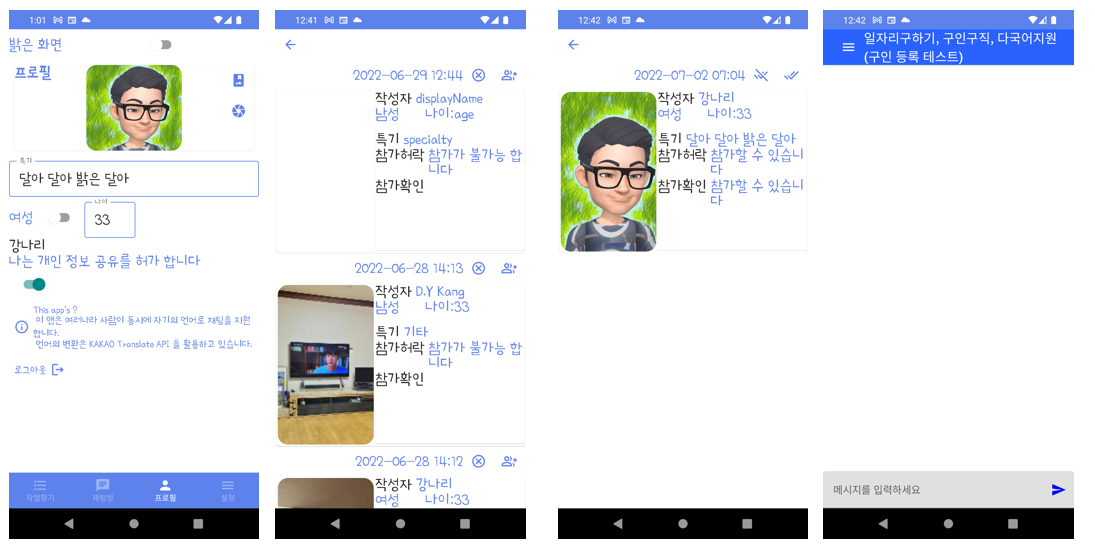
작업참여는 먼저 프로필 에서 개인정보을 공유 허가등록을 해야 합니다. 공유되는 정보는 프로필에서 입력하는 이미지, 특기, 성별, 나이, 로그인에서 받아온 이름이 공유 됩니다. 중요한 개인정보는 없으므로 자료 공유를 해 주어야 합니다.
To participate in work, you must first register for permission to share personal information in your profile. The shared information is shared with the image entered in the profile, skills, gender, age, and the name received from the login. Since there is no important personal information, you must share the data.


내가 작성한 게시물에 참여을 신청한 사람의 목록을 볼 수 있습니다. 또는 다른 사람이 작성한 게시글에 참여 신청을 할 수 있습니다. You can see a list of people who have subscribed to your posts. Alternatively, you can apply to participate in posts written by others.

내가 신청한 게시물이 허가된 경우 확인할 수 있으며, 나의 참여를 등록할 수 있습니다.
You can check if the post you have applied for is approved, and you can register your participation.

참여가 허가되고, 내가 참여을 확인한 경우만 채팅창으로 접근할 수 있습니다.
You can access the chat window only if participation is permitted and I confirm participation.

게시물을 작성한 사용자에게 나의 참여 신청에 대한 알림을 보낼 수 있습니다.
You can send notifications about your subscription to the person who wrote the post.

게시물을 작성한 사용자의 경우만 해당 게시물을 삭제할 수 있습니다.
Only the person who created the post can delete the post.

해당 게시물을 스팸으로 신고할 수 있습니다.
You can report this post as spam

설정 화면에서 나오고 나면 채팅 목록이 나오는 화면이 있습니다.
After exiting the settings screen, there is a screen that shows the chat list.
채팅 목록에 표시는 내용은 첫 번째 줄에는
방제목과 개설자의 사용 언어가 표시됩니다. (en는 영어)
The content displayed in the chat list is in the first line
The title and the language of the creator are displayed. (en is English)
다음 줄에는 방 이름과 개설자의 이름, 참여 중인 사용자의 수
그리고 삭제를 위한 버튼이 표시됩니다.
The next line contains the name of the room, the name of the creator, and the number of participating users.
And a button to delete is displayed.
화면 하단의 + 표시 버튼을 클릭하면 새로운 채팅방을 생성할 수 있습니다.
You can create a new chat room by clicking the + sign button at the bottom of the screen.

채팅창은 내가 입력한 내용은 오른쪽에 나오고, 상대가 입력한 내용은 왼쪽에 표시됩니다.
In the chat window, your input is displayed on the right, and your opponent's input is displayed on the left.
내가 입력한 내용은 그대로 표시가 되지만, 상대가 입력한 내용은 선택에 따라 나의 언어로 번역된 내용이 추가되어 표시됩니다.
(상대방의 언어로 표시는 기본사항)
The content you typed is displayed as is, but the content entered by the other person is displayed with the translated content added to your language according to your selection.
(Basic display in the other person's language)
아래 그림과 같이 나의 설정에 따라 자동으로 변억이 실행 되어 표시 됩니다. 괄호안에 상대방의 언어가 표시 됩니다.
As shown in the picture below, change memory is automatically executed and displayed according to my settings. The other person's language is displayed in parentheses.

그 외의 기능은 현재 진행형이기 때문에 다른 기능은 아직 구현되지 않았습니다. 그리고 playstore에도 현재는 등록을 진행중이기 때문에 관련 링크는 아직 없습니다. playstore 에 등록되고 난 이후에 update을 할 예정입니다.
Other features have not yet been implemented as they are currently in progress. Also, there are no related links yet because registration is in progress on the playstore. We plan to update after being registered on playstore.
아래 링크와 같이 playstore 에 등록이 되어 찾아 볼 수 있습니다.
As shown in the link below, it is registered on the playstore and can be found.
https://play.google.com/store/apps/details?id=com.billcoreatech.multichat416
일자리 구하기 - 구인구직 노가다 자동 번역 지원 - Google Play 앱
한국에서 일자리를 구하는 사람들에게 한국어가 익숙하지 않아도 찾을 수 있도록 지원할 예정 입니다.여러 나라 사람들과 채팅을 할 수 있습니다.
play.google.com
2025.02.11 변경된 새버전의 예시 영상 입니다.
https://andresand.medium.com/add-admob-ad-banner-using-android-compose-9ba78c8f1591
Add AdMob Ad banner using Android Compose
Tutorial shows how to display Google AdMob banner ads using Android Compose. Currently there is no official doc about AdMob and Android…
andresand.medium.com
jetpack compose 을 구현하면서 쉽게 광고판 달아보기 예제를 펌 했습니다. 읽어 보시면 도움이 될 것 같아요.
그래도 혹시나 해서 제가 만든 소스 의 일부를 공유해 봅니다.
import android.content.Intent
import android.content.SharedPreferences
import android.os.Bundle
import android.util.Log
import android.view.KeyEvent
import android.view.KeyEvent.*
import android.view.View
import android.view.View.inflate
import androidx.activity.ComponentActivity
import androidx.activity.compose.setContent
import androidx.activity.viewModels
import androidx.compose.foundation.background
import androidx.compose.foundation.gestures.Orientation
import androidx.compose.foundation.gestures.rememberScrollableState
import androidx.compose.foundation.gestures.scrollable
import androidx.compose.foundation.layout.*
import androidx.compose.material.*
import androidx.compose.material.icons.Icons
import androidx.compose.material.icons.filled.Logout
import androidx.compose.runtime.*
import androidx.compose.ui.Modifier
import androidx.compose.ui.graphics.Color
import androidx.compose.ui.graphics.Color.Companion.Red
import androidx.compose.ui.graphics.Color.Companion.White
import androidx.compose.ui.platform.LocalInspectionMode
import androidx.compose.ui.text.style.TextAlign
import androidx.compose.ui.unit.dp
import androidx.compose.ui.viewinterop.AndroidView
import androidx.compose.ui.viewinterop.AndroidViewBinding
import androidx.core.content.ContextCompat
import com.billcoreatech.multichat416.databean.*
import com.billcoreatech.multichat416.databinding.ActivityChatRoomBinding
import com.billcoreatech.multichat416.ui.theme.MultiChat416Theme
import com.google.android.gms.ads.AdRequest
import com.google.android.gms.ads.AdSize
import com.google.android.gms.ads.AdView
import com.google.firebase.auth.FirebaseAuth
import com.google.firebase.auth.ktx.auth
import com.google.firebase.database.ChildEventListener
import com.google.firebase.database.DataSnapshot
import com.google.firebase.database.DatabaseError
import com.google.firebase.database.ktx.database
import com.google.firebase.ktx.Firebase
import retrofit2.Call
import retrofit2.Callback
import retrofit2.Response
import java.text.SimpleDateFormat
import java.util.*

class ChatRoomActivity : ComponentActivity() {

    var TAG = "ChatRoomActivity"

    lateinit var displayName:String
    lateinit var auth: FirebaseAuth
    lateinit var sp: SharedPreferences
    lateinit var sdf:SimpleDateFormat
    private val database = Firebase.database
    private val chatroomViewModel by viewModels<ListViewModel>()
    private val chatMessages = database.getReference("ChatMessage")
    lateinit var df:SimpleDateFormat
    lateinit var chatId:String
    lateinit var startDt:String
    lateinit var adapter:ChatAdapter
    var chatMesgItems = ArrayList<ChatMessage>()
        private set
    lateinit var binding:ActivityChatRoomBinding
    lateinit var retrofitApi:RetrofitApi

    override fun onCreate(savedInstanceState: Bundle?) {
        super.onCreate(savedInstanceState)

        retrofitApi = RetrofitApi.create()
        auth = Firebase.auth
        sp = getSharedPreferences("MultiChat", MODE_PRIVATE)
        sdf = SimpleDateFormat("yyyyMMddHHmmss")
        df = SimpleDateFormat("yyyy-MM-dd HH:mm:ss")
        chatId = intent.getStringExtra("chatId") as String
        startDt = intent.getSerializableExtra("startDt") as String
        Log.e(TAG, "${startDt}")
        displayName = auth.currentUser?.displayName.toString()

        chatMesgItems.clear()
        adapter = ChatAdapter(chatMesgItems, displayName)
        binding = ActivityChatRoomBinding.inflate(layoutInflater)

        setContent {
            val isDarkTheme = remember { mutableStateOf(false) }
            if(isDarkTheme.value){
                this.window.statusBarColor = ContextCompat.getColor(this, R.color.softBlack)
            }else{
                this.window.statusBarColor = ContextCompat.getColor(this, R.color.softBlue)
            }
            MultiChat416Theme(darkTheme = isDarkTheme.value) {
                Scaffold(topBar = {
                    ThemeAppBar(darkThemeState = isDarkTheme)
                }, modifier = Modifier.fillMaxSize()
                ) { innerPadding ->
                    mainContent(Modifier.padding(innerPadding))
                    // 광고를 달아 봅니다.
                    AdvertView()
                }
            }
        }
    }

    @Composable
    fun ThemeAppBar(darkThemeState: MutableState<Boolean>) {

        TopAppBar(title = {
            Row {
                Text(text = getString(R.string.app_name), modifier = Modifier.weight(8f))
                Switch(checked = darkThemeState.value, onCheckedChange = {
                    darkThemeState.value = it
                }, modifier = Modifier.weight(2f))
                IconButton(onClick = { doLogOut() }) {
                    Icon(imageVector = Icons.Default.Logout, contentDescription = "LogOut")
                }
            }
        })
    }

    @Composable
    fun mainContent(padding: Modifier) {
        Box(
            Modifier
                .fillMaxWidth()
                .fillMaxHeight()
                .scrollable(rememberScrollableState {
                    // view world deltas should be reflected in compose world
                    // components that participate in nested scrolling
                    it
                }, Orientation.Vertical)
        ) {
            AndroidViewBinding(ActivityChatRoomBinding::inflate) {
                binding = this
                chatMessages.child(chatId).orderByChild("crtDtim").startAfter(startDt.toString())
                    .addChildEventListener(object : ChildEventListener{
                        override fun onChildAdded(snapshot: DataSnapshot, previousChildName: String?) {
                            Log.e(TAG, "onChildAdded")
                            var chatMessageItem = snapshot.getValue(ChatMessage::class.java)
                            // 왜 2번씩 들어가는지 모르겠지만... 일단은 한번만 들어가게 하기 위해서
                            if (chatMessageItem != null && chatMesgItems.indexOf(chatMessageItem) < 0) {
                                if (sp.getBoolean("translateTy", false)
                                    && !sp.getString("languageCode", "kr").equals(chatMessageItem.locale)
                                ) {
                                    doGetTranslate(chatMessageItem)
                                }
                                chatMesgItems.add(chatMessageItem)
                            }
                            binding.rv.adapter = adapter
                            binding.rv.scrollToPosition(chatMesgItems.size - 1)
                        }

                        override fun onChildChanged(snapshot: DataSnapshot, previousChildName: String?) {
                            Log.e(TAG, "onChildChanged")
                        }

                        override fun onChildRemoved(snapshot: DataSnapshot) {
                            Log.e(TAG, "onChildRemoved")
                        }

                        override fun onChildMoved(snapshot: DataSnapshot, previousChildName: String?) {
                            Log.e(TAG, "onChildMoved")
                        }

                        override fun onCancelled(error: DatabaseError) {
                            Log.e(TAG, "onCancelled")
                        }

                    })
                binding.sendIv.setOnClickListener {
                    doChatWrite()
                }
                binding.rv.setOnScrollChangeListener { view, i, i2, i3, i4 ->

                }
                binding.contentEt.setOnKeyListener(object : View.OnKeyListener{
                    override fun onKey(v: View?, keyCode: Int, event: KeyEvent?): Boolean {
                        if (event?.action == ACTION_DOWN && keyCode == KEYCODE_ENTER) {
                            doChatWrite()
                        }
                        return true
                    }
                })
            }
        }
    }

    // 이 부분은 펌한 코드 입니다.
    @Composable
    fun AdvertView(modifier: Modifier = Modifier) {
        val isInEditMode = LocalInspectionMode.current
        if (isInEditMode) {
            Text(
                modifier = modifier
                    .fillMaxWidth()
                    .background(Red)
                    .padding(horizontal = 2.dp, vertical = 6.dp),
                textAlign = TextAlign.Center,
                color = White,
                text = "Advert Here",
            )
        } else {
            AndroidView(
                modifier = modifier.fillMaxWidth(),
                factory = { context ->
                    AdView(context).apply {
                        adSize = AdSize.BANNER
                        adUnitId = context.getString(R.string.admob_banner_test_id)
                        loadAd(AdRequest.Builder().build())
                    }
                }
            )
        }
    }

   .....


    private fun doLogOut() {
        chatMessages.child(chatId).setValue(null)
        var rIntent:Intent = intent
        rIntent.putExtra("chatId", chatId)
        setResult(RESULT_OK, rIntent)
        finish()
    }

}
이렇게 구현을 해 보면 다음과 같이 광고가 보입니다.

How to authenticate to Firebase using Google One Tap in Jetpack Compose?
A simple solution for implementing Firebase Authentication with Google, using Jetpack Compose on Android.
medium.com
오늘은 Google One tab login에 관한 참고 자료 링크를 하나 공유합니다. 좋은 공부가 되시길 바라며...
청사옆 숲길 점심을 먹고 나서면 이제 제법 낮볓이 뜨겁다. 청사가 가까이에 있어 주변에 조성된 숲길(?)이 이제 제법 시원하게 느껴 지기도 한다. 점심을 먹고 나면 잠깐 낮잠이 오히려 필요한 것 같은 요즘이기는 하나, 갈수록 무거워지는 몸을 지탱...