공공데이터 포털에서 API 키를 발급받아야 합니다. 발급받은 키를 활용하여 데이터를 요청합니다.
코드 예제
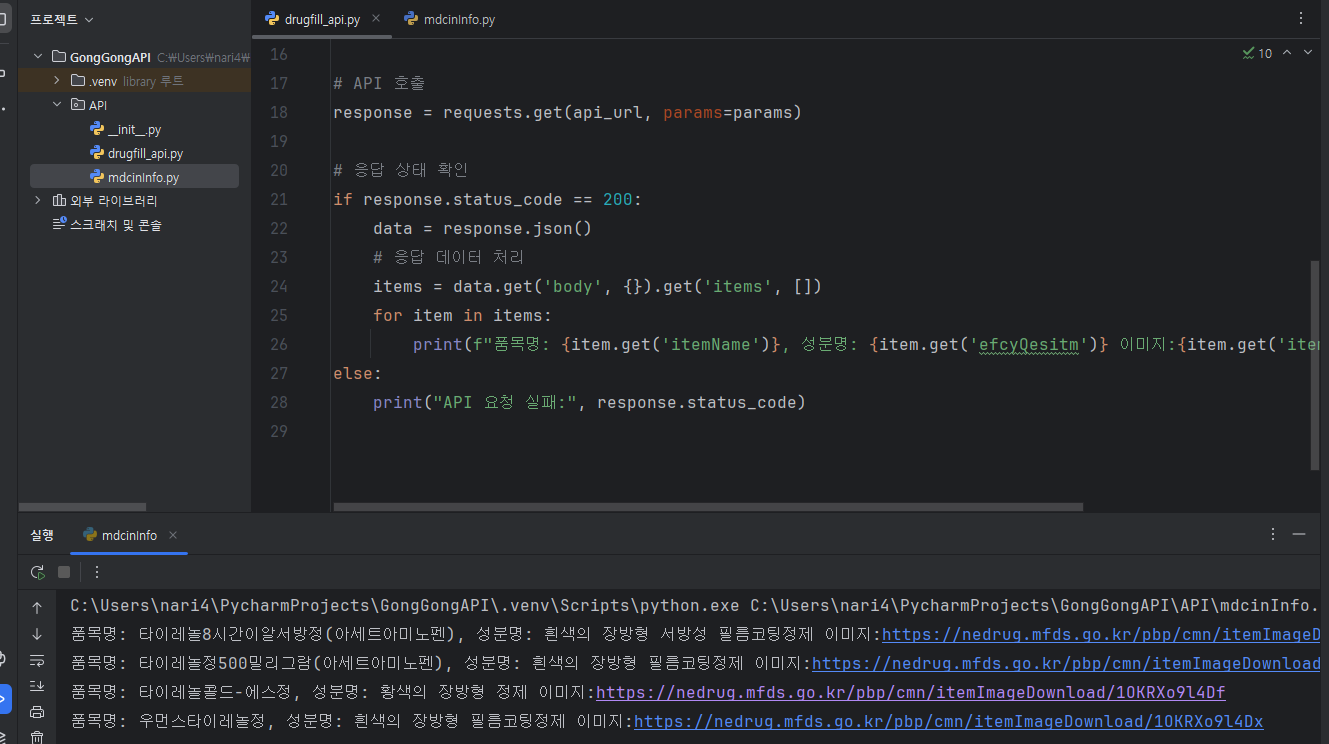
다음은 API를 호출하고 응답 데이터를 처리하는 Python 예제 코드입니다:
python
복사
import requests
# API URL과 키 설정 api_url = "http://apis.data.go.kr/1471000/MdcinGrnIdntfcInfoService01/getMdcinGrnIdntfcInfoList01" api_key = "YOUR_API_KEY" # 여기서 API 키를 입력하세요.
# API 호출 response = requests.get(api_url, params=params)
# 응답 상태 확인 if response.status_code == 200: data = response.json() # 응답 데이터 처리 items = data.get('body', {}).get('items', []) for item in items: print(f"품목명: {item.get('ITEM_NAME')}, 성분명: {item.get('MATERIAL_NAME')}") else: print("API 요청 실패:", response.status_code)
주요 단계
API URL 및 키 설정: 발급받은 API 키를 사용하여 요청 URL을 구성합니다.
요청 파라미터 설정: 필요한 파라미터를 설정하여 API 요청을 준비합니다.
API 호출: requests.get() 메서드를 사용하여 API 호출을 수행합니다.
응답 상태 확인: 응답 상태 코드를 확인하여 요청이 성공적으로 처리되었는지 확인합니다.
응답 데이터 처리: 응답 데이터를 JSON 형식으로 파싱하여 필요한 정보를 추출합니다.
이 예제에서는 공공데이터 포털의 API를 사용하여 의약품 정보를 가져오고, 이를 Python으로 처리하는 방법을 보여줍니다. API를 활용하면 다양한 공공데이터를 쉽게 사용할 수 있으니, 여러분도 한번 시도해 보세요!
class MyForegroundService : Service() {
    private lateinit var notification: Notification

    override fun onCreate() {
        super.onCreate()
        startForeground(1, createNotification())
    }

    private fun createNotification(): Notification {
        val builder = NotificationCompat.Builder(this, "channel_id")
            .setContentTitle("Foreground Service")
            .setContentText("This is a foreground service")
            .setSmallIcon(R.drawable.ic_launcher_foreground)
            .setContentIntent(PendingIntent.getActivity(this, 0, Intent(this, MainActivity::class.java), 0))
            .setAutoCancel(false)

        // android api 26 이상의 경우 필요
        val channel = NotificationChannel("channel_id", "Channel Name", NotificationManager.IMPORTANCE_DEFAULT)
        val notificationManager = getSystemService(NotificationManager::class.java)
        notificationManager.createNotificationChannel(channel)

        return builder.build()
    }

    override fun onBind(intent: Intent): IBinder? {
        return null
    }

    override fun onDestroy() {
        super.onDestroy()
        stopForeground(true)
    }
}
2.서비스시작
서비스를시작하려면액티비티나프래그먼트에서다음과같이호출합니다.
kotlin
복사
val serviceIntent = Intent(this, MyForegroundService::class.java)
// android api 30 이상의 경우
startForegroundService(serviceIntent)
#스하리1000명프로젝트,
Lost in Korea?即使您不会说韩语,这个应用程序也可以帮助您轻松出行。
只需说出您的语言即可 - 它会翻译、搜索并以您的语言显示结果。
非常适合旅行者!支持英语、日语、中文、越南语等10多种语言。
现在就试试吧!
https://play.google.com/store/apps/details?id=com.billcoreatech.opdgang1127
#스하리1000명프로젝트,
Às vezes é difícil conversar com trabalhadores estrangeiros, certo?
Fiz um aplicativo simples que ajuda! Você escreve na sua língua e os outros veem na deles.
Ele é traduzido automaticamente com base nas configurações.
Muito útil para bate-papos fáceis. Dê uma olhada quando tiver uma chance!
https://play.google.com/store/apps/details?id=com.billcoreatech.multichat416
Jetpack Compose는 Android UI 개발을 혁신적으로 변화시키고 있습니다. 하지만 때로는 Compose 컴파일러가 특정 클래스를 안정적으로 처리하도록 설정해야 할 때가 있습니다. 이때 유용하게 사용할 수 있는 것이 바로 stability_config.conf 파일입니다. 이번 포스트에서는 stability_config.conf 파일의 역할과 설정 방법에 대해 알아보겠습니다.
stability_config.conf 파일이란?
stability_config.conf 파일은 Jetpack Compose 컴파일러가 특정 클래스를 안정적으로 처리하도록 설정하는 구성 파일입니다. 이 파일을 사용하면 코드베이스에 포함되지 않은 클래스도 안정적으로 처리할 수 있습니다. 예를 들어, 외부 라이브러리의 클래스나 프로젝트 내에서 자주 사용되는 클래스를 안정적으로 처리하도록 설정할 수 있습니다.
stability_config.conf 파일의 내용
파일의 내용은 다음과 같은 형식을 따릅니다:
// 안정적으로 처리할 클래스 목록
com.example.MyStableClass
com.external.library.ExternalClass
이렇게 정의된 클래스들은 Compose 컴파일러가 안정적으로 처리하게 됩니다. 예를 들어, com.example.MyStableClass와 com.external.library.ExternalClass를 안정적으로 처리하도록 설정할 수 있습니다.
설정 방법
프로젝트 루트 디렉토리에 stability_config.conf 파일 추가: 프로젝트의 루트 디렉토리에 stability_config.conf 파일을 생성하고, 안정적으로 처리할 클래스 목록을 추가합니다.
build.gradle.kts 파일 수정: build.gradle.kts 파일에서 다음과 같이 설정합니다:
Kotlin
android {
...
composeCompiler {
stabilityConfigurationFile = rootProject.layout.projectDirectory.file("stability_config.conf")
}
}
AI가 생성한 코드입니다. 신중하게 검토하고 사용하세요. FAQ의 자세한 정보.
이렇게 하면 Compose 컴파일러가 stability_config.conf 파일에 정의된 클래스를 안정적으로 처리하게 됩니다.
결론
Jetpack Compose에서 stability_config.conf 파일을 사용하면 특정 클래스를 안정적으로 처리할 수 있어 더욱 안정적인 UI 개발이 가능합니다. 이 파일을 적절히 활용하여 프로젝트의 안정성을 높여보세요!
Android에서 Koin, Room 데이터베이스, Nordic BLE 라이브러리를 사용한 UART 통신
BLE 통신을 이해해 보자
소개
이 블로그 포스트에서는 Android 애플리케이션에서 Koin을 사용한 종속성 주입, Room 데이터베이스를 사용한 데이터 관리, 그리고 Nordic Semiconductor의no.nordicsemi.android:ble라이브러리를 사용한 BLE 연결 및 UART 통신을 설정하는 방법을 다룹니다.
1. Koin을 사용한 종속성 주입
Koin은 Android 애플리케이션에서 종속성 주입을 간편하게 설정할 수 있는 라이브러리입니다. 먼저,build.gradle파일에 Koin 종속성을 추가합니다:
@Entity(tableName = "devices")
data class Device(
    @PrimaryKey(autoGenerate = true) val id: Int,
    @ColumnInfo(name = "name") val name: String,
    @ColumnInfo(name = "address") val address: String
)

@Dao
interface DeviceDao {
    @Query("SELECT * FROM devices")
    fun getAllDevices(): LiveData<List<Device>>

    @Insert
    suspend fun insertDevice(device: Device)
}
class DeviceRepositoryImpl(private val deviceDao: DeviceDao) : DeviceRepository { override fun getAllDevices(): LiveData<List<Device>> = deviceDao.getAllDevices()
이 블로그 포스트에서는 Koin을 사용한 종속성 주입, Room 데이터베이스를 사용한 데이터 관리, 그리고 Nordic Semiconductor의no.nordicsemi.android:ble라이브러리를 사용한 BLE 연결 및 UART 통신을 설정하는 방법을 설명했습니다. BLE 연결을 안전하게 관리하고 메모리 누수 문제를 방지하기 위해 적절한 리소스 해제 방법을 사용하는 것이 중요합니다.
추가적인 정보는 Nordic Semiconductor의 공식 문서와 Android Developers 공식 문서에서 확인할 수 있습니다.