2026/03/01
오늘의 이야기
#스치니1000프로젝트 #재미 #행운기원 #Compose #Firebase
🎯 야 너 토요일마다 로또 확인하냐?
나도 맨날 "혹시나~" 하면서 봤거든 ㅋㅋ
근데 이제는 그냥 안 해
AI한테 맡겼어 🤖✨
그것도 구글 Gemini로다가!
그래서 앱 하나 만들었지
👉 "로또 예상번호 by Gemini" 🎱
AI가 분석해서 번호 딱! 뽑아줌
그냥 보고 참고만 하면 됨
재미로 해도 좋고…
혹시 모르는 거잖아? 😏
https://play.google.com/store/apps/details?id=com.billcorea.gptlotto1127


오늘의 이야기
#스하리1000명프로젝트
스치니들!
내가 만든 이 앱은, 내 폰에 오는 알림 중에서 중요한 키워드가 있는 경우
등록해둔 친구에게 자동으로 전달해주는 앱이야 📲
예를 들어, 카드 결제 알림을 와이프나 자녀에게 보내주거나
이번 달 지출을 달력처럼 확인할 수도 있어!
앱을 함께 쓰려면 친구도 설치 & 로그인해줘야 해.
그래야 친구 목록에서 서로 선택할 수 있으니까~
서로 써보고 불편한 점 있으면 알려줘 🙏
👉 https://play.google.com/store/apps/details?id=com.nari.notify2kakao
오늘의 이야기
어제는 오랜만에 갑천변을 걸었다. 길이 끝이 나지 않도록... 갑천을 걷고 있었는 데, 강가에 한쌍의 새가 있어서 사진을 찍어 보기로 했다.
내가 지금 사용하는 폰은 갤노트 20인데, 카메라가 30배까지의 줌을 지원한다. 그래서 그냥 30배로 확대해서 찍어 보았다.


일반적인 사진을 촬영할 때는 상관이 없었는데, 30배 줌으로 했더니, 흔들리기도 하고 사진이 명확하기 나오지 않는다. 이럴 때는 삼각대를 설치해야 하는 건가?
삼각대가 있었더면 이 보다는 조금 더 선명하게 촬영을 할 수 있었을까?
오늘도 날은 좋다. 창가 베란다에 않아서 이런 글을 적고 있는 지금은 밖의 기온은 따듯하다. 이 안이 덥게 느껴지는 것으로 봐서는...
오늘의 이야기
https://medium.com/@alexstyl/views-to-composables-d715b92c6055
From View to Composable: A Quick jump to Jetpack Compose from a Android View mindset (with Cheat…
Learn how to apply your View knowledge to speed up your Compose learning.
medium.com
오늘도 Jetpack Compose을 활용한 화면 구현에 대한 내용을 구글링을 통해서 보고 있는 데, 이런 정도의 자료가 있으면 도움이 될 듯하여 링크를 달아 둔다.
아직은 시작인 단계 이기 때문에 많은 정보를 찾아서 적어 두는 것이 나중에 배움을 구할 때 도움이 될 거 라고 생각된다.

하나씩 만들어 보자... 오늘도 파이팅!
오늘의 이야기
앞에서 python 코드를 이용해서 random 숫자를 만들고 FCM 전송하는 코드를 구현해 보았다면, 이번에 그걸 이용해서 수신하는 앱을 하나 만들어 볼 차례다.
https://billcorea.tistory.com/179
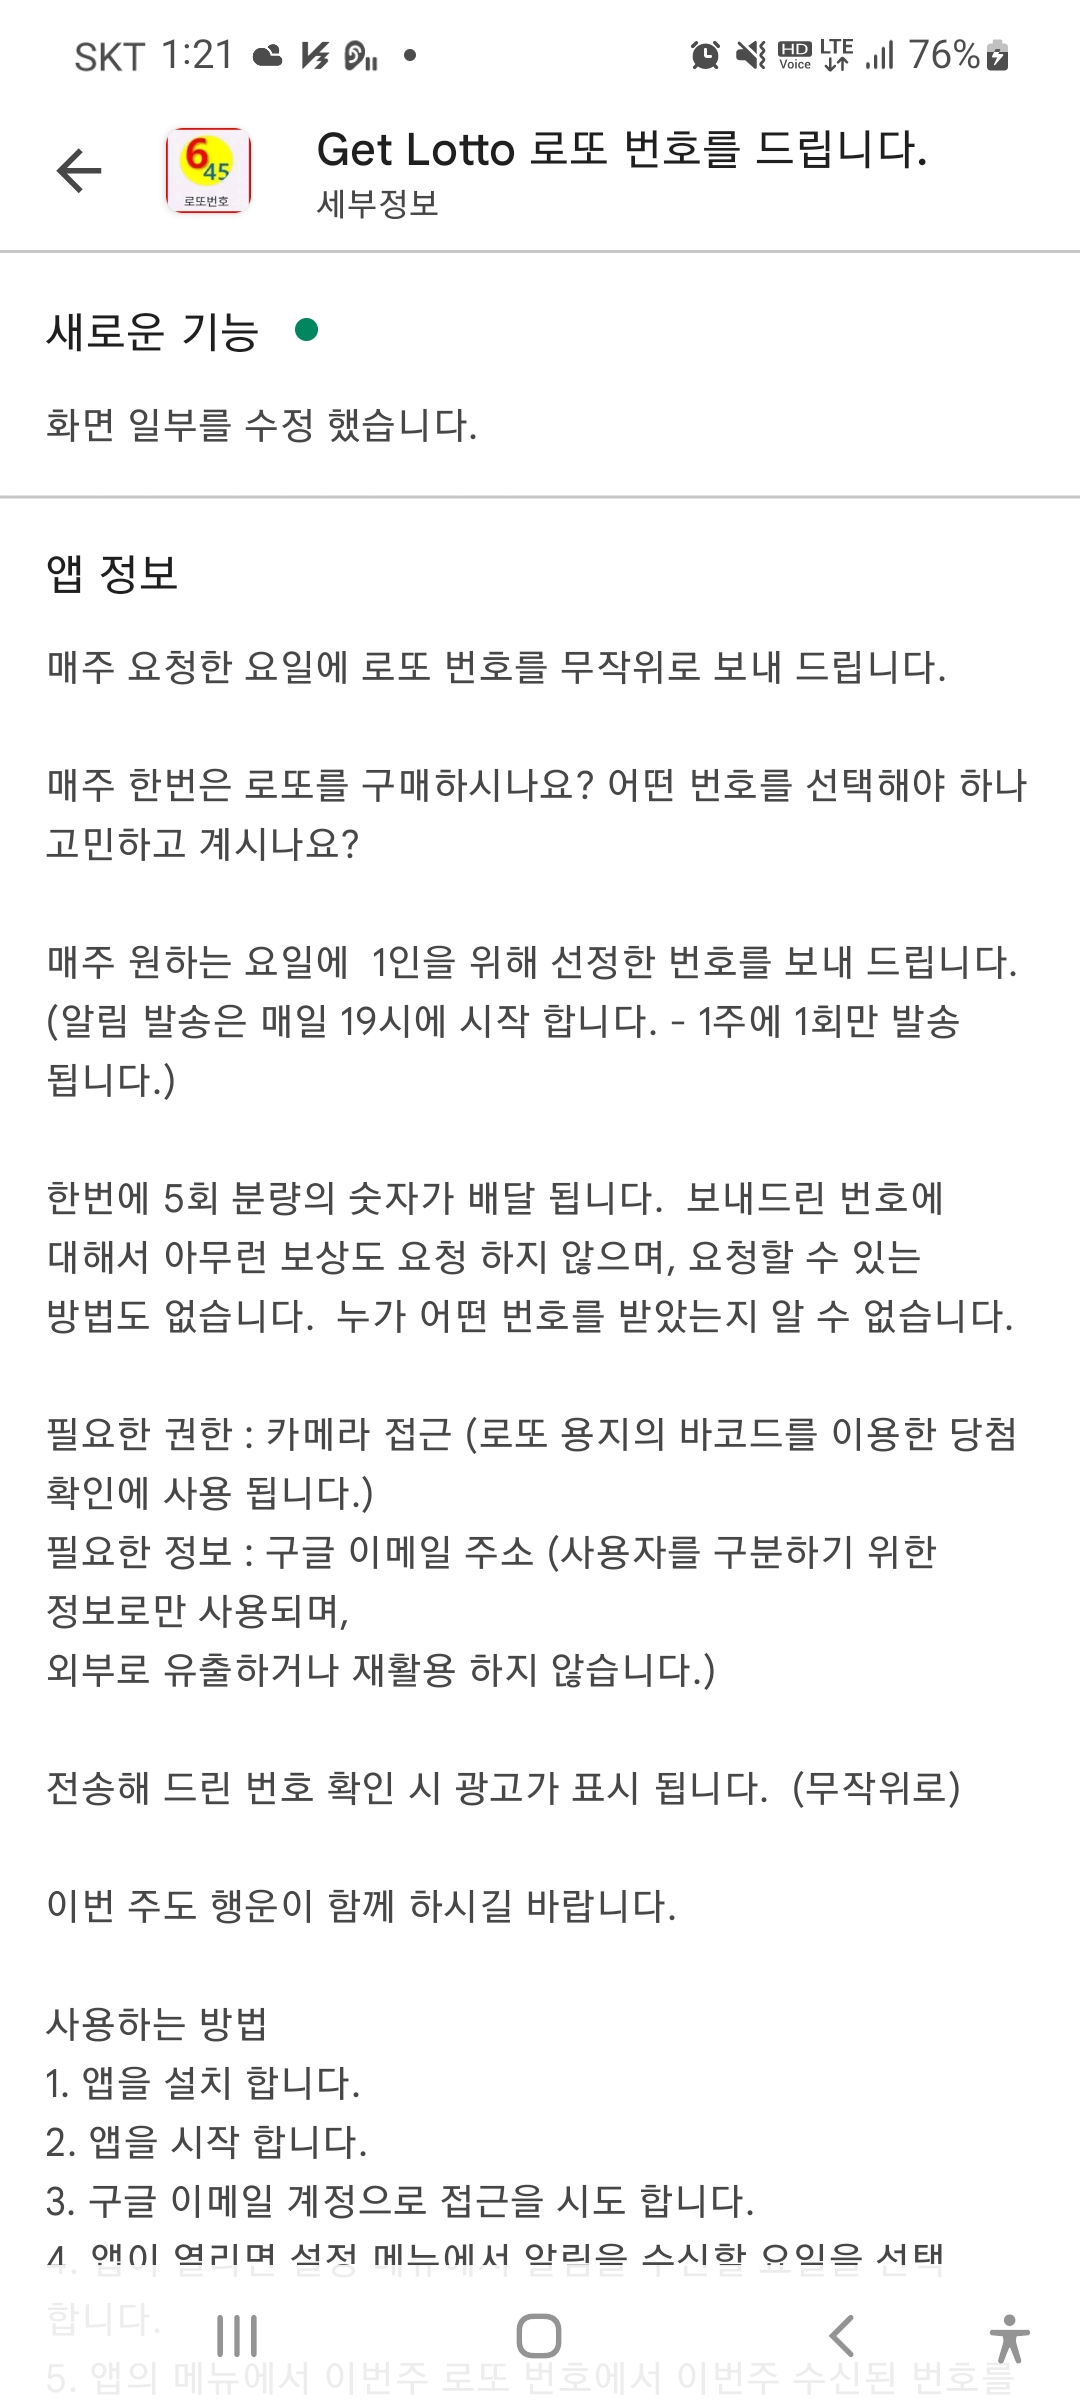
자작 앱 설명서 : 로또에 관심 있으세요?
https://play.google.com/store/apps/details?id=com.billcoreatech.getLotto Get Lotto 로또 번호를 드립니다. - Google Play 앱 매주 요청한 요일에 로또 번호를 무작위로 보내 드립니다. play.google.com 앱을..
billcorea.tistory.com
코드 구현은 kotlin으로 해 보았다. 이제 걸음마 단계이기 때문에 코드가 조금 길어질 수 도 있지만, 아직은 준비 중인 단계이기 때문에...
먼저 FCM을 수신하기 위해서는 firebase와 연동을 위한 gradle 구성이 필요하다.
import java.text.SimpleDateFormat

plugins {
    id 'com.android.application'
    id 'com.google.gms.google-services'
    id 'com.google.firebase.crashlytics'
    id 'kotlin-android-extensions'
    id 'kotlin-android'
    id 'kotlin-kapt'
}

android {
    compileSdk 32

    defaultConfig {
        applicationId "com.bi.......tto"
        minSdk 28
        targetSdk 32
        versionCode 10
        versionName "0.1.0"

        testInstrumentationRunner "androidx.test.runner.AndroidJUnitRunner"
    }

    buildTypes {
        debug {
            buildConfigField "Boolean", "DEBUG_MODE", "true"
        }
        release {
            buildConfigField "Boolean", "DEBUG_MODE", "false"
            minifyEnabled false
            proguardFiles getDefaultProguardFile('proguard-android-optimize.txt'), 'proguard-rules.pro'
        }
    }

    compileOptions {
        sourceCompatibility JavaVersion.VERSION_1_8
        targetCompatibility JavaVersion.VERSION_1_8
    }

    // jetPack compose add
    buildFeatures {
        viewBinding true
    }

    kotlinOptions {
        jvmTarget = "1.8"
    }

    def archiveBuildType = ["release"]
    applicationVariants.all { variant ->
        variant.outputs.each { output ->
            if (variant.buildType.name in archiveBuildType) {
                def df = new SimpleDateFormat("yyyyMMdd")
                df.setTimeZone(TimeZone.getDefault())
                if (variant.versionName != null) {
                    String name = "GetLotto645_${df.format(new Date())}_${defaultConfig.versionCode}_${variant.versionName}.apk"
                    output.outputFileName = name
                }
            }
        }
    }
}

dependencies {

    implementation 'androidx.appcompat:appcompat:1.4.1'
    implementation 'com.google.android.material:material:1.5.0'
    implementation 'androidx.constraintlayout:constraintlayout:2.1.3'
    implementation 'com.google.android.play:core:1.10.3'

    // 파이어 베이스 연동을 위한 설정...
    implementation platform('com.google.firebase:firebase-bom:29.2.1')
    // 메시징
    implementation 'com.google.firebase:firebase-messaging:23.0.2'
    // 인증처리
    implementation 'com.google.firebase:firebase-auth-ktx'
    implementation 'com.google.android.gms:play-services-auth:20.1.0'
    // realtime database
    implementation 'com.google.firebase:firebase-database-ktx'
    // crashlytics
    implementation 'com.google.firebase:firebase-crashlytics-ktx'
    implementation 'com.google.firebase:firebase-analytics-ktx'
    // safetynet 앱 인증
    implementation 'com.google.firebase:firebase-appcheck-safetynet:16.0.0-beta05'
    implementation 'com.google.firebase:firebase-appcheck-debug:16.0.0-beta05'

    implementation 'androidx.preference:preference-ktx:1.2.0'
    testImplementation 'junit:junit:4.13.2'
    androidTestImplementation 'androidx.test.ext:junit:1.1.3'
    androidTestImplementation 'androidx.test.espresso:espresso-core:3.4.0'
    implementation "androidx.core:core-ktx:1.7.0"
    implementation "org.jetbrains.kotlin:kotlin-stdlib-jdk7:$kotlin_version"
    implementation 'com.google.android.gms:play-services-ads:20.6.0'

    implementation 'com.journeyapps:zxing-android-embedded:4.3.0'
    implementation 'com.google.zxing:core:3.4.1'

}
다음은 manifest에 intenet 활용을 위한 permission 선언이 필요하고.
<uses-permission android:name="android.permission.INTERNET" />그리고 service을 등록해야 한다. FCM 수신을 위한 리시버...
<service
    android:name="com.billcoreatech.getLotto.utils.FcmReceiveService"
    android:exported="true">
    <intent-filter>
        <action android:name="com.google.firebase.MESSAGING_EVENT" />
    </intent-filter>
</service>
다음은 kotlin으로 구현한 service 코드 (사실 개발자 문서의 내용을 그대로 옮겨 왔다고 해도 과언은 아닐 것이다.)
package com.b...................to.utils

import android.app.NotificationChannel
import android.app.NotificationManager
import android.app.PendingIntent
import android.content.Intent
import android.content.SharedPreferences
import android.graphics.Color
import android.media.RingtoneManager
import android.os.Build
import android.util.Log
import androidx.core.app.NotificationCompat
import com.billcoreatech.getLotto.MainActivity
import com.google.firebase.messaging.FirebaseMessagingService
import com.google.firebase.messaging.RemoteMessage
import getLotto.R

class FcmReceiveService : FirebaseMessagingService() {

    var TAG:String = "FcmReceiveService"

    override fun onMessageReceived(remoteMessage: RemoteMessage) {

        // TODO(developer): Handle FCM messages here.
        // Not getting messages here? See why this may be: https://goo.gl/39bRNJ
        Log.e(TAG, "From: " + remoteMessage.from)

        // Check if message contains a data payload.
        if (remoteMessage.data.size > 0) {
            Log.e(TAG, "Message data payload: " + remoteMessage.data)
            sendNotification(remoteMessage.data["body"])
            var sp = getSharedPreferences("Messageing", MODE_PRIVATE)
            var editor = sp.edit()
            editor.putString("SendMsg", remoteMessage.data["body"]);
            editor.putBoolean("msgSet", true)
            editor.commit()
        }

        // Check if message contains a notification payload.
        if (remoteMessage.notification != null) {
            Log.e(
                TAG, "Message Notification Body: " + remoteMessage.notification!!.body
            )
            sendNotification(remoteMessage.notification!!.body)
        }
        onDeletedMessages()
    }

    // [END receive_message]
    override fun onNewToken(token: String) {
        Log.e(TAG, "Refreshed token: $token")

        // If you want to send messages to this application instance or
        // manage this apps subscriptions on the server side, send the
        // FCM registration token to your app server.
        sendRegistrationToServer(token)
    }
    // [END on_new_token]
    /**
     * Handle time allotted to BroadcastReceivers.
     */
    private fun handleNow() {
        Log.d(TAG, "Short lived task is done.")
        val intent = Intent(this@FcmReceiveService, MainActivity::class.java)
        intent.addFlags(Intent.FLAG_ACTIVITY_NEW_TASK)
        startActivity(intent)
    }

    /**
     * Persist token to third-party servers.
     *
     * Modify this method to associate the user's FCM registration token with any
     * server-side account maintained by your application.
     *
     * @param token The new token.
     */
    private fun sendRegistrationToServer(token: String) {
        // TODO: Implement this method to send token to your app server.
    }

    /**
     * Create and show a simple notification containing the received FCM message.
     *
     * @param messageBody FCM message body received.
     */
    private fun sendNotification(messageBody: String?) {
        val intent = Intent(this, MainActivity::class.java)
        intent.addFlags(Intent.FLAG_ACTIVITY_CLEAR_TOP)
        Log.e(TAG, "mesg=${messageBody}")

        val pendingIntent = PendingIntent.getActivity(
            this, 0 /* Request code */,
            intent, PendingIntent.FLAG_IMMUTABLE
        )
        val notificationManager = getSystemService(NOTIFICATION_SERVICE) as NotificationManager
        val channelId = getString(R.string.default_notification_channel_id)
        val channelName: CharSequence = getString(R.string.default_notification_channel_name)
        val importance = NotificationManager.IMPORTANCE_LOW
        val notificationChannel = NotificationChannel(channelId, channelName, importance)
        notificationChannel.enableLights(true)
        notificationChannel.lightColor = Color.BLUE
        notificationChannel.enableVibration(true)
        notificationChannel.vibrationPattern =
            longArrayOf(100, 200, 300, 400, 500, 400, 300, 200, 400)
        notificationManager.createNotificationChannel(notificationChannel)
        val defaultSoundUri = RingtoneManager.getDefaultUri(RingtoneManager.TYPE_NOTIFICATION)
        val notificationBuilder = NotificationCompat.Builder(this, channelId)
            .setSmallIcon(R.mipmap.ic_logo645_foreground)
            .setContentTitle(getString(R.string.fcm_message))
            .setContentText(messageBody)
            .setAutoCancel(true)
            .setSound(defaultSoundUri)
            .extend(
                NotificationCompat.WearableExtender()
                    .setBridgeTag("Foo")
                    .setContentIcon(R.mipmap.ic_logo645_foreground)
            )
            .setContentIntent(pendingIntent)

        // Since android Oreo notification channel is needed.
        if (Build.VERSION.SDK_INT >= Build.VERSION_CODES.O) {
            val channel = NotificationChannel(
                channelId,
                "Channel human readable title",
                NotificationManager.IMPORTANCE_DEFAULT
            )
            notificationManager.createNotificationChannel(channel)
        }

        // Dismiss notification once the user touches it.
        notificationBuilder.setAutoCancel(true)
        notificationManager.notify(0 /* ID of notification */, notificationBuilder.build())
    }

}
필요한 부분만 일부 수정을 했다.
이번에 또 알게 된 부분이라면 전송할 때 코드 구현에 따라 수신되는 위치가 달라진다는 것이다.
<data로 구현했을 때>
def lambda_handler(token, context):
    FCMToken = token

    Data = {'data': {'title': 'Lotto 보내 드립니다.', 'body': context}, 'to': FCMToken}
    Headers = {'Content-type': 'application/json',
               'Authorization': 'Key=AAAAR_..........................3uTasJ-DGfJKZkS-ccyNr0xhRHTepcuk4GaFoNMTADl4jvNFM1HYIRqzSLs219BxVA-T9frSd3VCSUIRXXn1PSxhOKgqroBVqTaxmWk'}
    http = urllib3.PoolManager().request('POST', 'https://fcm.googleapis.com/fcm/send', headers=Headers,
                                         body=json.dumps(Data))

    return {'statusCode': 200, 'body': json.dumps('Hello from Lambda!')}
<notification으로 구현했을 때>
def lambda_handler(token, context):
    FCMToken = token

    Data = {'notification': {'title': 'Lotto 보내 드립니다.', 'body': context}, 'to': FCMToken}
    Headers = {'Content-type': 'application/json',
               'Authorization': 'Key=AAAAR_0..........................uTasJ-DGfJKZkS-ccyNr0xhRHTepcuk4GaFoNMTADl4jvNFM1HYIRqzSLs219BxVA-T9frSd3VCSUIRXXn1PSxhOKgqroBVqTaxmWk'}
    http = urllib3.PoolManager().request('POST', 'https://fcm.googleapis.com/fcm/send', headers=Headers,
                                         body=json.dumps(Data))

    return {'statusCode': 200, 'body': json.dumps('Hello from Lambda!')}
같은 코드 이기는 하지만, 전송하는 parameter에 따라서 그걸 수신 앱에서는 다른 처리를 할 수 있다는 것이 된다.
그래서 앞으로는 필요에 따라서 parameter을 다르게 해서 전송할 생각이다.
두 영상의 미묘한 차이를 찾을 수 있을까??? 위에 기술한 fcmReceiceService 코드를 같이 보면서 이해를 해 보면 작은 차이을 알 수 있지 않을까 싶다.
오늘도 즐 코딩 ...
오늘의 이야기
https://play.google.com/store/apps/details?id=com.billcoreatech.getLotto
Get Lotto 로또 번호를 드립니다. - Google Play 앱
매주 요청한 요일에 로또 번호를 무작위로 보내 드립니다.
play.google.com
앱을 하나 또 게시했어요. 기능 구현을 위해서 firebase을 사용하고
번호 전달을 위해 python을 이용했습니다. random 번호를 추출하기 때문에 당첨이 되거나 하지는 않겠지만,
python을 이용해서 firebase readtime database을 활용하는 방법이 나올 듯합니다.
또한 24시간 365일 컴터 하나를 켜 두어야 하는데, 그럴 수는 없으니, rasberry pi 3을 사용하기로 했습니다.
os는 linux 계열을 사용했고요.
crontab에 등록을 해 두었기 때문에 매일 반복적인 작업이 가능합니다.
게시된 앱의 설명이에요.
이제 random 을 이용해서 숫자를 만들고 전송하는 python code을 살펴볼게요...
import datetime
import json
import random
import sqlite3

# 2021.11.13 FCM 전송을 위한 수정
import firebase_admin
import requests
import telegram
import urllib3
from bs4 import BeautifulSoup
from firebase_admin import credentials
from firebase_admin import db

# 로컬에 저장을 해 두기 위해서 python 코드로 sqlite 테이블 만들어서 사용
conn = sqlite3.connect("opDeGangDB.sqlite", isolation_level=None)
# 커서 획득
rs = conn.cursor()
# 테이블 생성 (데이터 타입은 TEST, NUMERIC, INTEGER, REAL, BLOB 등)
rs.execute(''' CREATE TABLE IF NOT EXISTS LottoResult
              (id integer PRIMARY KEY,
              hei text,
              num1 text,
              num2 text,
              num3 text,
              num4 text,
              num5 text,
              num6 text,
              bonus text)
    ''')

# 저장된 마지막 회차를 구하기 위해서
# 저장된 값이 string 이라서 int 타입으로 변환해서 찾음.
rs.execute('''
        select max(cast(hei as integer)) from LottoResult
    ''')
getHei = rs.fetchone()[0]

print(getHei)

# 마지막 회차는 삭제
# 아래에서 다시 받음.
rs.execute('''
    delete from LottoResult
    where hei = {0}
'''.format(getHei))

# 동행복권 사이트에서 당첨 숫자를 파싱 하기 위해서
def getNumParase(getNum):
    # print(getNum)
    x = getNum.split('+')
    bonus = x[1].replace('.','')
    num = x[0].split(',')
    num.append(bonus)
    return num

# 동행복권 사이트 읽어오기
# 1등 당첨 번호만 마자막 회차와 다음 회차를 구함
# 그래야 최종 당첨 회차까지 구해짐.
baseUrl = "https://dhlottery.co.kr/gameResult.do?method=byWin"
for id in range(getHei, getHei+2):
    parameter = {'drwNo': id}
    res = requests.post(baseUrl, params=parameter)
    bs = BeautifulSoup(res.text, 'html.parser')
    desc = bs.find(id="desc")
    getText = desc['content']
    getNow = getText.split(' ')[1].replace('회','')
    getNum = getNumParase(getText.split(' ')[3])
    print(getNow + " " + str(getNum))

    # 한번 구해진 다음에는 null 이 오는 경우가 있어서
    try:
        rs.execute('''
            insert into LottoResult (hei, num1, num2, num3, num4, num5, num6, bonus)
            values ({0}, {1}, {2}, {3}, {4}, {5}, {6}, {7})
        '''.format(getNow, getNum[0], getNum[1], getNum[2], getNum[3], getNum[4], getNum[5], getNum[6]))
    except:
        pass

token = "2052..........................FBZM71o"
id = "8.....0"

# 텔레그램 봇으로 실행 되고 있음을 알려 주기 위해서...
bot = telegram.Bot(token)
now = datetime.datetime.now()

androidMsg = "이번 주({0}) 로또 번호를 알려 드려요...\n".format(now)
bot.sendMessage(chat_id=id, text=androidMsg)

# randint 을 이용해서 숫자 만들기
def getNum():
    number = []
    for i in range(0, 6):
        iNo = random.randint(1, 45)
        try:
            number.index(iNo)
        except:
            number.append(iNo)
    return number

# 여기서 5회차 분의 숫자를 구함.
def getLotto645(androidMsg):
    for i in range(0, 5):
        while True:
            numX = getNum()
            numX.sort()
            if len(numX) == 6:
                break
        androidMsg += json.dumps(numX) + "\n"

    return androidMsg

bot.sendMessage(chat_id=id, text="행복한 한 주 되세요")

#Firebase database 인증 및 앱 초기화
cred = credentials.Certificate('./services_firebase.json')
firebase_admin.initialize_app(cred,{
    'databaseURL' : 'https://getlo.....................atabase.app'
})

# FCM 전송을 하기 위해서 구한 함수 medium.com 에서 구함.
def lambda_handler(token, context):
    FCMToken = token

    Data = {'data': {'title': 'Lotto 보내 드립니다.', 'body': context}, 'to': FCMToken}
    Headers = {'Content-type': 'application/json',
               'Authorization': 'Key=AAAAR_0M6y...................xVA-T9frSd3VCSUIRXXn1PSxhOKgqroBVqTaxmWk'}
    http = urllib3.PoolManager().request('POST', 'https://fcm.googleapis.com/fcm/send', headers=Headers,
                                         body=json.dumps(Data))

    return {'statusCode': 200, 'body': json.dumps('Hello from Lambda!')}

# 전송해줄 요일을 구하기 위해서.
days = ['Mon', 'Tue', 'Wed', 'Thu', 'Fri', 'Sat', 'Sun']
weekDay = datetime.datetime.today().weekday()

# firebase 에 저장된 사용자 정보 획득.
userInfo = db.reference('UserInfo')
sendNumber = db.reference('sendNumber')

# print(type(userInfo.get()))
for val in userInfo.get().values():
    # 오늘 보내야 하는 것만 보냄.
    if val["weeklyReceived"] in days[weekDay]:
        androidMsg = ""
        # 범호를 구하고
        androidMsg = getLotto645(androidMsg)
        # 번호를 보내주고
        lambda_handler(val['userToken'], androidMsg)
        print('send to ' + val['userToken'] + " " + val["weeklyReceived"] + " sendNumber(" + androidMsg + ")")
        # 보내준 번호 기록
        sendNumber.update({val['accountId'] : {'accountId': val['accountId'], 'sendNumber': androidMsg, 'sendDateTime': '{0}'.format(datetime.datetime.now())}})

# 작업 끝.
print('END JOB ...')
자료 전송을 위해서 SQlite을 이용해서 파싱 된 데이터를 참조해서 로또 당첨 번호를 기록해 두고 있어요.
중간에 lambda_handler 함수는 다른 분이 posting 하신 코드를 참조해서 FCM 전송을 하고 있는데, 설정만 잘하면 전송하는 것은 문제가 없이 잘 사용하고 있습니다.
Python으로 FCM push 보내기
Firebase엔 FCM이라는 Push 서비스가 있습니다. 간단한 설정으로 안드로이드 앱이나 아이폰 앱에 push를 보낼 수 있습니다.
medium.com
다음 posting에서는 안드로이드 앱에 관한 부분을 기술해 볼게요.
좋은 일이 있기를 바라요.
오늘의 이야기
https://medium.com/kotlin-academy/say-hello-to-jetpack-compose-and-compare-with-xml-6bc6053aec13
Say Hello 👋 to Jetpack Compose and Compare with XML
Introduction
blog.kotlin-academy.com
오늘도 또 하나의 글을 찾았다... Jetpack Compose 로 만드는 화면과 기존 xml 로 만드는 화면의 차이에 대한 글을 하나 찾았다.
xml 와 만드는 화면과 Jetpack Compose 을 비교해 보니 이해가 되는 것 같기도 하고... 아직은 갈 길이 멀어 보인다.
<xml layout 예제>
<?xml version="1.0" encoding="utf-8"?>
<ScrollView xmlns:android="http://schemas.android.com/apk/res/android"
    android:layout_width="match_parent"
    android:layout_height="match_parent">

    <LinearLayout
        android:layout_width="match_parent"
        android:layout_height="wrap_content"
        android:gravity="center"
        android:orientation="vertical">

        <TextView
            android:id="@+id/txtHeader"
            style="@style/TextAppearance.MaterialComponents.Headline2"
            android:layout_width="match_parent"
            android:layout_height="wrap_content"
            android:layout_marginBottom="20dp"
            android:paddingHorizontal="20dp"
            android:text="Hello Compose"
            android:textAlignment="center" />

        <ImageView
            android:id="@+id/imgSelectedAnimal"
            android:layout_width="match_parent"
            android:layout_height="wrap_content"
            android:contentDescription="selected animal image"
            android:paddingHorizontal="20dp"
            android:scaleType="centerCrop"
            android:layout_marginBottom="20dp"
            android:src="@drawable/ic_launcher_foreground" />

        <LinearLayout
            android:layout_width="match_parent"
            android:layout_marginBottom="20dp"
            android:layout_height="wrap_content"
            android:gravity="center"
            android:orientation="horizontal">

            <RadioButton
                android:id="@+id/radioButtonDog"
                android:layout_width="wrap_content"
                android:layout_height="wrap_content" />

            <Space
                android:layout_width="100dp"
                android:layout_height="wrap_content" />

            <RadioButton
                android:id="@+id/radioButtonCat"
                android:layout_width="wrap_content"
                android:layout_height="wrap_content" />

        </LinearLayout>

        <Button
            android:id="@+id/btnScrollToTop"
            android:layout_width="wrap_content"
            android:backgroundTint="@color/black"
            android:textColor="@color/white"
            android:text="Scroll to Top"
            android:textAllCaps="false"
            android:layout_height="wrap_content"/>

    </LinearLayout>

</ScrollView>
<Jetpack Compose 화면 예제>
        val scrollState = rememberScrollState()
        val scope = rememberCoroutineScope()
        var selectedAnimal by remember { mutableStateOf<Animal?>(null) }

        Column(
            modifier = Modifier
                .fillMaxSize()
                .verticalScroll(scrollState),
            verticalArrangement = Arrangement.spacedBy(20.dp),
            horizontalAlignment = Alignment.CenterHorizontally
        ) {
            Text(
                text = "Hello Compose",
                style = MaterialTheme.typography.h2,
                textAlign = TextAlign.Center,
                modifier = Modifier
                    .fillMaxWidth()
                    .padding(horizontal = 24.dp)
            )

            Image(
                painter = painterResource(
                    id = selectedAnimal?.imageSrc ?: R.drawable.ic_launcher_foreground
                ),
                contentDescription = "selected animal image",
                modifier = Modifier
                    .fillMaxWidth(fraction = 0.75f)
                    .aspectRatio(3 / 8f),
                contentScale = ContentScale.Crop
            )

            Row(
                modifier = Modifier
                    .fillMaxWidth()
                    .wrapContentHeight(),
                horizontalArrangement = Arrangement.SpaceEvenly
            ) {

                RadioButton(
                    selected = selectedAnimal is Animal.Dog,
                    onClick = { selectedAnimal = Animal.Dog },
                )

                RadioButton(
                    selected = selectedAnimal is Animal.Cat,
                    onClick = { selectedAnimal = Animal.Cat },
                )
            }

            Button(
                onClick = {
                    scope.launch {
                        scrollState.animateScrollTo(0)
                    }
                },
                colors = ButtonDefaults.buttonColors(
                    backgroundColor = Color.Black,
                    contentColor = Color.White,
                )
            ) {
                Text(text = "Scroll to Top")
            }

            Spacer(modifier = Modifier.size(100.dp))
        }
이렇게 구현하는 것을 언제 쯤 이면 수월하게 할 수 있을 까 ? 잘 되는 날이 올 때 까지...
다시한번 글을 작성해 주신 원작자에게 감사를 드리며... 잘 읽어 보겠습니다.
오늘의 이야기
5 useful Jetpack Compose Library you should use in your next project — Part-1
No need to invent the new wheel
towardsdev.com
또 하나의 글을 찾았다.... 짧은 영어 때문에 번역글을 만들어 본다. 원본은 위 링크에서...
다음 프로젝트에서 사용해야 하는 5가지 유용한 Jetpack Compose 라이브러리 — 1부
새로운 바퀴를 발명할 필요가 없습니다
동일한 기능을 쉽게 달성하기 위해 라이브러리를 사용할 수 있는데 왜 사용자 정의 기능을 작성해야 합니까? 라이브러리는 개발자의 가장 친한 친구이자 인생의 맛입니다. 나는 좋은 프로젝트가 최고의 라이브러리를 사용한다고 믿습니다.
Jetpack compose는 Android 제품군의 최신 멤버이자 중요한 제품군 중 하나입니다. 오늘 우리는 Jetpack Compose를 위한 몇 가지 멋진 라이브러리를 볼 것입니다.
1. Showkase
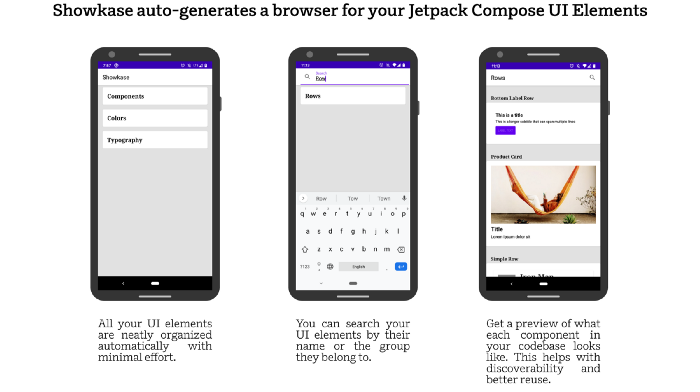
이 라이브러리는 Airbnb에서 제공합니다. 롯데의 유명한 애니메이션 라이브러리도 만든 사람입니다. 이 라이브러리는 Jetpack Compose UI 요소를 구성, 검색, 검색 및 시각화하는 데 도움이 되는 주석 프로세서를 기반으로 합니다. 구성 요소, 색상 및 타이포그래피를 빠르게 찾을 수 있도록 최소한의 설정으로 UI를 제공합니다. 또한 어두운 모드, 오른쪽에서 왼쪽 레이아웃, 크기가 조정된 글꼴 등과 같은 일반적인 시나리오에서 구성 요소를 렌더링 합니다.
2. Accompanist

구글에서 만든 ❤.Jetpack compose용 유틸리티 모음입니다. Jetpack compose는 디자인을 위한 Android 앱 개발의 새로운 표준입니다. Navigation-Animation, Permission 등과 같은 많은 경우에 도움이 될 수 있습니다.
3. Compose-destinations

이 라이브러리는 뒤에서 공식 Jetpack Compose Navigation을 사용합니다. 주석을 처리하고 코드를 생성합니다. 또한 작성해야 하는 유형 안전하지 않고 복잡하며 상용구 코드를 숨깁니다. 대부분의 API가 Jetpack 구성 요소와 동일하거나 영감을 받았기 때문에 찾아보기 위해 새로운 프레임워크를 배울 필요가 없습니다. 현재 800개의 별이 있습니다.
4. Shot

PlayStore와 같은 여러 가지 이유로 앱의 스크린숏을 찍어야 하는 경우가 있습니다. 이 라이브러리를 사용하면 앱에 대한 쉽고 멋진 스크린샷을 만들 수 있습니다. 또한 테스트를 작성하는 ScreenshotTest데 사용할 수 있는 이름이 지정된 편리한 인터페이스를 제공합니다.ShotTestRunner버전 5.0.0은 Jetpack Compose에 대한 스크린숏 테스트 지원을 제공합니다.
5. Capturable

이 라이브러리는 구성 가능한 콘텐츠를 비트맵 이미지로 변환하는 데 도움이 됩니다. 보기에서 비트맵 이미지를 그리는 것은 이전 보기 시스템에서 비교적 간단했습니다. 그러나 Jetpack Compose는 이전 방식과 여러 면에서 다르기 때문에 그렇지 않습니다. 이 라이브러리를 사용하면 동일한 결과를 쉽게 얻을 수 있습니다. ComposeView를 기반으로 하며 View의 API를 사용하여 Bitmap 그림을 그립니다.
다시 한번 원작자님에게 감사를 드리면... 오늘도 한 수 배웠습니다.
피드 구독하기:
덧글 (Atom)
오늘의 이야기
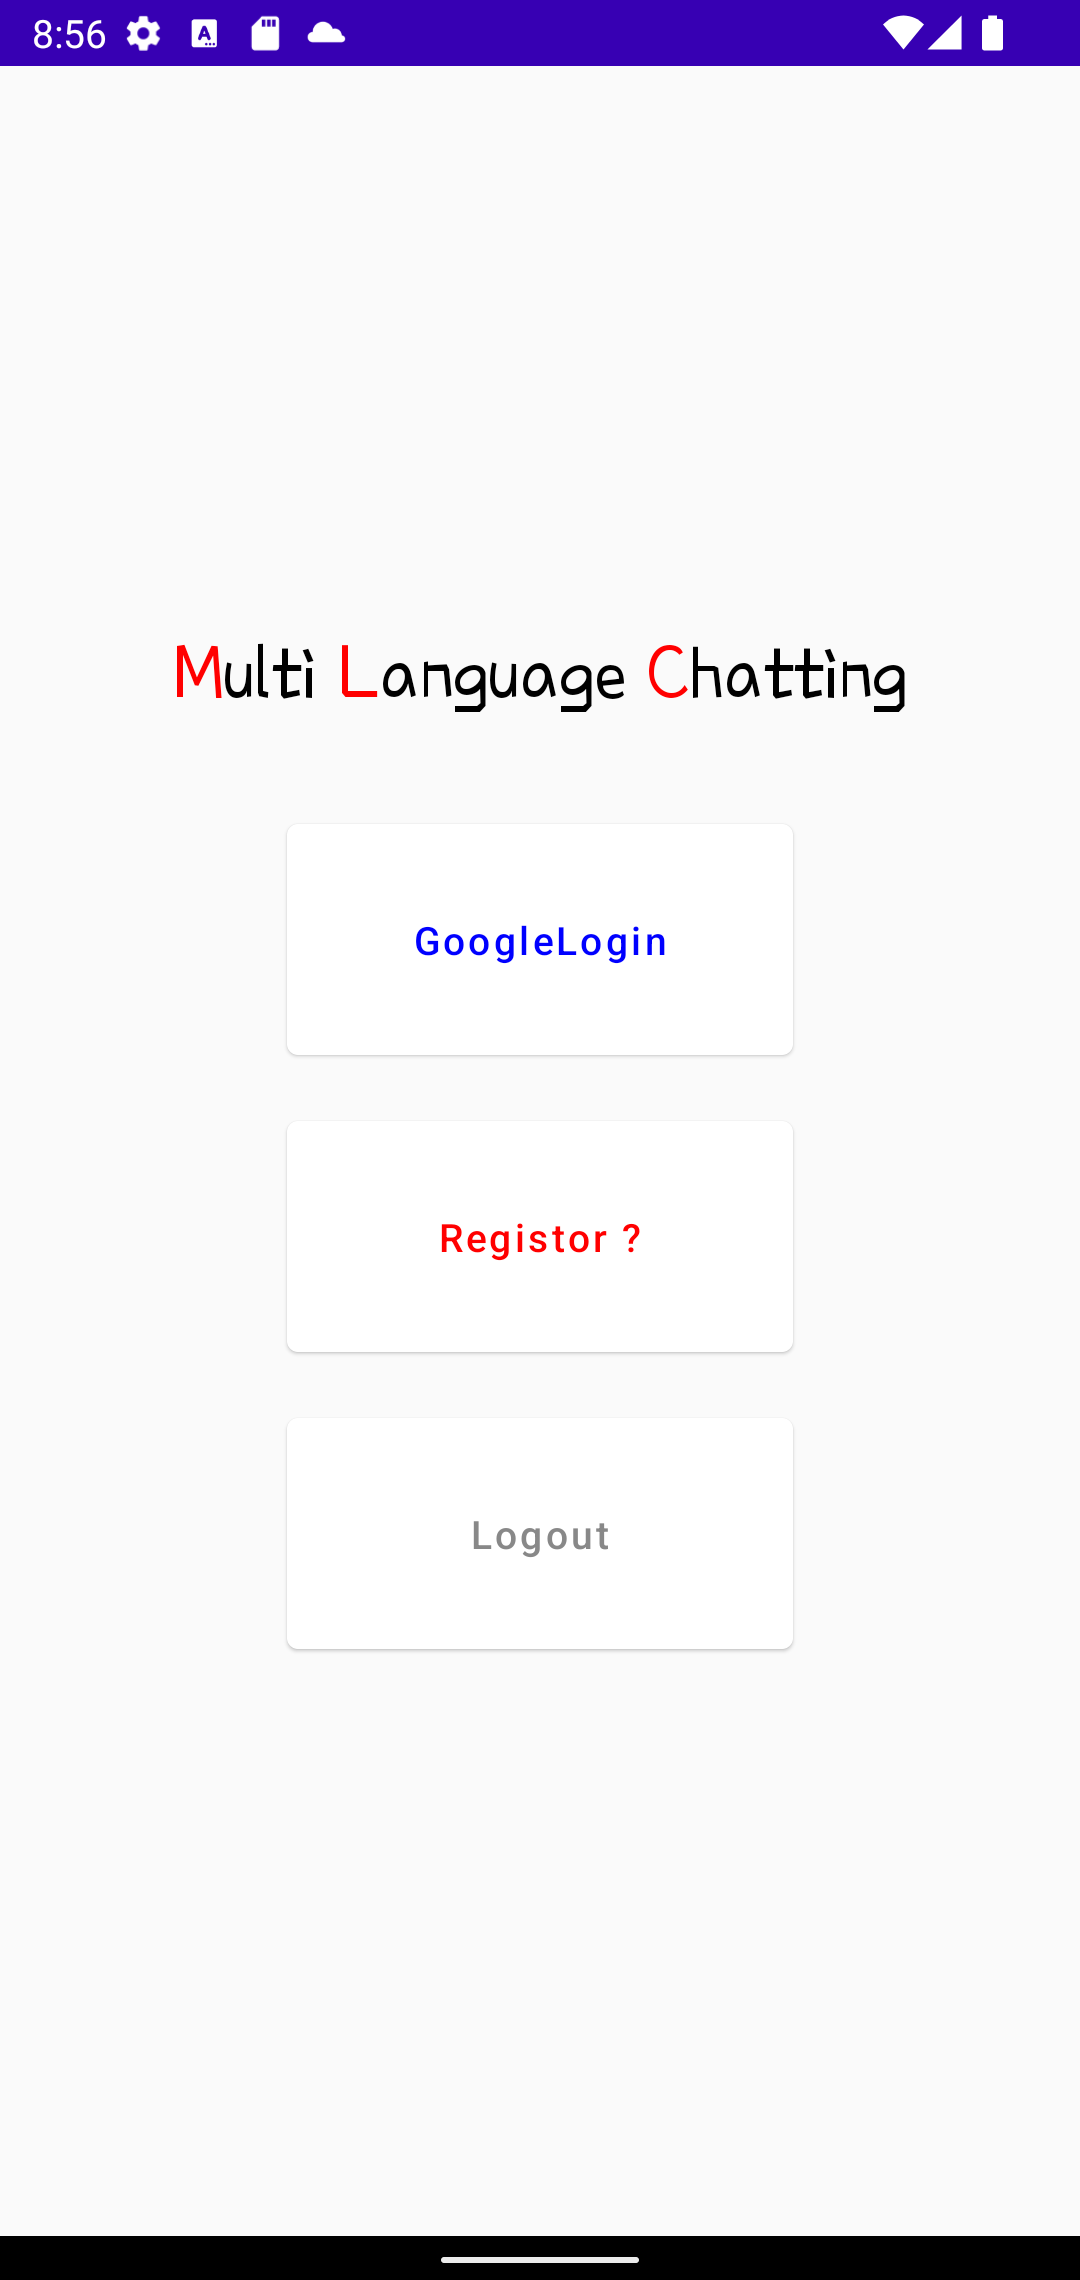
이 나라에는 여러 나라의 사람 들어와 살고 있다. 코리안 드림을 꿈꾸며... 한 때는 이 나라의 사람들이 아메리칸드림을 꿈꾸며, 미국으로 떠났던 것처럼... 그래서 이번에는 다국적 언어를 이용한 채팅앱을 하나 만들어 볼까 한다. 잘 될지는 모르겠...