2026/02/20
오늘의 이야기
#스치니1000프로젝트 #재미 #행운기원 #Compose #Firebase
🎯 야 너 토요일마다 로또 확인하냐?
나도 맨날 "혹시나~" 하면서 봤거든 ㅋㅋ
근데 이제는 그냥 안 해
AI한테 맡겼어 🤖✨
그것도 구글 Gemini로다가!
그래서 앱 하나 만들었지
👉 "로또 예상번호 by Gemini" 🎱
AI가 분석해서 번호 딱! 뽑아줌
그냥 보고 참고만 하면 됨
재미로 해도 좋고…
혹시 모르는 거잖아? 😏
https://play.google.com/store/apps/details?id=com.billcorea.gptlotto1127
오늘의 이야기
나의 블로그를 찾아주는 사람이 없는 관계로 다가... 다른 사람들의 글을 읽고 댓글을 달아겠다.
그전에 먼저 그들을 글을 읽고 공감(?)을 클릭해 본다. 매일 처럼...
물론 글을 다 잘 읽고 잘 달아 주면 좋겠지만, 그들에게 힘을 보태주기 위해서 난 오늘도 자동화를 해 보기로 했다.
스크립트 중간에 sleep 이 들어가는 것은 아무래도 페이지가 다 로드 되기 전에 다음 action 을 하게 되면 스크립트 오류가 발생하기 때문이다. 그래서 중간 중간에 그런 걸 막기 위해서...
# coding=utf-8

import ssl
from bs4 import BeautifulSoup
from selenium import webdriver
import time

import urllib.request
import urllib.parse
from bs4 import BeautifulSoup

path = "C:\\Users\\nari4\\AppData\\Local\\Programs\Python\\Python37\\chromedriver.exe"
driver = webdriver.Chrome(path)
driver.implicitly_wait(2)
# 티스토리 접속
driver.get('https://www.tistory.com/')
# 계정 로그인 버튼 클릭
driver.find_element_by_xpath('//*[@id="kakaoHead"]/div/div[3]/div/a').click()
driver.find_element_by_xpath('//*[@id="cMain"]/div/div/div/a[1]/span[2]').click()
time.sleep(1) # 페이지가 로딩하는 걸 기다리기 위해서
# 로그인
username=driver.find_element_by_xpath('//*[@id="id_email_2"]')
username.send_keys('아이디')
password=driver.find_element_by_xpath('//*[@id="id_password_3"]')
password.send_keys('패스워드')
time.sleep(1) # 페이지가 로딩하는 걸 기다리기 위해서
driver.find_element_by_xpath('//*[@id="login-form"]/fieldset/div[8]/button[1]').click()
time.sleep(1) # 페이지가 로딩하는 걸 기다리기 위해서
driver.get("https://www.tistory.com/feed")
time.sleep(1) # 페이지가 로딩하는 걸 기다리기 위해서
html = driver.find_element_by_class_name("list_tistory").get_attribute("innerHTML")

soup = BeautifulSoup(html.encode("utf-8"),'html.parser')
urls=soup.find_all(class_="inner_desc_tit") # 내가 읽을 feed 의 URL 주소만 뽑아오기
for url in urls:
    try:
        driver.get(url['href'])
        driver.implicitly_wait(30)  # 페이지가 로딩하는 걸 기다리기 위해서
        driver.find_element_by_class_name("wrap_btn").click()
    except:
        print(url['href'] + " 이 페이지는 오류 입니다.")

print("Job END ... ")
driver.close()
준비물 : python 은 기본, chromedriver 이건 아래 링크를 참고해서 설치하시면 될 듯... 그리고는 늘 켜져 있는 컴퓨터가 필요한데, 그걸 대신 하는 방법은 rasberry pi 을 이용하는 것도 한가지 방법일 듯...
말은 필요 없을 듯 하고, 스크립트 작성해서 그냥 실행하시면 끝... 다만 간혹 중간에 클릭이 되지 않는 페이지 들이 발생하고 있는데, 이건 아직... 나중에 알게 되면 수정해서 다시 업데이트를 진행하는 것으로 해야겠다.
크롬 드라이버 설치는 아래 링크를 참고하시길...
https://chromedriver.chromium.org/downloads
ChromeDriver - WebDriver for Chrome - Downloads
Current Releases If you are using Chrome version 93, please download ChromeDriver 93.0.4577.15 If you are using Chrome version 92, please download ChromeDriver 92.0.4515.107 If you are using Chrome version 91, please download ChromeDriver 91.0.4472.101 For
chromedriver.chromium.org
이걸 작성하면서 참고한 페이지
https://yobbicorgi.tistory.com/21
[python] Selenium을 이용한 티스토리 로그인 & 게시글 자동 작성
이번에는 Selenium과 크롬 웹드라이버('chromedriver')를 이용해 자동으로 티스토리에 로그인을 하고, 간단한 게시글을 작성하는 코드를 짜보고자 한다. 우선 자신이 사용하고 있는 크롬 버전과 맞는 c
yobbicorgi.tistory.com
이 페이지를 참고하면서 얻은 것은 내가 만든 스크립트가 로봇으로 걸리지 않는다는 것이다. 어떻게 구현하다 보니 로봇으로 인식이 되어 로봇이 아님을 인증해 주어야 하는 그림 캡쳐가 나오던데... 이분의 스크립트는 그런게 없었다.
오늘의 이야기
매일 처럼 쏟아지는 feed 에 댓글을 달아보자 (노노~ 찾아 오는 이가 없는 나의 블로그에 방문객 유인을 위한 방책으로) 자동 댓글 달기를 해 보기로 했다.
# coding=utf-8

import ssl
import sqlite3
from bs4 import BeautifulSoup
from selenium import webdriver
import time
import os.path
import urllib.request
import urllib.parse
from bs4 import BeautifulSoup
from selenium.webdriver.remote.webelement import WebElement
from datetime import datetime
from selenium.webdriver.support.ui import WebDriverWait as wait
from selenium.webdriver.common.keys import Keys

conn = sqlite3.connect("test.sqlite", isolation_level=None)
rs = conn.cursor()
# 한번 갔던 글을 더 작성을 하지 않도록 하기 위해서 저장하기
rs.execute("CREATE TABLE IF NOT EXISTS urlInfo \
        (id integer PRIMARY KEY, urlName text, writeDate text)")

path = "C:\\Users\\nari4\\AppData\\Local\\Programs\Python\\Python37\\chromedriver.exe"
driver = webdriver.Chrome(path)

driver.implicitly_wait(2)
# 티스토리 접속
driver.get('https://www.tistory.com/')
# 계정 로그인 버튼 클릭
driver.find_element_by_xpath('//*[@id="kakaoHead"]/div/div[3]/div/a').click()
driver.find_element_by_xpath('//*[@id="cMain"]/div/div/div/a[1]/span[2]').click()
time.sleep(1)
# 로그인
username=driver.find_element_by_xpath('//*[@id="id_email_2"]')
username.send_keys('카카오ID')
password=driver.find_element_by_xpath('//*[@id="id_password_3"]')
password.send_keys('비밀번호')
time.sleep(1)
driver.find_element_by_xpath('//*[@id="login-form"]/fieldset/div[8]/button[1]').click()
time.sleep(1)
# 로그인이 되면 feed 로 이동
driver.get("https://www.tistory.com/feed")
time.sleep(1)
html = driver.find_element_by_class_name("list_tistory").get_attribute("innerHTML")

# 내가 읽어야 하는 feed 목록을 추려본다.
# 다만, 아직은 전체가 다 나오지는 않는다. 이유는 좀 더 찾아 보는 것으로 해야겠다.
soup = BeautifulSoup(html.encode("utf-8"),'html.parser')
urls=soup.find_all(class_="inner_desc_tit")
for url in urls:
    urlPath = url['href']
    urlStr = urlPath.split('//')[1]
    print(urlStr)
    #이미 다녀간 곳인지 확인
    rs.execute(''' select count(*) from urlInfo
                    where urlName = "{0}" '''.format(urlStr))
    # 이미 다녀간 곳이면 패스
    if (rs.fetchone()[0] == 1):
        print(urlPath + ' 이미 작성한 경로 입니다.')
    else:
        # 그렇지 않다면 작성하기
        print(urlPath + ' 작성중... ')
        nId = urlStr.split('/')[1]
        driver.get(urlPath)
        driver.implicitly_wait(30)
        comments = driver.find_element_by_name("comment")
        comments.send_keys("포스팅 잘 읽고 갑니다.  좋은글 감사합니다.  제 블로그에도 방문 부탁 드립니다.")
        print(nId)
        # 버튼을 클릭하고 싶지만, 버튼이 한가지가 아닌 것 같아서 스크립트 실행으로 대신함.
        # 21.09.01 스크립트 실행은 안되는 경우가 발생 됨 다시 버튼 클릭으로 수정
        #driver.execute_script('addComment(this, {0}); return false;'.format(nId))
        commentsBtn = driver.find_element_by_class_name("btn")
        commentsBtn.click();
        rs.execute(''' insert into urlInfo (urlName,  writeDate)
                       values ("{0}", "{1}") '''.format(urlStr,
                                                                                              datetime.today().strftime(
                                                                                                  "%Y%m%d%H%M%S")))
    print("next .....")

rs.close()
print("Job END ... ")
driver.close()
실행한 결과는 아래 그림 처럼 feed 작성글에 자동으로 댓글을 작성해 준다.

관리자님들께서 불평을 하지 않으신다면 ... 이렇게 댓글 쓰기를 마무리 해 본다.
ps. 2021.09.01 스크립트 실행중 오류가 있는 것 같아서 수정함. 수정한 부분은 아래 내용임.
        # 21.09.01 스크립트 실행은 안되는 경우가 발생 됨 다시 버튼 클릭으로 수정
        #driver.execute_script('addComment(this, {0}); return false;'.format(nId))
        try:
            commentsBtn = driver.find_element_by_class_name("btn")
            commentsBtn.click();
        except:
            try:
                commentsBtn = driver.find_element_by_class_name("btn_enter")
                commentsBtn.click();
            except:
                commentsBtn = driver.find_element_by_class_name("btn_register")
                commentsBtn.click();
그런데 실제 적용해서 운영을 하다보니... 버튼 class 가 btn , btn_enter, btn_register 등등 여러개가 발견 되었다.
그래서 일단은 다시 수정했다.
오늘의 이야기
#스하리1000명프로젝트
스치니들!
내가 만든 이 앱은, 내 폰에 오는 알림 중에서 중요한 키워드가 있는 경우
등록해둔 친구에게 자동으로 전달해주는 앱이야 📲
예를 들어, 카드 결제 알림을 와이프나 자녀에게 보내주거나
이번 달 지출을 달력처럼 확인할 수도 있어!
앱을 함께 쓰려면 친구도 설치 & 로그인해줘야 해.
그래야 친구 목록에서 서로 선택할 수 있으니까~
서로 써보고 불편한 점 있으면 알려줘 🙏
👉 https://play.google.com/store/apps/details?id=com.nari.notify2kakao
오늘의 이야기
매일 처럼 쏟아지는 feed 에 댓글을 달아보자 (노노~ 찾아 오는 이가 없는 나의 블로그에 방문객 유인을 위한 방책으로) 자동 댓글 달기를 해 보기로 했다.
# coding=utf-8

import ssl
import sqlite3
from bs4 import BeautifulSoup
from selenium import webdriver
import time
import os.path
import urllib.request
import urllib.parse
from bs4 import BeautifulSoup
from selenium.webdriver.remote.webelement import WebElement
from datetime import datetime
from selenium.webdriver.support.ui import WebDriverWait as wait
from selenium.webdriver.common.keys import Keys

conn = sqlite3.connect("test.sqlite", isolation_level=None)
rs = conn.cursor()
# 한번 갔던 글을 더 작성을 하지 않도록 하기 위해서 저장하기
rs.execute("CREATE TABLE IF NOT EXISTS urlInfo \
        (id integer PRIMARY KEY, urlName text, writeDate text)")

path = "C:\\Users\\nari4\\AppData\\Local\\Programs\Python\\Python37\\chromedriver.exe"
driver = webdriver.Chrome(path)

driver.implicitly_wait(2)
# 티스토리 접속
driver.get('https://www.tistory.com/')
# 계정 로그인 버튼 클릭
driver.find_element_by_xpath('//*[@id="kakaoHead"]/div/div[3]/div/a').click()
driver.find_element_by_xpath('//*[@id="cMain"]/div/div/div/a[1]/span[2]').click()
time.sleep(1)
# 로그인
username=driver.find_element_by_xpath('//*[@id="id_email_2"]')
username.send_keys('카카오ID')
password=driver.find_element_by_xpath('//*[@id="id_password_3"]')
password.send_keys('비밀번호')
time.sleep(1)
driver.find_element_by_xpath('//*[@id="login-form"]/fieldset/div[8]/button[1]').click()
time.sleep(1)
# 로그인이 되면 feed 로 이동
driver.get("https://www.tistory.com/feed")
time.sleep(1)
html = driver.find_element_by_class_name("list_tistory").get_attribute("innerHTML")

# 내가 읽어야 하는 feed 목록을 추려본다.
# 다만, 아직은 전체가 다 나오지는 않는다. 이유는 좀 더 찾아 보는 것으로 해야겠다.
soup = BeautifulSoup(html.encode("utf-8"),'html.parser')
urls=soup.find_all(class_="inner_desc_tit")
for url in urls:
    urlPath = url['href']
    urlStr = urlPath.split('//')[1]
    print(urlStr)
    #이미 다녀간 곳인지 확인
    rs.execute(''' select count(*) from urlInfo
                    where urlName = "{0}" '''.format(urlStr))
    # 이미 다녀간 곳이면 패스
    if (rs.fetchone()[0] == 1):
        print(urlPath + ' 이미 작성한 경로 입니다.')
    else:
        # 그렇지 않다면 작성하기
        print(urlPath + ' 작성중... ')
        nId = urlStr.split('/')[1]
        driver.get(urlPath)
        driver.implicitly_wait(30)
        comments = driver.find_element_by_name("comment")
        comments.send_keys("포스팅 잘 읽고 갑니다.  좋은글 감사합니다.  제 블로그에도 방문 부탁 드립니다.")
        print(nId)
        # 버튼을 클릭하고 싶지만, 버튼이 한가지가 아닌 것 같아서 스크립트 실행으로 대신함.
        # 21.09.01 스크립트 실행은 안되는 경우가 발생 됨 다시 버튼 클릭으로 수정
        #driver.execute_script('addComment(this, {0}); return false;'.format(nId))
        commentsBtn = driver.find_element_by_class_name("btn")
        commentsBtn.click();
        rs.execute(''' insert into urlInfo (urlName,  writeDate)
                       values ("{0}", "{1}") '''.format(urlStr,
                                                                                              datetime.today().strftime(
                                                                                                  "%Y%m%d%H%M%S")))
    print("next .....")

rs.close()
print("Job END ... ")
driver.close()
실행한 결과는 아래 그림 처럼 feed 작성글에 자동으로 댓글을 작성해 준다.
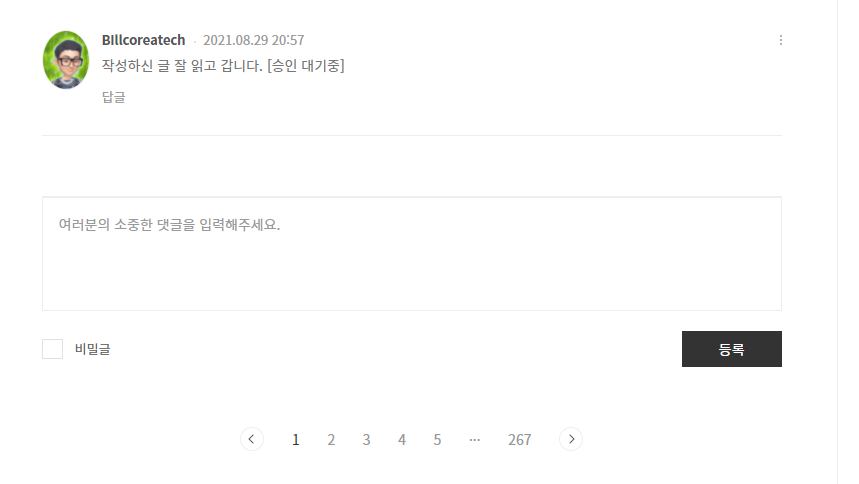
관리자님들께서 불평을 하지 않으신다면 ... 이렇게 댓글 쓰기를 마무리 해 본다.
ps. 2021.09.01 스크립트 실행중 오류가 있는 것 같아서 수정함. 수정한 부분은 아래 내용임.
        # 21.09.01 스크립트 실행은 안되는 경우가 발생 됨 다시 버튼 클릭으로 수정
        #driver.execute_script('addComment(this, {0}); return false;'.format(nId))
        try:
            commentsBtn = driver.find_element_by_class_name("btn")
            commentsBtn.click();
        except:
            try:
                commentsBtn = driver.find_element_by_class_name("btn_enter")
                commentsBtn.click();
            except:
                commentsBtn = driver.find_element_by_class_name("btn_register")
                commentsBtn.click();
그런데 실제 적용해서 운영을 하다보니... 버튼 class 가 btn , btn_enter, btn_register 등등 여러개가 발견 되었다.
그래서 일단은 다시 수정했다. 그런데 운영을 하다 보니... 항의글이 발생한다... 자신의 블로그가 저품질이 될 수 있다는 것이다. 이유인 것은 블로그에 대기시간이 너무 짧은면 그것도 저품질 대상이 된다는 것이다. 그래서 당분간 이 기능은 운영하지 않기로 했다.
오늘의 이야기
앱을 구현 하다 보면 알림을 보여 주어야 하는 경우가 있게 된다. 그럴때 마다 쉽게 했던 방식은 Toast 알림을 이용하는 방식으로 구현하는 것이였다.
Toast 의 경우의 위 영상에서 20초 이후 구간에 보이는 화면 하단에 잠시 나오는 알림창이다. 코드 구현은 다음과 같이...
Toast.makeText(context.getApplicationContext(), context.getString(R.string.msgUpdateCompleted), Toast.LENGTH_SHORT).show();파라미터로 넣어주어야 하는 것은 context, 문자열, Toast의 길이 이렇게 3가지가 전달 되면 구현이 가능 하다.
다음은 Snackbar 인데, 이것은 알림 나왔다가 사라는지는 구현도 가능하겠지만, action 을 넣어 주면 버튼 클릭이 끝나면 동작을 마무리 하도록 구현해 볼 수 있다.
위 영상의 예시처럼 화면에 알림을 띄워주고 사용자가 click 을 할 때 까지 기다리는 동작을 구현해 볼 수 있다.
코드 구현은 다음과 같이 해 볼 수 있다.
        Snackbar.make(
                ((Activity) context).findViewById(android.R.id.content),
                context.getString(mainTextStringId),
                Snackbar.LENGTH_INDEFINITE).setAction(context.getString(actionStringId), listener).show();
첫번째 파라미터는 알림을 담을 content 인데, android.R.id.content 는 안드로이드가 제공하고 있는 일반적인 content 을 담을 수 있는 것이락 생각하면 쉬을 것 같다. 다음은 화면에 보여줄 문자열이고, 그 다음은 action 을 위한 버튼에서 보여줄 문자, 마지막으로는 해당 action 을 클릭했을 때 처리할 action listener 을 넘겨 주면 된다.
이것으로 알림 방법에 대해 간략하게 알아보았다.
오늘의 이야기
#스하리1000명프로젝트,
Đôi khi thật khó để nói chuyện với người lao động nước ngoài phải không?
Tôi đã tạo một ứng dụng đơn giản có ích! Bạn viết bằng ngôn ngữ của bạn và những người khác nhìn thấy nó bằng ngôn ngữ của họ.
Nó tự động dịch dựa trên cài đặt.
Siêu tiện dụng để trò chuyện dễ dàng. Hãy xem khi bạn có cơ hội!
https://play.google.com/store/apps/details?id=com.billcoreatech.multichat416
오늘의 이야기
나의 블로그를 찾아주는 사람이 없는 관계로 다가... 다른 사람들의 글을 읽고 댓글을 달아겠다.
그전에 먼저 그들을 글을 읽고 공감(?)을 클릭해 본다. 매일 처럼...
물론 글을 다 잘 읽고 잘 달아 주면 좋겠지만, 그들에게 힘을 보태주기 위해서 난 오늘도 자동화를 해 보기로 했다.
스크립트 중간에 sleep 이 들어가는 것은 아무래도 페이지가 다 로드 되기 전에 다음 action 을 하게 되면 스크립트 오류가 발생하기 때문이다. 그래서 중간 중간에 그런 걸 막기 위해서...
# coding=utf-8

import ssl
from bs4 import BeautifulSoup
from selenium import webdriver
import time

import urllib.request
import urllib.parse
from bs4 import BeautifulSoup

path = "C:\\Users\\nari4\\AppData\\Local\\Programs\Python\\Python37\\chromedriver.exe"
driver = webdriver.Chrome(path)
driver.implicitly_wait(2)
# 티스토리 접속
driver.get('https://www.tistory.com/')
# 계정 로그인 버튼 클릭
driver.find_element_by_xpath('//*[@id="kakaoHead"]/div/div[3]/div/a').click()
driver.find_element_by_xpath('//*[@id="cMain"]/div/div/div/a[1]/span[2]').click()
time.sleep(1) # 페이지가 로딩하는 걸 기다리기 위해서
# 로그인
username=driver.find_element_by_xpath('//*[@id="id_email_2"]')
username.send_keys('아이디')
password=driver.find_element_by_xpath('//*[@id="id_password_3"]')
password.send_keys('패스워드')
time.sleep(1) # 페이지가 로딩하는 걸 기다리기 위해서
driver.find_element_by_xpath('//*[@id="login-form"]/fieldset/div[8]/button[1]').click()
time.sleep(1) # 페이지가 로딩하는 걸 기다리기 위해서
driver.get("https://www.tistory.com/feed")
time.sleep(1) # 페이지가 로딩하는 걸 기다리기 위해서
html = driver.find_element_by_class_name("list_tistory").get_attribute("innerHTML")

soup = BeautifulSoup(html.encode("utf-8"),'html.parser')
urls=soup.find_all(class_="inner_desc_tit") # 내가 읽을 feed 의 URL 주소만 뽑아오기
for url in urls:
    try:
        driver.get(url['href'])
        driver.implicitly_wait(30)  # 페이지가 로딩하는 걸 기다리기 위해서
        driver.find_element_by_class_name("wrap_btn").click()
    except:
        print(url['href'] + " 이 페이지는 오류 입니다.")

print("Job END ... ")
driver.close()
준비물 : python 은 기본, chromedriver 이건 아래 링크를 참고해서 설치하시면 될 듯... 그리고는 늘 켜져 있는 컴퓨터가 필요한데, 그걸 대신 하는 방법은 rasberry pi 을 이용하는 것도 한가지 방법일 듯...
말은 필요 없을 듯 하고, 스크립트 작성해서 그냥 실행하시면 끝... 다만 간혹 중간에 클릭이 되지 않는 페이지 들이 발생하고 있는데, 이건 아직... 나중에 알게 되면 수정해서 다시 업데이트를 진행하는 것으로 해야겠다.
크롬 드라이버 설치는 아래 링크를 참고하시길...
https://chromedriver.chromium.org/downloads
ChromeDriver - WebDriver for Chrome - Downloads
Current Releases If you are using Chrome version 93, please download ChromeDriver 93.0.4577.15 If you are using Chrome version 92, please download ChromeDriver 92.0.4515.107 If you are using Chrome version 91, please download ChromeDriver 91.0.4472.101 For
chromedriver.chromium.org
이걸 작성하면서 참고한 페이지
https://yobbicorgi.tistory.com/21
[python] Selenium을 이용한 티스토리 로그인 & 게시글 자동 작성
이번에는 Selenium과 크롬 웹드라이버('chromedriver')를 이용해 자동으로 티스토리에 로그인을 하고, 간단한 게시글을 작성하는 코드를 짜보고자 한다. 우선 자신이 사용하고 있는 크롬 버전과 맞는 c
yobbicorgi.tistory.com
이 페이지를 참고하면서 얻은 것은 내가 만든 스크립트가 로봇으로 걸리지 않는다는 것이다. 어떻게 구현하다 보니 로봇으로 인식이 되어 로봇이 아님을 인증해 주어야 하는 그림 캡쳐가 나오던데... 이분의 스크립트는 그런게 없었다.
오늘의 이야기
python 을 배우면서 해보고 싶었던 RPA 자동화 이게 그 RPA 의 밑거름이 되길 바라며...
다른 사이트들은 자동화을 할 수 없으나, tistory 는 가능해 보인다. 그래서 이 소스가 마중물이 되어 그 꿈을 실현해 볼 수 있기를...
#
#
import requests
client_id = "be43b5c087b8e5575b04e86f1973286e"
seckey = "be43b5c087b8e5..................89f03000fbc8983c7915"
callback_url = "http://autoposting.tistory.com"
getUrl = 'https://www.tistory.com/oauth/authorize?client_id={0}&redirect_uri={1}&response_type=code&state=someValue'
getUrl = getUrl.format(client_id, callback_url)
#res = requests.get(getUrl, verify=False)
print(getUrl)

# 등록시 입력 값
code = "421872a45b631..........................38780a493025b71908"
token_url="https://www.tistory.com/oauth/access_token?client_id={0}&client_secret={1}&redirect_uri={2}&code={3}&grant_type=authorization_code".format(client_id, seckey, callback_url, code)
#res = requests.get(token_url, verify=False)
#access_token = res.text.split("=")[1]
#print(access_token)
access_token = 'be7ca24dd08ad5...............................0e355a4da0ee119d'

getList = 'https://www.tistory.com/apis/post/list?access_token={0}&output={1}&blogName={2}&page={3}'.format(access_token, 'xml', 'autoposting', 1)
res = requests.get(getList, verify=False)
print(res.text)
코드 중간에 .... 으로 가린것은 일종의 프라이버시 이므로 사용자의 값을 찾아서 해야됨.
오늘의 이야기
#billcorea #운동동아리관리앱
🏸 Schneedle, một ứng dụng cần có cho các câu lạc bộ cầu lông!
👉 Đấu trận – Ghi điểm & Tìm đối thủ 🎉
Hoàn hảo cho mọi nơi, một mình, với bạn bè hoặc trong câu lạc bộ! 🤝
Nếu bạn thích cầu lông, nhất định phải thử nó
Vào ứng dụng 👉 https://play.google.com/store/apps/details?id=com.billcorea.matchplay
오늘의 이야기
앱을 만들다 보면 앱에 광고에 넣고 싶다. 그런데 화면에는 리사이클뷰가 들어있는데 그안에는 어떻게 넣을 것인가 ? 그것을 찾다 보니...
https://github.com/googleads/googleads-mobile-android-examples
GitHub - googleads/googleads-mobile-android-examples: googleads-mobile-android
googleads-mobile-android. Contribute to googleads/googleads-mobile-android-examples development by creating an account on GitHub.
github.com
여기 까지 찾아갔다. 그 안을 찾다보니, BannerRecyclerViewExample 이라는 프로젝트 파일을 찾을 수 있었다. 이 예제의 내용은 menu(식당에서 말하는) item 을 넣은 recycleview 에 banner 광고를 추가하는 식으로 예제를 보여 주고 있다.
물론 나도 recycleview 에 데이터를 넣은 다음 그안에 banner 광고를 추가할 생각이니 대략 다름이 없게 되는 것이다.
admob 광고를 설정하는 것은 이전 포스팅을 참고해서 하고...
https://billcorea.tistory.com/57
안드로이드 앱 만들기 도전 4일차 admob 달아 보기
오늘은 내가 만든 앱에 광고를 달아보자... admob 으로 다가... 그래서 먼저 할 꺼는 admob 에 로그인하고 앱 만들기를 클릭하기 그럼 다음 그림과 같이 나옴. 나의 앱은 안드로이드 버전이고, 아직
billcorea.tistory.com
일단 layout 에 recycleview 을 넣어 보자.
<?xml version="1.0" encoding="utf-8"?>
<LinearLayout xmlns:android="http://schemas.android.com/apk/res/android"
    xmlns:app="http://schemas.android.com/apk/res-auto"
    xmlns:tools="http://schemas.android.com/tools"
    android:layout_width="match_parent"
    android:layout_height="match_parent"
    android:orientation="vertical"
    android:weightSum="30"
    tools:context=".MainActivity">

    <LinearLayout
        android:id="@+id/base_progressBar"
        android:layout_width="match_parent"
        android:layout_height="match_parent"
        android:background="@drawable/backgroud_blueline"
        android:clickable="true"
        android:gravity="center"
        android:orientation="vertical"
        android:visibility="gone">

        <TextView
            android:layout_width="wrap_content"
            android:layout_height="wrap_content"
            android:text="@string/msgWaitForSecond"/>

        <ProgressBar
            style="?android:attr/progressBarStyle"
            android:layout_width="wrap_content"
            android:layout_height="wrap_content"
            android:indeterminateDrawable="@drawable/circle_progress"
            android:indeterminateDuration="1000" />
    </LinearLayout>

    <Spinner
        android:id="@+id/spAclass"
        android:layout_width="match_parent"
        android:layout_height="0dp"
        android:layout_weight="2"
        android:theme="@style/SpinnerTheme" />

    <Spinner
        android:id="@+id/spBclass"
        android:layout_width="match_parent"
        android:layout_height="0dp"
        android:layout_weight="2"
        android:theme="@style/SpinnerTheme" />

    <Spinner
        android:id="@+id/spCclass"
        android:layout_width="match_parent"
        android:layout_height="0dp"
        android:layout_weight="2"
        android:theme="@style/SpinnerTheme" />

    <LinearLayout
        android:layout_width="match_parent"
        android:layout_height="0dp"
        android:layout_weight="2"
        android:orientation="horizontal"
        android:weightSum="10">

        <EditText
            android:id="@+id/editSearchKey"
            android:layout_width="0dp"
            android:layout_height="match_parent"
            android:layout_weight="8"
            android:ems="10"
            android:hint="@string/msgSearchKey"
            android:inputType="textPersonName" />

        <ImageButton
            android:id="@+id/btnSearch"
            android:layout_width="0dp"
            android:layout_height="match_parent"
            android:layout_weight="1"
            app:srcCompat="@drawable/ic_baseline_search_24" />

        <ImageButton
            android:id="@+id/btnMaps"
            android:layout_width="0dp"
            android:layout_height="match_parent"
            android:layout_weight="1"
            app:srcCompat="@drawable/ic_baseline_map_24" />
    </LinearLayout>

    <androidx.recyclerview.widget.RecyclerView
        android:id="@+id/listData"
        android:layout_width="match_parent"
        android:layout_height="0dp"
        android:layout_weight="22" />
</LinearLayout>
이렇게 디자인된 화면을 미리 보기를 해 보면

그 다음은 recycleview 을 그려낼 화면 adapter 을 만들어 보면 다음과 같이 구현이 될 수 있다.
import android.content.Context;
import android.util.Log;
import android.view.LayoutInflater;
import android.view.View;
import android.view.ViewGroup;
import android.widget.ImageView;
import android.widget.TextView;

import androidx.annotation.NonNull;
import androidx.recyclerview.widget.RecyclerView;

import com.billcoreatech.opdgang1127.MainActivity;
import com.billcoreatech.opdgang1127.R;
import com.billcoreatech.opdgang1127.databinding.BannerAdContainerBinding;
import com.billcoreatech.opdgang1127.databinding.Jejufd6infoViewBinding;
import com.google.android.gms.ads.AdView;

import java.util.List;

/**
 * {@link RecyclerAdMobAdapter} 클래스.
 * <p>어댑터는 {@link ViewHolder}의 항목에 대한 액세스를 제공합니다.
 * 또는 {@link AdViewHolder}.</p>
 */
public class RecyclerAdMobAdapter extends RecyclerView.Adapter<RecyclerView.ViewHolder> {
    // 데이터 항목 보기 유형입니다.
    private static final int DATA_ITEM_VIEW_TYPE = 0;

    // 배너 광고 보기 유형입니다.
    private static final int BANNER_AD_VIEW_TYPE = 1;

    // 활동의 컨텍스트입니다.
    private final Context context;

    // The list of banner ads and menu items.
    private final List<Object> recyclerViewItems;

    // data item layout
    Jejufd6infoViewBinding binding ;
    // banner ad layout
    BannerAdContainerBinding adBinding ;
    String TAG = "RecyclerAdMobAdapter";

    /**
     * 이 예제 앱의 경우 recyclerViewItems 목록에는
     * {@link JejuFD6infoBean} 및 {@link AdView} 유형.
     */
    public RecyclerAdMobAdapter(Context context, List<Object> recyclerViewItems) {
        this.context = context;
        this.recyclerViewItems = recyclerViewItems;
    }

    /**
     * {@link ViewHolder} 클래스.
     * 메뉴 항목 보기의 각 보기에 대한 참조를 제공합니다.
     */
    public class ViewHolder extends RecyclerView.ViewHolder {
        TextView placeName ;
        TextView categoryName ;
        TextView phone ;
        TextView roadAddressName ;
        public ViewHolder(@NonNull View itemView) {
            super(itemView);

            placeName = binding.placeName ;
            categoryName = binding.categoryName;
            phone = binding.phone;
            roadAddressName = binding.roadAddressName;

            // item click 을 활용 하기 위해서
            itemView.setOnClickListener(new View.OnClickListener() {
                @Override public void onClick(View v) {
                    int pos = getAdapterPosition() ;
                    if (pos != RecyclerView.NO_POSITION) {
                        // 리스너 객체의 메서드 호출.
                        if (mListener != null) {
                            mListener.onItemClick(v, pos) ;
                        }
                    }
                }
            });
        }
    }

    /**
     * {@link AdViewHolder} 클래스입니다.
     */
    public class AdViewHolder extends RecyclerView.ViewHolder {

        AdViewHolder(View view) {
            super(view);
        }
    }

    /**
     * 데이터의 갯수를 구하기
     * @return
     */
    @Override
    public int getItemCount() {
        return recyclerViewItems.size();
    }

    /**
     * 주어진 위치에 대한 보기 유형을 결정합니다.
     *
     */
    @Override
    public int getItemViewType(int position) {
        return (position % MainActivity.ITEMS_PER_AD == 0) ? BANNER_AD_VIEW_TYPE
                : DATA_ITEM_VIEW_TYPE;
    }

    /**
     * 메뉴 항목 보기 또는 배너 광고 보기에 대한 새 보기 만들기
     * viewType을 기반으로 합니다. 이 메소드는 레이아웃 관리자에 의해 호출됩니다.
     */
    @Override
    public RecyclerView.ViewHolder onCreateViewHolder(ViewGroup parent, int viewType) {
        switch (viewType) {
            case DATA_ITEM_VIEW_TYPE:
                RecyclerView.LayoutParams lp = new RecyclerView.LayoutParams(ViewGroup.LayoutParams.MATCH_PARENT, ViewGroup.LayoutParams.WRAP_CONTENT);
                binding = Jejufd6infoViewBinding.inflate((LayoutInflater) parent.getContext().getSystemService(Context.LAYOUT_INFLATER_SERVICE));
                View view = binding.getRoot() ;
                view.setLayoutParams(lp);
                return new ViewHolder(view);
            case BANNER_AD_VIEW_TYPE:
                // fall through
            default:
                adBinding = BannerAdContainerBinding.inflate((LayoutInflater) parent.getContext().getSystemService(Context.LAYOUT_INFLATER_SERVICE));
                View bannerLayoutView = adBinding.getRoot();
                return new AdViewHolder(bannerLayoutView);
        }
    }

    /**
     * 메뉴 항목 보기를 구성하는 보기의 내용을 대체하고
     * 배너 광고 보기. 이 메소드는 레이아웃 관리자에 의해 호출됩니다.
     */
    @Override
    public void onBindViewHolder(RecyclerView.ViewHolder holder, int position) {
        int viewType = getItemViewType(position);
        switch (viewType) {
            case DATA_ITEM_VIEW_TYPE:
                ViewHolder viewHolder = (ViewHolder) holder;
                JejuFD6infoBean dataBean = (JejuFD6infoBean) recyclerViewItems.get(position);
                viewHolder.categoryName.setText(dataBean.getCategory_name());
                viewHolder.phone.setText(dataBean.getPhone());
                viewHolder.placeName.setText(dataBean.getPlace_name());
                viewHolder.roadAddressName.setText(dataBean.getRoad_address_name());
                break;
            case BANNER_AD_VIEW_TYPE:
                // 실패로 끝나다
            default:
                AdViewHolder bannerHolder = (AdViewHolder) holder;
                AdView adView = (AdView) recyclerViewItems.get(position);
                ViewGroup adCardView = (ViewGroup) bannerHolder.itemView;
//                RecyclerView에 의해 재활용된 AdViewHolder는 다를 수 있습니다.
//                이전에 이 위치에 사용된 것보다 인스턴스입니다. 지우다
//                다른 하위 보기의 AdViewHolder
//                AdView가 연결되어 있고 이 위치에 대한 AdView가
//                이미 다른 재활용 AdViewHolder의 상위 항목이 있습니다.

                if (adCardView.getChildCount() > 0) {
                    adCardView.removeAllViews();
                }
                if (adView.getParent() != null) {
                    ((ViewGroup) adView.getParent()).removeView(adView);
                }

                // Add the banner ad to the ad view.
                adCardView.addView(adView);
        }
    }

    // 리스너 객체 참조를 저장하는 변수
    private RecyclerAdMobAdapter.OnItemClickListener mListener = null ;

    // OnItemClickListener 리스너 객체 참조를 어댑터에 전달하는 메서드
    public void setOnItemClickListener(RecyclerAdMobAdapter.OnItemClickListener listener) {
        this.mListener = listener ;
    }

    public interface OnItemClickListener {
        void onItemClick(View v, int position) ;
    }

}
앞에서 말했던 예제 소스에서 recycleview adapter class 을 복사해서 내가 필요한 부분으로 수정을 진행 했다.
이제까지 구현했던 adapter class 와 다른 것은 viewHolder 을 2가지로 구성해서 한가지는 화면에 보여줄 데이터가 표시되는 viewHolder 을 만들고, 또 하나는 광고 banner 가 들어가는 adViewHolder 을 구현하는 것이다.
그리고 viewType 을 이용해서 각각 뷰에 필요한 데이터를 넣어주는 방식으로 구현이 되는 것을 볼 수 있었다. 추가적으로 item 을 클릭했을 때 처리를 하기 위해서 onItemClickListener 을 구현해 주는 것이다. listview에서는 item에 onClick 리스너가 들어가서 클릭했을 때 처리를 할 수 있었으나, recycleview 에선 item 의 클릭을 인식을 구현할 수 없으므로 adapter의 onClick 리스너를 구현해서 처리를 하는 것이다.
이제 MainActivity 에서 데이터와 adBanner 을 넣는 것을 구현해 보자.
import android.annotation.SuppressLint;
import android.content.Context;

.....

public class MainActivity extends AppCompatActivity {

    // recycleview 에서 광고가 보여질 간격
    public static final int ITEMS_PER_AD = 8;
    private static final String TAG = "MainActivity";
    ActivityMainBinding binding ;
    Updatejejufd6infoViewBinding fd6Binding ;
    AppsInfoViewBinding infoViewBinding ;
    ArrayList<String> listSpinnerA ;
    ArrayList<String> listSpinnerB;
    ArrayList<String> listSpinnerC;

    DBHandler dbHandler ;
    ArrayList<JejuFD6infoBean> dataBeans ;
    JejuFD6Adapter adapter ;
    // 수정한 recycleview 용 adapter
    RecyclerAdMobAdapter recyclerAdMobAdapter ;
    // adapter 로 전달할 데이터 구조체
    //     안에 들어가는 정보가 2가지 형식이라 object 로 선언한 것 같음.
    List<Object> recyclerViewItems ;

    SharedPreferences sp ;
    SharedPreferences.Editor editor ;
    private final long FINISH_INTERVAL_TIME = 2000;
    private long backPressedTime = 0;
    public static Context mContext ;

    // 광고 요청을 위해서
    AdRequest adRequest ;

    @Override
    protected void onCreate(Bundle savedInstanceState) {
        super.onCreate(savedInstanceState);
        binding = ActivityMainBinding.inflate(getLayoutInflater());
        setContentView(binding.getRoot());

        /**
         * 이건 다른 class 에서 요기 있는 함수를 사용해 보기 위해서
         */
        mContext = this ;

        // 광고 초기화를 꼭 처리 해야 한다.
        MobileAds.initialize(this, new OnInitializationCompleteListener() {
            @Override
            public void onInitializationComplete(InitializationStatus initializationStatus) {
                Log.e(TAG, "adMob Ready !!!");
            }
        });

        // 광고 요청을 선언 하고.
        adRequest = new AdRequest.Builder().build();

        // adapter 로 보낼 데이터 초기화
        recyclerViewItems = new ArrayList<>();

        // adapter 을 선언
        recyclerAdMobAdapter = new RecyclerAdMobAdapter(MainActivity.this, recyclerViewItems);

        .....

        // item 클릭을 했을 때 처리하기 위한 구현 부분
        recyclerAdMobAdapter.setOnItemClickListener(new RecyclerAdMobAdapter.OnItemClickListener() {
            @Override
            public void onItemClick(View v, int position) {
                Object data = recyclerViewItems.get(position);
                Log.e(TAG, "pos=" + position) ;
                if (!data.equals(JejuFD6infoBean.class)) {
                    JejuFD6infoBean dataBean = (JejuFD6infoBean) data;
                    Intent intent = new Intent(MainActivity.this, MapsActivity.class);
                    Bundle extras = new Bundle();
                    extras.putString("viewOption", "placePoint");
                    extras.putString("placeName", dataBean.getPlace_name());
                    extras.putString("y", dataBean.getY());
                    extras.putString("x", dataBean.getX());
                    intent.putExtras(extras);
                    startActivityIfNeeded( intent, 100) ;
                } else {
                    Log.e(TAG, "" + data.equals(JejuFD6infoBean.class));
                }
            }
        });
        doInfoView();
    }

    '''''

    @SuppressLint("Range")
    public void doInfoDataView(String categoryName) {
        // adapter 로 전달해 구조체를 지운다음.
        recyclerViewItems.clear();
        dbHandler = DBHandler.open(getApplicationContext());
        Cursor rs = dbHandler.selectCategoryName(categoryName);
        while (rs.moveToNext()) {
            JejuFD6infoBean dataBean = new JejuFD6infoBean();
            dataBean.setPlace_name(rs.getString(rs.getColumnIndex("place_name")));
            dataBean.setPhone(rs.getString(rs.getColumnIndex("phone")));
            dataBean.setRoad_address_name(rs.getString(rs.getColumnIndex("road_address_name")));
            dataBean.setCategory_name(rs.getString(rs.getColumnIndex("category_name")));
            dataBean.setUrl(rs.getString(rs.getColumnIndex("url")));
            dataBean.setY(rs.getString(rs.getColumnIndex("y")));
            dataBean.setX(rs.getString(rs.getColumnIndex("x")));
            // 읽어온 데이터를 adapter 용 구조체에 일단 추가
            recyclerViewItems.add(dataBean);
        }
        // 광고를 추가 하는 부분들
        addBannerAds();
        loadBannerAds();
        // recycleview 에 adapter 을 설정
        binding.listData.setAdapter(recyclerAdMobAdapter);
        // recycleview 의 모양을 리스트형태로 설정
        binding.listData.setLayoutManager(new LinearLayoutManager(getApplicationContext()));
    }

    .....

    // 광고 배너를 추가 하기.
    private void addBannerAds() {
        // ITEMS_PER_AD 는 상수선언을 통해서 광고가 반복될 간격을 정한 값
        for (int i = 0; i <= recyclerViewItems.size(); i += ITEMS_PER_AD) {
            final AdView adView = new AdView(MainActivity.this);
            adView.setAdSize(AdSize.BANNER);
            adView.setAdUnitId(getString(R.string.BANNER_ID));
            recyclerViewItems.add(i, adView);
        }
    }

    /**
     * 광고를 loading
     */
    private void loadBannerAds() {
        // Load the first banner ad in the items list (subsequent ads will be loaded automatically
        // in sequence).
        loadBannerAd(0);
    }

    /**
     * 광고를 loading
     */
    private void loadBannerAd(final int index) {

        if (index >= recyclerViewItems.size()) {
            return;
        }

        Object item = recyclerViewItems.get(index);
        if (!(item instanceof AdView)) {
            throw new ClassCastException("Expected item at index " + index + " to be a banner ad"
                    + " ad.");
        }

        final AdView adView = (AdView) item;

        // Set an AdListener on the AdView to wait for the previous banner ad
        // to finish loading before loading the next ad in the items list.
        adView.setAdListener(
                new AdListener() {
                    @Override
                    public void onAdLoaded() {
                        super.onAdLoaded();
                        // The previous banner ad loaded successfully, call this method again to
                        // load the next ad in the items list.
                        loadBannerAd(index + ITEMS_PER_AD);
                    }

                    @Override
                    public void onAdFailedToLoad(LoadAdError loadAdError) {
                        // The previous banner ad failed to load. Call this method again to load
                        // the next ad in the items list.
                        String error =
                                String.format(
                                        "domain: %s, code: %d, message: %s",
                                        loadAdError.getDomain(), loadAdError.getCode(), loadAdError.getMessage());
                        Log.e(
                                "MainActivity",
                                "The previous banner ad failed to load with error: "
                                        + error
                                        + ". Attempting to"
                                        + " load the next banner ad in the items list.");
                        loadBannerAd(index + ITEMS_PER_AD);
                    }
                });

        // Load the banner ad.
        adView.loadAd(new AdRequest.Builder().build());
    }
}
앞에서 말한 예제 소스에서 필요한 부분만 내가 만든 MainActivity 에 추가해 보았다. 이해를 하면 쉬워 보이기는 하는데, 일단 항목을 넣을 list 을 하다 선언하고 그 안에 데이터를 먼저 채운 다음 광고를 중간에 삽입 하는 그런 형식으로 추가가 되는 것으로 이해가 되었다. 실제 동작을 시켜 봐도 그렇게 이해가 될 수 있을 것 같다.
실행해 보니 대충 이해가 되는 모양이 되었다. 이것으로 또 하나 배움(?)을 전하며...
피드 구독하기:
글 (Atom)
