원본출처: 티스토리 바로가기
Compose을 활용한 앱을 구현하는 동안에 이전에 만들었던 layout 을 활용하고자 하는 경우가 생긴다면... Androind ViewBinding을 활용하는 방법이 있었다.
https://developer.android.com/jetpack/compose/interop/interop-apis?hl=ko
상호 운용성 API | Jetpack Compose | Android Developers
상호 운용성 API 앱에 Compose를 채택하는 동안 Compose와 뷰 기반 UI를 결합할 수 있습니다. 다음에는 Compose로의 전환을 보다 쉽게 할 수 있는 API, 권장사항 및 팁이 나와 있습니다. Android 뷰의 Compose
developer.android.com
구현을 시작해 보면, 먼저 gradle 파일에 implementation 을 추가해야 한다.
implementation "androidx.compose.ui:ui-viewbinding:$compose_version"다음은 채팅방 구현을 위해서 예전에 만들었던 코드에서 Recycleview 을 활용했던 layout을 가지고 왔다.
<?xml version="1.0" encoding="utf-8"?> <androidx.constraintlayout.widget.ConstraintLayout xmlns:android="http://schemas.android.com/apk/res/android" xmlns:app="http://schemas.android.com/apk/res-auto" xmlns:tools="http://schemas.android.com/tools" android:layout_width="match_parent" android:layout_height="match_parent" tools:context=".ChatRoomActivity"> <LinearLayout android:id="@+id/linearLayout2" android:layout_width="match_parent" android:layout_height="60dp" android:orientation="vertical" android:weightSum="5" app:layout_constraintStart_toStartOf="parent" app:layout_constraintTop_toTopOf="parent"> <LinearLayout android:layout_width="match_parent" android:layout_height="0dp" android:layout_weight="5" android:orientation="horizontal" android:weightSum="10"> <TextView android:id="@+id/textView11" android:layout_width="0dp" android:layout_height="match_parent" android:layout_weight="2" android:gravity="center_horizontal|center_vertical" android:text="현재시간" /> <TextClock android:id="@+id/textView10" android:layout_width="0dp" android:layout_height="match_parent" android:layout_weight="7" android:format12Hour="hh:mm" android:format24Hour="HH:mm" android:gravity="center_horizontal|center_vertical" /> </LinearLayout> </LinearLayout> <androidx.recyclerview.widget.RecyclerView android:id="@+id/rv" android:name="com.roopre.simpleboard.Fragment.ChatMsgFragment" android:layout_width="match_parent" android:layout_height="0dp" android:layout_marginStart="8dp" android:layout_marginEnd="8dp" app:layoutManager="LinearLayoutManager" app:layout_constraintBottom_toTopOf="@+id/linearLayout" app:layout_constraintEnd_toEndOf="parent" app:layout_constraintStart_toStartOf="parent" app:layout_constraintTop_toBottomOf="@+id/linearLayout2" tools:context=".Fragment.ChatMsgFragment" tools:listitem="@layout/custom_chat_msg" /> <LinearLayout android:id="@+id/linearLayout" android:layout_width="match_parent" android:layout_height="wrap_content" android:layout_marginStart="8dp" android:layout_marginEnd="8dp" android:layout_marginBottom="8dp" android:orientation="horizontal" app:layout_constraintBottom_toBottomOf="parent" app:layout_constraintEnd_toEndOf="parent" app:layout_constraintStart_toStartOf="parent"> <EditText android:id="@+id/content_et" android:layout_width="0dp" android:layout_height="match_parent" android:layout_weight="1" android:background="@drawable/bg_content_et" android:hint="메시지를 입력하세요." android:lines="1" android:maxLines="1" android:padding="8dp" /> <ImageView android:id="@+id/send_iv" android:layout_width="40dp" android:padding="2dp" android:layout_height="wrap_content" android:adjustViewBounds="true" android:src="@drawable/ic_send" /> </LinearLayout> </androidx.constraintlayout.widget.ConstraintLayout>
다음은 recycleview 에 들어갈 item layout은 다음과 같이 구현하였다.
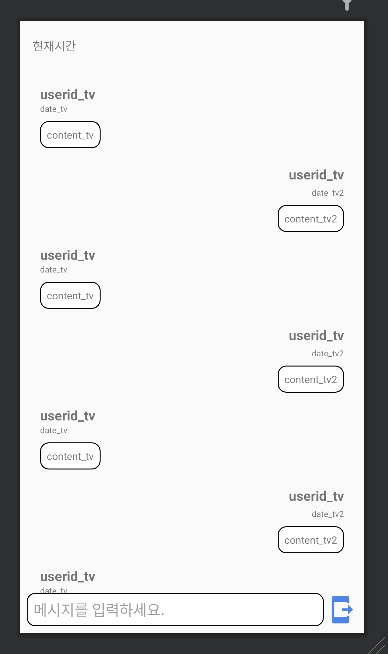
<?xml version="1.0" encoding="utf-8"?> <androidx.constraintlayout.widget.ConstraintLayout xmlns:android="http://schemas.android.com/apk/res/android" xmlns:app="http://schemas.android.com/apk/res-auto" xmlns:tools="http://schemas.android.com/tools" android:id="@+id/constraintLayout" android:layout_width="match_parent" android:layout_height="wrap_content"> <androidx.constraintlayout.widget.ConstraintLayout android:id="@+id/other_cl" android:layout_width="0dp" android:layout_height="wrap_content" app:layout_constraintBottom_toTopOf="@+id/my_cl" app:layout_constraintEnd_toEndOf="parent" app:layout_constraintStart_toStartOf="parent" app:layout_constraintTop_toTopOf="parent"> <TextView android:id="@+id/userid_tv" android:layout_width="wrap_content" android:layout_height="wrap_content" android:layout_marginStart="16dp" android:layout_marginTop="16dp" android:text="userid_tv" android:textSize="16sp" android:textStyle="bold" app:layout_constraintStart_toStartOf="parent" app:layout_constraintTop_toTopOf="parent" /> <TextView android:id="@+id/date_tv" android:layout_width="wrap_content" android:layout_height="wrap_content" android:text="date_tv" android:textSize="10sp" app:layout_constraintStart_toStartOf="@+id/userid_tv" app:layout_constraintTop_toBottomOf="@+id/userid_tv" /> <TextView android:id="@+id/content_tv" android:layout_width="wrap_content" android:layout_height="wrap_content" android:layout_marginTop="8dp" android:background="@drawable/bg_content_et" android:padding="8dp" android:text="content_tv" android:textSize="12sp" app:layout_constraintBottom_toBottomOf="parent" app:layout_constraintStart_toStartOf="@+id/date_tv" app:layout_constraintTop_toBottomOf="@+id/date_tv" /> </androidx.constraintlayout.widget.ConstraintLayout> <androidx.constraintlayout.widget.ConstraintLayout android:id="@+id/my_cl" android:layout_width="0dp" android:layout_height="wrap_content" app:layout_constraintBottom_toBottomOf="parent" app:layout_constraintEnd_toEndOf="parent" app:layout_constraintHorizontal_bias="1.0" app:layout_constraintStart_toStartOf="parent" app:layout_constraintTop_toBottomOf="@+id/other_cl"> <TextView android:id="@+id/userid_tv2" android:layout_width="wrap_content" android:layout_height="wrap_content" android:layout_marginTop="20dp" android:layout_marginEnd="16dp" android:text="userid_tv" android:textSize="16sp" android:textStyle="bold" app:layout_constraintEnd_toEndOf="parent" app:layout_constraintTop_toTopOf="parent" /> <TextView android:id="@+id/date_tv2" android:layout_width="wrap_content" android:layout_height="wrap_content" android:layout_marginTop="4dp" android:layout_marginEnd="16dp" android:text="date_tv2" android:textSize="10sp" app:layout_constraintEnd_toEndOf="parent" app:layout_constraintTop_toBottomOf="@+id/userid_tv2" /> <TextView android:id="@+id/content_tv2" android:layout_width="wrap_content" android:layout_height="wrap_content" android:layout_marginTop="8dp" android:layout_marginEnd="16dp" android:background="@drawable/bg_content_et" android:padding="8dp" android:text="content_tv2" android:textSize="12sp" app:layout_constraintBottom_toBottomOf="parent" app:layout_constraintEnd_toEndOf="parent" app:layout_constraintTop_toBottomOf="@+id/date_tv2" app:layout_constraintVertical_bias="0.0" /> </androidx.constraintlayout.widget.ConstraintLayout> </androidx.constraintlayout.widget.ConstraintLayout>
그리고 Recycleview 에 데이터를 넣고 구현하기 위해서 adapter을 구현하였다.
import android.util.Log; import android.view.LayoutInflater; import android.view.View; import android.view.ViewGroup; import android.widget.TextView; import androidx.compose.runtime.snapshots.SnapshotStateList; import androidx.constraintlayout.widget.ConstraintLayout; import androidx.recyclerview.widget.RecyclerView; import com.billcoreatech.multichat416.R; import org.jetbrains.annotations.NotNull; import java.util.ArrayList; public class ChatAdapter extends RecyclerView.Adapter<ChatAdapter.ViewHolder> { private static final String TAG = "ChatAdapter"; private final ArrayList<ChatMessage> chatMsgModels; String displayName ; public ChatAdapter( ArrayList<ChatMessage> items, String displayName) { this.chatMsgModels = items; this.displayName = displayName; } @Override public ViewHolder onCreateViewHolder(ViewGroup parent, int viewType) { View view = LayoutInflater.from(parent.getContext()) .inflate(R.layout.custom_chat_msg, parent, false); return new ViewHolder(view); } @Override public void onBindViewHolder(final ViewHolder holder, int position) { ChatMessage vo = chatMsgModels.get(position); try { Log.e(TAG, " userId=" + vo.getDisplayName()+ ": displayName=" + displayName) ; } catch (Exception e) { } if (vo.getDisplayName().equals(displayName)) { holder.other_cl.setVisibility(View.GONE); holder.my_cl.setVisibility(View.VISIBLE); holder.userid_tv2.setText(vo.getDisplayName()); holder.date_tv2.setText(vo.getCrtDtim()); holder.content_tv2.setText(vo.getContent()); }else { holder.other_cl.setVisibility(View.VISIBLE); holder.my_cl.setVisibility(View.GONE); holder.userid_tv.setText(vo.getDisplayName()); // userId 대신 nickName 으로 대체 holder.date_tv.setText(vo.getCrtDtim()); holder.content_tv.setText(vo.getContent()); } } @Override public int getItemCount() { return chatMsgModels.size(); } public class ViewHolder extends RecyclerView.ViewHolder { public ConstraintLayout my_cl, other_cl; public TextView userid_tv, date_tv, content_tv, userid_tv2, date_tv2, content_tv2; public ViewHolder(View view) { super(view); my_cl = view.findViewById(R.id.my_cl); other_cl = view.findViewById(R.id.other_cl); userid_tv = view.findViewById(R.id.userid_tv); date_tv = view.findViewById(R.id.date_tv); content_tv = view.findViewById(R.id.content_tv); userid_tv2 = view.findViewById(R.id.userid_tv2); date_tv2 = view.findViewById(R.id.date_tv2); content_tv2 = view.findViewById(R.id.content_tv2); // 2021.11.01 item 클릭 처리를 위해서 추가 itemView.setOnClickListener(new View.OnClickListener() { @Override public void onClick(View v) { int pos = getAdapterPosition() ; if (pos != RecyclerView.NO_POSITION) { // 리스너 객체의 메서드 호출. if (mListener != null) { mListener.onItemClick(v, pos) ; } } } }); } } // 2021.11.01 리스너 객체 참조를 저장하는 변수 private OnItemClickListener mListener = null ; // OnItemClickListener 리스너 객체 참조를 어댑터에 전달하는 메서드 public void setOnItemClickListener(OnItemClickListener listener) { this.mListener = listener ; } public interface OnItemClickListener { void onItemClick(View v, int position) ; } }
다음은 데이터를 넣기 위한 구조체는 다음 처럼 구현을 하였다.
data class ChatMessage( var displayName:String = "", var crtDtim:String = "", var content:String = "" )kotlin 으로 구현을 하면서 좋은 것은 source code 가 간소화된다는 것이다. java로 구현했다면 getter / setter을 다 넣어 주었어야 하겠지만, kotlin 으로 구현하다 보니 그럼 군더더기는 필요가 없게 되었다.
이번에는 채팅방 운영을 위한 activity code을 구현해 보았다.
import android.content.Intent import android.content.SharedPreferences import android.os.Bundle import android.util.Log import android.view.KeyEvent import android.view.KeyEvent.KEYCODE_ENTER import androidx.activity.ComponentActivity import androidx.activity.compose.setContent import androidx.activity.viewModels import androidx.compose.foundation.gestures.Orientation import androidx.compose.foundation.gestures.rememberScrollableState import androidx.compose.foundation.gestures.scrollable import androidx.compose.foundation.layout.* import androidx.compose.material.* import androidx.compose.material.icons.Icons import androidx.compose.material.icons.filled.Face import androidx.compose.material.icons.filled.Logout import androidx.compose.material.icons.filled.ManageAccounts import androidx.compose.runtime.* import androidx.compose.ui.Modifier import androidx.compose.ui.viewinterop.AndroidViewBinding import androidx.core.content.ContextCompat import com.billcoreatech.multichat416.databean.ChatAdapter import com.billcoreatech.multichat416.databean.ChatMessage import com.billcoreatech.multichat416.databean.ChatMessageViewModel import com.billcoreatech.multichat416.databinding.ActivityChatRoomBinding import com.billcoreatech.multichat416.ui.theme.MultiChat416Theme import com.google.firebase.auth.FirebaseAuth import com.google.firebase.auth.ktx.auth import com.google.firebase.database.ChildEventListener import com.google.firebase.database.DataSnapshot import com.google.firebase.database.DatabaseError import com.google.firebase.database.ktx.database import com.google.firebase.ktx.Firebase import java.text.SimpleDateFormat import java.util.* import kotlin.collections.ArrayList class ChatRoomActivity : ComponentActivity() { var TAG = "ChatRoomActivity" lateinit var displayName:String lateinit var auth: FirebaseAuth lateinit var sp: SharedPreferences lateinit var sdf:SimpleDateFormat private val database = Firebase.database private val chatMessages = database.getReference("ChatMessage") lateinit var df:SimpleDateFormat lateinit var chatId:String lateinit var startDt:String lateinit var adapter:ChatAdapter var chatMesgItems = ArrayList<ChatMessage>() private set lateinit var binding:ActivityChatRoomBinding override fun onCreate(savedInstanceState: Bundle?) { super.onCreate(savedInstanceState) auth = Firebase.auth sp = getSharedPreferences("MultiChat", MODE_PRIVATE) sdf = SimpleDateFormat("yyyyMMddHHmmss") df = SimpleDateFormat("yyyy-MM-dd HH:mm:ss") chatId = intent.getStringExtra("chatId") as String startDt = intent.getSerializableExtra("startDt") as String Log.e(TAG, "${startDt}") displayName = auth.currentUser?.displayName.toString() chatMesgItems.clear() adapter = ChatAdapter(chatMesgItems, displayName) binding = ActivityChatRoomBinding.inflate(layoutInflater) setContent { val isDarkTheme = remember { mutableStateOf(false) } if(isDarkTheme.value){ this.window.statusBarColor = ContextCompat.getColor(this, R.color.softBlack) }else{ this.window.statusBarColor = ContextCompat.getColor(this, R.color.softBlue) } MultiChat416Theme(darkTheme = isDarkTheme.value) { Scaffold(topBar = { ThemeAppBar(darkThemeState = isDarkTheme) }, modifier = Modifier.fillMaxSize() ) { innerPadding -> mainContent(Modifier.padding(innerPadding)) } } } } @Composable fun ThemeAppBar(darkThemeState: MutableState<Boolean>) { TopAppBar(title = { Row { Text(text = getString(R.string.app_name), modifier = Modifier.weight(8f)) Switch(checked = darkThemeState.value, onCheckedChange = { darkThemeState.value = it }, modifier = Modifier.weight(2f)) IconButton(onClick = { }) { Icon(imageVector = Icons.Default.Face, contentDescription = "ChatRoom") } IconButton(onClick = { doProfile() }) { Icon(imageVector = Icons.Default.ManageAccounts, contentDescription = "Profile") } IconButton(onClick = { doLogOut() }) { Icon(imageVector = Icons.Default.Logout, contentDescription = "LogOut") } } }) } private fun doProfile() { var intent = Intent(this@ChatRoomActivity, SettingActivity::class.java) startActivity(intent) } @Composable fun mainContent(padding: Modifier) { Box( Modifier .fillMaxWidth() .fillMaxHeight() .scrollable(rememberScrollableState { // view world deltas should be reflected in compose world // components that participate in nested scrolling it }, Orientation.Vertical) ) { // compose 에서 layout 을 binding 해서 사용하는 코드 구현... AndroidViewBinding(ActivityChatRoomBinding::inflate) { var binding = this chatMessages.child(chatId).orderByChild("crtDtim").startAfter(startDt.toString()) .addChildEventListener(object : ChildEventListener{ override fun onChildAdded(snapshot: DataSnapshot, previousChildName: String?) { Log.e(TAG, "onChildAdded") var chatMessageItem = snapshot.getValue(ChatMessage::class.java) // 왜 2번씩 들어가는지 모르겠지만... 일단은 한번만 들어가게 하기 위해서 if (chatMessageItem != null && chatMesgItems.indexOf(chatMessageItem) < 0) { chatMesgItems.add(chatMessageItem) } binding.rv.adapter = adapter binding.rv.scrollToPosition(chatMesgItems.size - 1) } override fun onChildChanged(snapshot: DataSnapshot, previousChildName: String?) { Log.e(TAG, "onChildChanged") } override fun onChildRemoved(snapshot: DataSnapshot) { Log.e(TAG, "onChildRemoved") } override fun onChildMoved(snapshot: DataSnapshot, previousChildName: String?) { Log.e(TAG, "onChildMoved") } override fun onCancelled(error: DatabaseError) { Log.e(TAG, "onCancelled") } }) this.sendIv.setOnClickListener { if (this.contentEt.text.length > 0) { var chatMessage = ChatMessage(displayName, df.format(GregorianCalendar.getInstance(TimeZone.getDefault()).timeInMillis),this.contentEt.text.toString() ) chatMessages.child(chatId).push().setValue(chatMessage).addOnSuccessListener { Log.e(TAG, "push Success...") }.addOnFailureListener { Log.e(TAG, "push Failure...") } } } } } } private fun doLogOut() { chatMessages.child(chatId).setValue(null) finish() } }
이렇게 구현을 해서 처리가 되기는 했지만, 아직 해소가 되지 않은 것은 내용을 입력 하면 realtime database에 기록이 되고, addChiledEventListener을 통해서 기록된 내용을 가져와서 recycleview에 표시를 하기 위해서 arryalist에 넣어 주는 구현을 하였는데, 입력은 1번인데 실제 표시는 2번씩 나오는 현상이 발생하였다. 아직 그 원인을 알지 못해 꼼수를 넣었다. arraylist에 이미 들어 있는 거면 넣지 않도록 하여 해소를 하였다.
구현된 화면 예시와 동작은 다음과 같이 처리가 되었다.

이렇게 까지 구현을 하면 compose 로 화면을 구현하고 예전에 만들었던 layout 을 가져와서 활용하는 것도 구현을 해 보았다.


![[엉클컴퍼니] 우리밀 찐빵/흑미찐빵/단호박찐빵/고구마찐빵 국산팥, 우리밀 고구마찐빵(20개입) 1300g 국산팥 우리밀](https://static.coupangcdn.com/image/affiliate/banner/345ad85c72716f54e24a8f6665da3dde@2x.jpg)


댓글
댓글 쓰기