원본출처: 티스토리 바로가기
Fcm 으로 메시지를 수신하는 예제들은 많이 찾아 볼 수 있으나, 보내는 건 ? 그것도 안드로이드 앱으로 그런 예제는 없는 것 같아서 정리를 해 보겠다. 다만, 전체를 다 정리하는 것이 아니라 꼭 필요한 부분만...
- MainActivity 에 아래 함수를 넣고 앱이 실행 되는 동안에 처리를 하자.
- 목적은 allDevices 라는 것은 나중에 메시지 전송을 할 때 사용할 Topic 이다.
subscribeToTopoc 을 이용해서 내가 구동하는 메시지중에서 해당 Topic 으로 전송되는 것을 구독(?)할 수 있도록 등록을 해 두는 것이다.
- 두번째 목적은 getToken 함수를 이용해서 특정앱에게만 메시지를 보내고자 할 떄 token 값으로 구분 하여 메시지 수신자를 지정하기 위함이다.
public void onRegistryToken() { FirebaseMessaging.getInstance().subscribeToTopic("allDevices") .addOnCompleteListener(new OnCompleteListener<Void>() { @Override public void onComplete(@NonNull Task<Void> task) { Log.e(TAG, "allDevices subscribed ..."); } }) .addOnFailureListener(new OnFailureListener() { @Override public void onFailure(@NonNull Exception e) { Toast.makeText(getApplicationContext(), getString(R.string.nonSyncTopic), Toast.LENGTH_LONG).show(); } }); FirebaseMessaging.getInstance().getToken() .addOnCompleteListener(new OnCompleteListener<String>() { @Override public void onComplete(@NonNull Task<String> task) { if (!task.isSuccessful()) { Log.w(TAG, "Fetching FCM registration token failed", task.getException()); return; } // Get new FCM registration token String token = task.getResult(); getRegistryPhoneNumber(token); } }); }
2. 다음은 Message 전송을 위한 함수 코드을 만들어 두는 것이다.
- 아래는 전체 코드이고 package 이름만 숨김했다.
package com.bill..............tils; import android.content.Context; import android.content.SharedPreferences; import android.content.res.AssetFileDescriptor; import android.content.res.AssetManager; import android.util.Log; import com.google.auth.oauth2.GoogleCredentials; import com.google.gson.Gson; import com.google.gson.GsonBuilder; import com.google.gson.JsonObject; import java.io.FileInputStream; import java.io.IOException; import java.io.InputStream; import java.io.OutputStreamWriter; import java.net.HttpURLConnection; import java.net.URL; import java.util.Arrays; import java.util.Scanner; /** Firebase 클라우드 메시징(FCM)을 사용하여 iOS, Android 및 웹의 클라이언트에 메시지를 보낼 수 있습니다. 이 샘플은 FCM을 사용하여 `news`를 구독하는 클라이언트에 두 가지 유형의 메시지를 보냅니다. 주제. 메시지의 한 유형은 단순 알림 메시지(디스플레이 메시지)입니다. 다른 하나는 플랫폼별 사용자 정의가 포함된 알림 메시지(알림 표시), 예를 들어, iOS 장치로 전송되는 메시지에 배지가 추가됩니다. */ public class Messaging { /** * project_id 는 firebase 에 등록한 나의 project ID */ private static final String PROJECT_ID = "my-application-f80fb"; private static final String BASE_URL = "https://fcm.googleapis.com"; private static final String FCM_SEND_ENDPOINT = "/v1/projects/" + PROJECT_ID + "/messages:send"; private static final String MESSAGING_SCOPE = "https://www.googleapis.com/auth/firebase.messaging"; private static final String[] SCOPES = { MESSAGING_SCOPE }; private static final String TAG = "FCM Messaging"; public static String TITLE = "FCM Notification"; public static String BODY = "Notification from FCM"; public static String URL = "https://billcorea.tistory.com"; public static String IMAGEURL = ""; public static final String MESSAGE_KEY = "message"; public static String tokenExam = "fIkVvZbATHu6Ilv1PNhp_8:APA91bG2q8MmfQvNqeP5afzKZRuLsTu1Mu6MVuYXuGlBhhgXZ3QGvP5EjoUBhVmmaBsT3CTKwKpUy5odRhzp5N46NB01txhxOFTUZnP8-LwnUovCx3hMGqNZtYW9jZ7FT-kCV37m7V2r"; Context context ; SharedPreferences sp ; public Messaging(Context context) { sp = context.getSharedPreferences(context.getPackageName(), Context.MODE_PRIVATE) ; this.context = context ; } /** FCM REST에 대한 요청을 승인하는 데 사용할 수 있는 유효한 액세스 토큰을 검색합니다. API. * * https://console.firebase.google.com/u/1/project/fcm.......40/settings/serviceaccounts/adminsdk * 이 url 에서 비공개생성키 을 클릭 해서 생성된 파일은 assets 폴더에 넣는다. * 파일 이름은 소문자로만 적용한다. (파일 이름이 너무 길면 줄이는 것이 좋다) * * @return Access token. * @throws IOException */ // [START retrieve_access_token] public String getAccessToken(Context context) throws IOException { AssetManager assetManager = context.getAssets(); AssetFileDescriptor fileDescriptor = assetManager.openFd("fcmdemo.json"); FileInputStream fileInputStream = fileDescriptor.createInputStream(); GoogleCredentials googleCredentials = GoogleCredentials .fromStream(fileInputStream) .createScoped(Arrays.asList(SCOPES)); return googleCredentials.refreshAccessToken().getTokenValue(); } // [END retrieve_access_token] /** * 검색 및 게시 모두에 사용할 수 있는 HttpURLConnection을 만듭니다. * * @return Base HttpURLConnection. * @throws IOException */ public HttpURLConnection getConnection(Context context) throws IOException { // [START use_access_token] URL url = new URL(BASE_URL + FCM_SEND_ENDPOINT); HttpURLConnection httpURLConnection = (HttpURLConnection) url.openConnection(); httpURLConnection.setRequestProperty("Authorization", "Bearer " + getAccessToken(context)); httpURLConnection.setRequestProperty("Content-Type", "application/json; UTF-8"); return httpURLConnection; // [END use_access_token] } /** HTTP를 사용하여 FCM 메시지에 요청을 보냅니다. UTF-8로 인코딩되고 특수 문자를 지원합니다. * * @param fcmMessage Body of the HTTP request. * @throws IOException */ public void sendMessage(JsonObject fcmMessage, Context context) throws IOException { HttpURLConnection connection = getConnection(context); connection.setDoOutput(true); OutputStreamWriter writer = new OutputStreamWriter(connection.getOutputStream(), "UTF-8"); writer.write(fcmMessage.toString()); writer.flush(); writer.close(); int responseCode = connection.getResponseCode(); if (responseCode == 200) { String response = inputstreamToString(connection.getInputStream()); Log.e(TAG, "Message sent to Firebase for delivery, response:"); Log.e(TAG, response); } else { Log.e(TAG, "Unable to send message to Firebase:"); String response = inputstreamToString(connection.getErrorStream()); Log.e(TAG, response); } } /** 공통 FCM 필드를 사용하여 모든 사용자에게 알림 메시지를 보내는 메시지를 보냅니다. 플랫폼. 또한 플랫폼별 재정의는 메시지가 표시되는 방식을 사용자 지정하는 데 사용됩니다. 안드로이드와 iOS에서 받았습니다. * * @throws IOException */ public void sendOverrideMessage() throws IOException { JsonObject overrideMessage = buildOverrideMessage(); Log.e(TAG, "FCM request body for override message:"); prettyPrint(overrideMessage); sendMessage(overrideMessage, context); } /** FCM 요청의 본문을 작성합니다. 이 본문은 공통 알림 개체를 정의합니다. android 및 apns 개체를 사용하는 플랫폼별 사용자 정의도 가능합니다. * * @return JSON representation of the FCM request body. */ public JsonObject buildOverrideMessage() { JsonObject jNotificationMessage = buildNotificationMessage(); JsonObject messagePayload = jNotificationMessage.get(MESSAGE_KEY).getAsJsonObject(); messagePayload.add("android", buildAndroidOverridePayload()); jNotificationMessage.add(MESSAGE_KEY, messagePayload); return jNotificationMessage; } /** * Android에서 메시지가 수신되는 방식을 사용자 지정하는 Android 페이로드를 빌드합니다. * * @return android payload of an FCM request. */ public JsonObject buildAndroidOverridePayload() { /** * 이부분은 notify 알림에 표시될 제목, 내용, 보여줄 이미지의 URL 경로 */ JsonObject androidNotification = new JsonObject(); androidNotification.addProperty("body", BODY); androidNotification.addProperty("title", TITLE); androidNotification.addProperty("image", IMAGEURL); /** * 사용자 viewAcitivy 로 전달할 내용 과 URL * * FcmReceiveService 에서 URL, BODY 을 읽어서 ViewActivity 로 전달함. */ JsonObject data = new JsonObject(); data.addProperty("URL", URL); data.addProperty("BODY", BODY); JsonObject androidNotificationPayload = new JsonObject(); androidNotificationPayload.add("notification", androidNotification); androidNotificationPayload.add("data", data); return androidNotificationPayload; } /** * iOS에서 메시지가 수신되는 방식을 사용자 지정하는 apns 페이로드를 빌드합니다. * * @return apns payload of an FCM request. */ public JsonObject buildApnsHeadersOverridePayload() { JsonObject apnsHeaders = new JsonObject(); apnsHeaders.addProperty("apns-priority", "10"); return apnsHeaders; } /** 전송되는 메시지에 배지 필드를 추가할 앱 페이로드를 빌드합니다. iOS 기기. * * @return JSON object with aps payload defined. */ public JsonObject buildApsOverridePayload() { JsonObject badgePayload = new JsonObject(); badgePayload.addProperty("badge", 1); JsonObject apsPayload = new JsonObject(); apsPayload.add("aps", badgePayload); return apsPayload; } /** * 등록된 장치에 전달하기 위해 FCM에 알림 메시지를 보냅니다. * * @throws IOException */ public void sendCommonMessage(Context context) throws IOException { JsonObject notificationMessage = buildNotificationMessage(); Log.e(TAG, "FCM request body for message using common notification object:"); prettyPrint(notificationMessage); sendMessage(notificationMessage, context); } /** * 알림 메시지 요청의 본문을 구성합니다. * * @return JSON of notification message. */ public JsonObject buildNotificationMessage() { /** * notify 알림에 사용할 제목과 내용 */ JsonObject jNotification = new JsonObject(); jNotification.addProperty("title", TITLE); jNotification.addProperty("body", BODY); JsonObject jMessage = new JsonObject(); if (sp.getBoolean("pushOne", false)) { jMessage.addProperty("token", tokenExam); } else { jMessage.addProperty("topic", "allDevices"); } jMessage.add("notification", jNotification); JsonObject jFcm = new JsonObject(); jFcm.add(MESSAGE_KEY, jMessage); return jFcm; } /** * InputStream의 내용을 String으로 읽습니다. * * @param inputStream InputStream to read. * @return String containing contents of InputStream. * @throws IOException */ public String inputstreamToString(InputStream inputStream) throws IOException { StringBuilder stringBuilder = new StringBuilder(); Scanner scanner = new Scanner(inputStream); while (scanner.hasNext()) { stringBuilder.append(scanner.nextLine()); } return stringBuilder.toString(); } /** * JsonObject를 예쁘게 인쇄하십시오. * * @param jsonObject JsonObject to pretty print. */ public void prettyPrint(JsonObject jsonObject) { Gson gson = new GsonBuilder().setPrettyPrinting().create(); Log.e(TAG, gson.toJson(jsonObject) + "\n"); } }
이 소스는 사실 구글링을 통해서 github 에서 퍼온 자료인데, 한국어 번역만 구글 번역을 통해서 해 보았다.
이 소스에서 봐야할 부분은
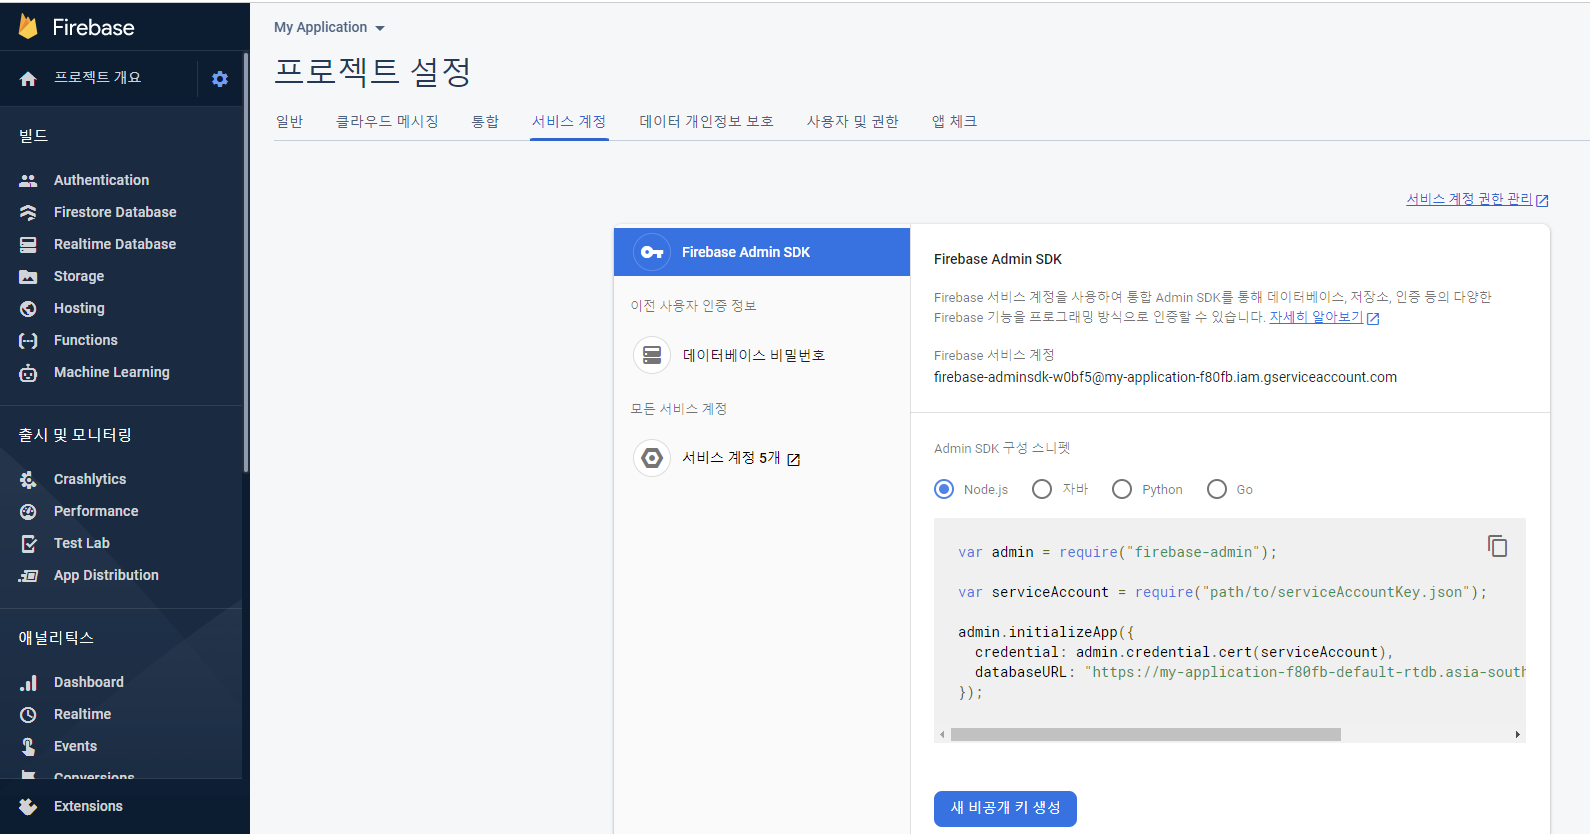
- 서버인증을 위한 부분 인데... 여기서 중요한 것은 assetManager 의 자원을 가져오는 것이다. fcmdemo.json 이라고 적었는데, 그것은 firebase 의 프로젝트 설정에서 얻어온다. 이것을 얻어와서 저장을 하는 것은 FCM 전송을 위한 서버 구현을 하기 위해서는 FCM 에 인증을 받아야 하는데, 개발가이드를 보면 서버에 보내고 받고 하는 과정이 있어야 한다고 되어 있기도 하지만, 아래 함수를 이용해서 token 을 받아오면 서버 인증절차가 한번에 해소가 되는 것을 확인하였다.
public String getAccessToken(Context context) throws IOException { AssetManager assetManager = context.getAssets(); AssetFileDescriptor fileDescriptor = assetManager.openFd("fcmdemo.json"); FileInputStream fileInputStream = fileDescriptor.createInputStream(); GoogleCredentials googleCredentials = GoogleCredentials .fromStream(fileInputStream) .createScoped(Arrays.asList(SCOPES)); return googleCredentials.refreshAccessToken().getTokenValue(); }내 앱을 사용하기 위해서 구성한 firebase 의 프로젝트 설정에 보면 서비스 계정 이라고 있는데, 그곳에 보면 새 비공개키 생성이라고 버튼이 있다. 그 버튼을 클릭하면 기~인 이름의 json 파일 하나를 만들어 준다. 그럼 그것을 이름을 줄여서 저장하고.
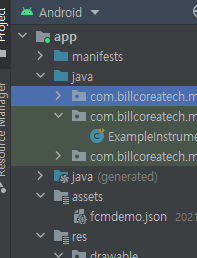
내 앱 프로젝트에 assets 으로 넣어준다. 그런데, 여기서 하나 걸리는 부분이 그냥 넣어주고 빌드해 실행해 보면 오류가 발생한다.

json 파일이 들어 있는데, 찾을 수 없다는 것이다. 왜 ? 빌드를 하면 압축(?)을 하나 보다. 그래서 json 파일을 제대로 읽어서 처리를 할 수 없는 것이다. 그래서 앱의 gradle 설정에 다음과 같이 추가 하였다.
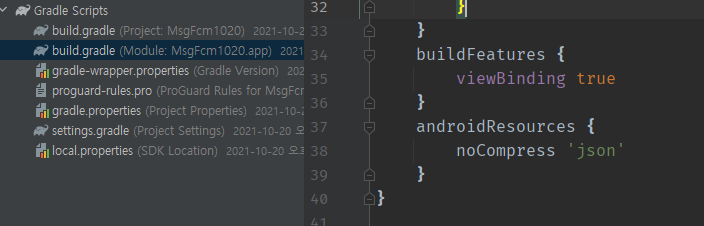
resources 는 noCompress 'json' 이라고... 압축을 하지 말라는 옵션이러니...
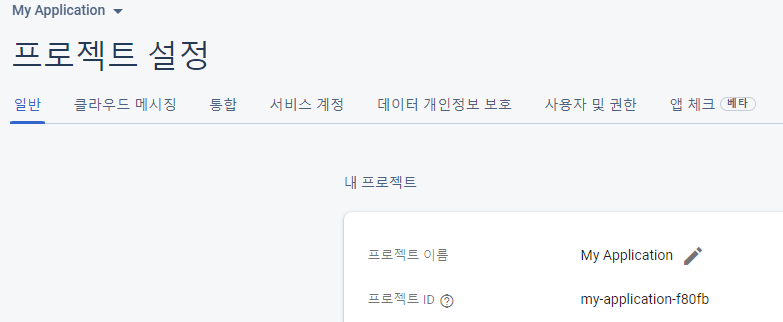
- 그 다음은 상수로 선언된 project-id : 이것은 나의 프로젝트 일반에 있는 것을 가져다 적는다.
/** * project_id 는 firebase 에 등록한 나의 project ID */ private static final String PROJECT_ID = "my-application-f80fb";
그리고 인증을 하기 위해서는 HttpURLConnection 을 이용하고 있기 때문이기도 하지만, manifest 에 user-permission 을 설정해 주는 것도 있지는 말아야겠다.

다음은 메세지를 보내는 함수 부분인데, 난 android 로만 메시지를 전송할 것이라서 buildAndroidOverridePayload함수만 사용한다. 그리고 그안에서 전달하고자 하는 파라미터등을 설정한다. body, title, image, URL, BODY 을 key로 설정해서 전달하고자 하는 값을 넣어 준다. 값을 global 변수를 이용해서 넣을 수 도 있고... 뭐 암튼...
/** FCM 요청의 본문을 작성합니다. 이 본문은 공통 알림 개체를 정의합니다. android 및 apns 개체를 사용하는 플랫폼별 사용자 정의도 가능합니다. * * @return JSON representation of the FCM request body. */ public JsonObject buildOverrideMessage() { JsonObject jNotificationMessage = buildNotificationMessage(); JsonObject messagePayload = jNotificationMessage.get(MESSAGE_KEY).getAsJsonObject(); messagePayload.add("android", buildAndroidOverridePayload()); jNotificationMessage.add(MESSAGE_KEY, messagePayload); return jNotificationMessage; } /** * Android에서 메시지가 수신되는 방식을 사용자 지정하는 Android 페이로드를 빌드합니다. * * @return android payload of an FCM request. */ public JsonObject buildAndroidOverridePayload() { /** * 이부분은 notify 알림에 표시될 제목, 내용, 보여줄 이미지의 URL 경로 */ JsonObject androidNotification = new JsonObject(); androidNotification.addProperty("body", BODY); androidNotification.addProperty("title", TITLE); androidNotification.addProperty("image", IMAGEURL); /** * 사용자 viewAcitivy 로 전달할 내용 과 URL * * FcmReceiveService 에서 URL, BODY 을 읽어서 ViewActivity 로 전달함. */ JsonObject data = new JsonObject(); data.addProperty("URL", URL); data.addProperty("BODY", BODY); JsonObject androidNotificationPayload = new JsonObject(); androidNotificationPayload.add("notification", androidNotification); androidNotificationPayload.add("data", data); return androidNotificationPayload; }
그럼 메시지 수신을 하는 FcmReceiveService 을 잠깐 살펴 보자. onMessageReceived 부분을 보면 payload 에서 들어간 내용 URL, BODY 이런 것들이 키로 수신이 되는 것을 볼 수 있다. 그래서 그것을 저정하거나 해서 잘 활용하면
수신된 메시지를 나의 앱으로 전달하는 방법으로 처리를 할 수 있을 것이다.
package com.bil.......................tils; import android.app.NotificationChannel; import android.app.NotificationManager; import android.app.PendingIntent; import android.content.Context; import android.content.Intent; import android.content.SharedPreferences; import android.graphics.Color; import android.media.RingtoneManager; import android.net.Uri; import android.os.Build; import android.os.Bundle; import android.util.Log; import androidx.core.app.NotificationCompat; import androidx.core.app.NotificationManagerCompat; import com.billcoreatech.msgfcm1020.MainActivity; import com.billcoreatech.msgfcm1020.R; import com.billcoreatech.msgfcm1020.ViewActivity; import com.google.firebase.messaging.FirebaseMessagingService; import com.google.firebase.messaging.RemoteMessage; import java.util.Map; public class FcmReceiveService extends FirebaseMessagingService { private static final String TAG = "FcmReceiveService"; SharedPreferences sp ; SharedPreferences.Editor editor ; @Override public void onMessageReceived(RemoteMessage remoteMessage) { // TODO(developer): Handle FCM messages here. // 여기에 메시지가 수신되지 않습니까? 이것이 가능한 이유를 참조하십시오 : https://goo.gl/39bRNJ Log.e(TAG, "From: " + remoteMessage.getFrom()); // 메시지에 데이터 페이로드가 포함되어 있는지 확인하십시오. if (remoteMessage.getData().size() > 0) { Log.e(TAG, "Message data payload: " + remoteMessage.getData()); sp = getSharedPreferences(getPackageName(), MODE_PRIVATE); editor = sp.edit() ; Map<String, String> strMap = remoteMessage.getData(); Log.e(TAG, "URL=" + strMap.get("URL")); Log.e(TAG, "BODY=" + strMap.get("BODY")); editor.putString("URL", strMap.get("URL").contains("http") ? strMap.get("URL") : "https://" + strMap.get("URL")); editor.putString("BODY", strMap.get("BODY")); editor.putBoolean("FcmTy", true) ; editor.commit(); handleNow(); } // 메시지에 알림 페이로드가 포함되어 있는지 확인합니다. if (remoteMessage.getNotification() != null) { Log.e(TAG, "Message Notification Body: " + remoteMessage.getNotification().getBody()); sendNotification(remoteMessage.getNotification().getTitle(), remoteMessage.getNotification().getBody()) ; } onDeletedMessages(); } // [END receive_message] @Override public void onNewToken(String token) { Log.e(TAG, "Refreshed token: " + token); // If you want to send messages to this application instance or // manage this apps subscriptions on the server side, send the // FCM registration token to your app server. sendRegistrationToServer(token); } // [END on_new_token] /** * BroadcastReceivers에 할당된 시간을 처리합니다. */ private void handleNow() { Log.d(TAG, "Short lived task is done."); Intent intent = new Intent(FcmReceiveService.this, ViewActivity.class); intent.addFlags(Intent.FLAG_ACTIVITY_NEW_TASK); startActivity(intent); } /** 타사 서버에 토큰을 유지합니다. 이 방법을 수정하여 사용자의 FCM 등록 토큰을 임의의 애플리케이션에서 유지 관리하는 서버 측 계정. * * @param token The new token. */ private void sendRegistrationToServer(String token) { // TODO: Implement this method to send token to your app server. } /** * 수신된 FCM 메시지가 포함된 간단한 알림을 만들고 표시합니다. * * @param messageBody FCM message body received. */ private void sendNotification(String msgTitle, String messageBody) { sp = getSharedPreferences(getPackageName(), MODE_PRIVATE); editor = sp.edit() ; editor.putString("BODY", messageBody); editor.putBoolean("FcmTy", true) ; editor.commit(); Log.e(TAG, "---------------------------------------------------------------------"); Bundle bundle = new Bundle(); bundle.putString("TITLE", msgTitle); bundle.putString("BODY", messageBody); Intent notifyIntent = new Intent(this, MainActivity.class); notifyIntent.putExtras(bundle); // Set the Activity to start in a new, empty task notifyIntent.setFlags(Intent.FLAG_ACTIVITY_NEW_TASK | Intent.FLAG_ACTIVITY_CLEAR_TASK); PendingIntent notifyPendingIntent = PendingIntent.getActivity( this, 0, notifyIntent, PendingIntent.FLAG_UPDATE_CURRENT ); String channelId = getString(R.string.default_notification_channel_id); CharSequence channelName = getString(R.string.default_notification_channel_name); Uri defaultSoundUri = RingtoneManager.getDefaultUri(RingtoneManager.TYPE_NOTIFICATION); NotificationCompat.Builder builder = new NotificationCompat.Builder(this, channelId); builder.setContentIntent(notifyPendingIntent) .setSmallIcon(R.drawable.ic_launcher_foreground) .setContentTitle(getString(R.string.fcm_message)) .setContentText(messageBody) .setAutoCancel(true) .setSound(defaultSoundUri); NotificationManagerCompat notificationManager = NotificationManagerCompat.from(this); if (Build.VERSION.SDK_INT >= Build.VERSION_CODES.O) { NotificationChannel channel = new NotificationChannel(channelId, "Channel human readable title", NotificationManager.IMPORTANCE_HIGH); channel.enableLights(true); channel.enableVibration(true); channel.setLightColor(Color.BLUE); channel.setVibrationPattern(new long[]{100, 200, 300, 400, 500, 400, 300, 200, 400}); notificationManager.createNotificationChannel(channel); } notificationManager.notify(Integer.parseInt(getString(R.string.default_notification_channel_id)), builder.build()); } }
수신된 알림이 notification 으로 저장이 되는 경우, 사용자는 알림창에 나와 있는 알림을 클릭했을 때 내 앱이 실행 되면서 그 내용을 확인할 수 있을 것이다. 알려야 하는 내용을 전달하는 방법은 메시지만 전달하거나, 미리 전달할 내용을 realtimedatabase 등에 저장해 두었다가, 확인해 볼 수 있도록 앱을 구성해 볼 수 있을 것 같다.
알림 수신을 위한 FcmReceiveService는 manifest 에 service 로 등록해 주면 된다. 이런 부분들은 구글링을 해 보면 많이 나오고 해서 추가 설명은 생략해 보겠다.
<meta-data android:name="com.google.firebase.messaging.default_notification_icon" android:resource="@drawable/ic_launcher_foreground" /> <meta-data android:name="com.google.firebase.messaging.default_notification_color" android:resource="@color/purple_500" /> <meta-data android:name="com.google.firebase.messaging.default_notification_channel_id" android:value="@string/default_notification_channel_id" /> <service android:name=".FcmUtils.FcmReceiveService" android:exported="true"> <intent-filter> <action android:name="com.google.firebase.MESSAGING_EVENT" /> </intent-filter> </service>
3. MainActivity 에서 메시지 전송을 구현해 보자...
아래 소스 처럼 필요한 부분만 살펴 보도록 하겠다.
package co.......................020; import android.Manifest; import android.annotation.SuppressLint; import android.app.NotificationChannel; import android.app.NotificationManager; import android.content.Context; import android.content.DialogInterface; import android.content.Intent; import android.content.SharedPreferences; import android.content.pm.PackageManager; import android.net.Uri; import android.os.Build; import android.os.Bundle; import android.provider.Settings; import android.telephony.TelephonyManager; import android.util.Log; import android.view.View; import android.widget.AdapterView; import android.widget.CompoundButton; import android.widget.Toast; import androidx.annotation.NonNull; import androidx.appcompat.app.AlertDialog; ........ import java.io.IOException; import java.util.ArrayList; import java.util.Set; public class MainActivity extends AppCompatActivity { private static final String TAG = "MainActivity"; ...... String strFCM = "" ; @Override protected void onCreate(Bundle savedInstanceState) { super.onCreate(savedInstanceState); binding = ActivityMainBinding.inflate(getLayoutInflater()); setContentView(binding.getRoot()); Intent intent = getIntent(); Bundle extras = intent.getExtras(); # FcmreceiveService 에서 extra 로 전달하면 그 값을 확인하기 위해서 추가 if (extras != null) { Log.e(TAG, "===" + extras.getString("BODY")); ..... } # 안드로이드 버전이후 에서는 channel ID 을 설정해 주어야 한다. if (Build.VERSION.SDK_INT >= Build.VERSION_CODES.O) { // Create channel to show notifications. String channelId = getString(R.string.default_notification_channel_id); String channelName = getString(R.string.default_notification_channel_name); NotificationManager notificationManager = getSystemService(NotificationManager.class); notificationManager.createNotificationChannel(new NotificationChannel(channelId, channelName, NotificationManager.IMPORTANCE_LOW)); } } @Override protected void onStart() { super.onStart(); ... binding.btnSend.setOnClickListener(new View.OnClickListener() { @Override public void onClick(View view) { if (sp.getBoolean("pushOne", false) && getChkCnt(userInfos) < 1) { Toast.makeText(getApplicationContext(), getString(R.string.msgCheckOnlyOne), Toast.LENGTH_LONG).show(); return; } pushBinding = PushentryBinding.inflate(getLayoutInflater()); pushBinding.edURL.setText("billcorea.tistory.com"); pushBinding.edMesg.setText("test send messages "); AlertDialog.Builder builder = new AlertDialog.Builder(MainActivity.this, R.style.myDialog); builder.setTitle(getString(R.string.pushTitle)) .setMessage(getString(R.string.msgPushMessages)) .setView(pushBinding.getRoot()) .setPositiveButton(getString(R.string.OK), new DialogInterface.OnClickListener() { @Override public void onClick(DialogInterface dialog, int which) { # 메시지 전송을 위한 호출 SendNotify(pushBinding.edMesg.getText().toString(), pushBinding.edURL.getText().toString()) ; } }) .setNegativeButton(getString(R.string.CANCEL), null); AlertDialog dialog = builder.create(); dialog.show(); } }); } /** * 전송할 메시지와 url 을 입력 받아옴. fragment 에서 개인/전체 발송 구분은 선택해서 sp 에 저장 되어 있다고 봄 * @param msg * @param url */ private void SendNotify(String msg, String url) { # 쓰레드을 사용하는 건 http 전송을 하기 때문에... new Thread(() -> { Messaging messaging = new Messaging(getApplicationContext()); # 전송하고 싶은 값들을 여기서 선언해 준다. # 추가가 필요하면 Message class 에 선언해 주면서 추가 하면됨. messaging.TITLE = getString(R.string.app_name) ; messaging.BODY = msg ; messaging.URL = url ; Log.e(TAG, "Send Messages " + msg); Log.e(TAG, "pushOne=" + sp.getBoolean("pushOne", false)); Log.e(TAG, "pushAll=" + sp.getBoolean("pushAll", false)); Log.e(TAG, "userInfo=" + userInfo.getUserToken()); if (sp.getBoolean("pushOne", false)) { if (userInfo == null) { Toast.makeText(getApplicationContext(), getString(R.string.nonSelectUser), Toast.LENGTH_LONG).show(); return ; } if (!userInfo.isUseTy()) { Toast.makeText(getApplicationContext(), getString(R.string.nonSelectUser), Toast.LENGTH_LONG).show(); return ; } /** * 개인에게 만 전송할 떄 : 미리 수집된 token 값으로 전달하고 */ messaging.tokenExam = userInfo.getUserToken() ; try { messaging.sendOverrideMessage(); } catch (IOException e) { e.printStackTrace(); } } else { /** * 전체에게 전송할 떄 : 앱 실행시 구독설정한 topic 으로 전송을 하게 됨 */ try { messaging.sendOverrideMessage(); } catch (IOException e) { e.printStackTrace(); } } }).start(); } # 토근 얻어오기 및 구독 설정 하기 public void onRegistryToken() { FirebaseMessaging.getInstance().subscribeToTopic("allDevices") .addOnCompleteListener(new OnCompleteListener<Void>() { @Override public void onComplete(@NonNull Task<Void> task) { Log.e(TAG, "allDevices subscribed ..."); } }) .addOnFailureListener(new OnFailureListener() { @Override public void onFailure(@NonNull Exception e) { Toast.makeText(getApplicationContext(), getString(R.string.nonSyncTopic), Toast.LENGTH_LONG).show(); } }); FirebaseMessaging.getInstance().getToken() .addOnCompleteListener(new OnCompleteListener<String>() { @Override public void onComplete(@NonNull Task<String> task) { if (!task.isSuccessful()) { Log.w(TAG, "Fetching FCM registration token failed", task.getException()); return; } // Get new FCM registration token String token = task.getResult(); getRegistryPhoneNumber(token); } }); } }처음에 보았던 client 토큰 값을 이용해서 개별에게 전달을 하거나, 구독 설정한 topic 을 통해서 전체 전달을 할 수 있다.
여기서 중요한 것은 개별 전송을 위한 token 을 메시지를 보내는 쪽에서 알아야 한다는 것인데, 그걸 해소하기 위해서는 추천하는 방법으로는 realtime database 에 저장을 해서 공유하는 방법이 실시간으로 데이터를 공유할 수 있지 않을 까 생각이 든다. 관리자는 모든 사용자의 token 값을 알고 있어야 하고, 서로 모르는 상대방에게 메시지를 보낸다면 특정인의 token을 알 수 있는 방법이 있어야 하기 떄문이다 .
p.s : 2021.11.15 오늘 공개할 python 이야기도 잠시 참고해 보시길.
https://billcoreapython.tistory.com/29
댓글
댓글 쓰기