2026/02/13

오늘의 이야기

2021.03.29 - [분류 전체보기] - 작업일정관리 사용자 설명서 (한국어판)


작업일정관리 사용자 설명서 (한국어판)


이 앱은 작은 정비업소등에서 사용할 수 있도록 개발된 앱입니다. 1. 이앱은 5가지 정도의 공정을 가지고 있는 정비업소에서 각 공정별로 입고되는 수리대상 품목(이하 수리차량이라 명칭)을 입


billcorea.tistory.com


This app is an app developed to be used in small maintenance shops.


1 This app supports the management of items subject to repair (hereinafter referred to as repair vehicles) that are worn by each process at a maintenance business that has about 5 processes, and manages them according to classifications such as painting, lower part, sheet metal, and inspection. It is an app to do.
2. Since the data is based on the Firebase Realtime Database, you can share real-time work status.
3. The user can use it for a certain period of time free of charge to determine whether or not to apply the business, and if he/she wants to continue using it, he/she can maintain the use through a monthly payment. (The administrator manages the backup with regular payment income if the data needs to be backed up.)
4. In this app, user management is based on the Google account email, but the user's email account is used only for user verification, and it is not allowed to be provided to the outside. (When registering a user, you can use an alias for the user name.)
5. The e-mail account used for initial registration is used as the account of the data manager, so please enter it carefully. If you delete the app later, if you re-register the user e-mail account, the existing data may be lost, so remember the administrator e-mail account well. Must be. (If necessary, upon request, we can inform you after confirmation.)
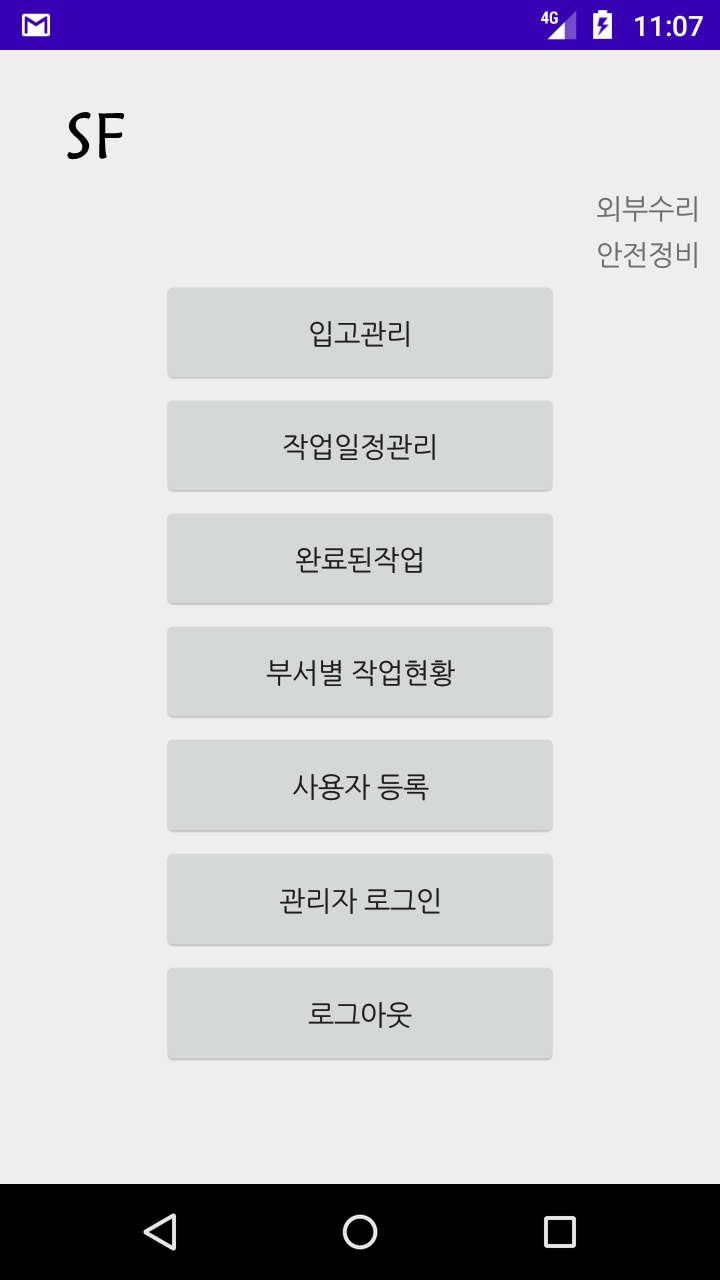
As shown in the screen above, if you enter the administrator's e-mail account and the user's company name during initial execution, it will be displayed on the screen.
The basic menu composition of this app is as follows.


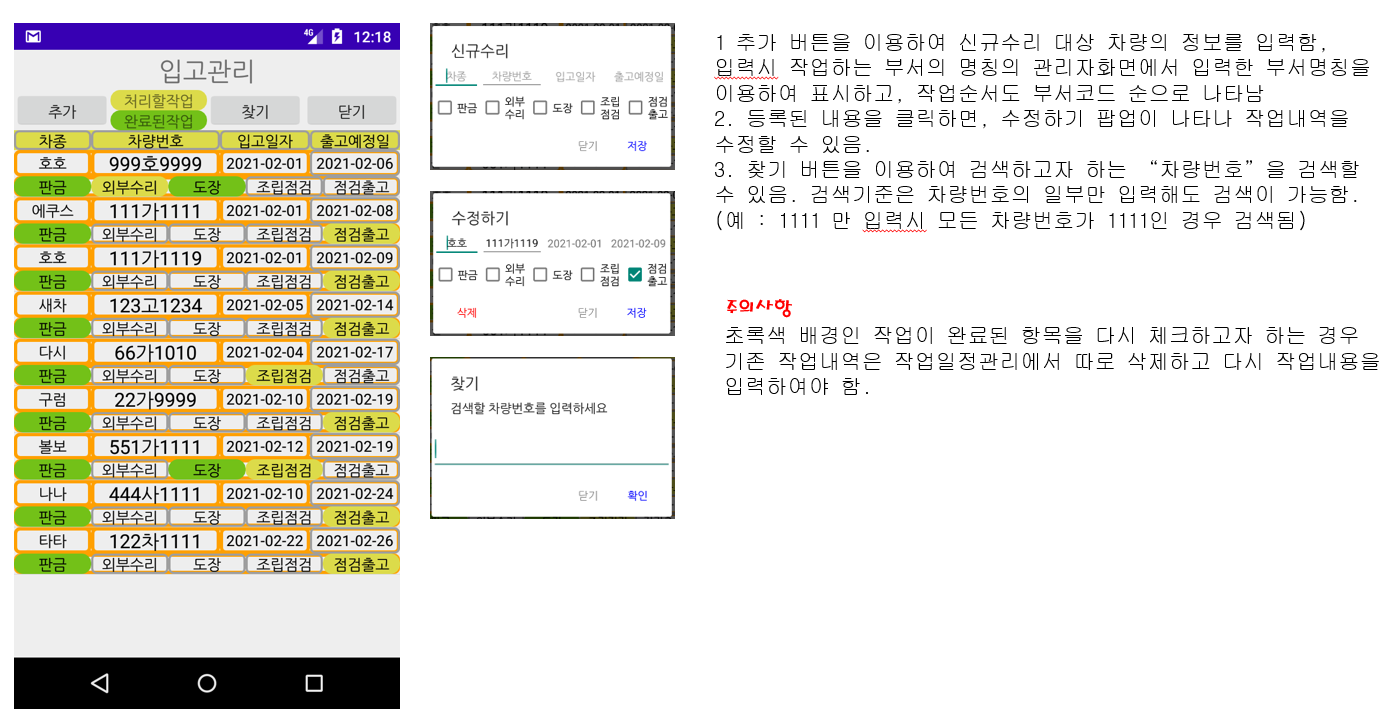
1. Receipt management: New vehicle registration screen
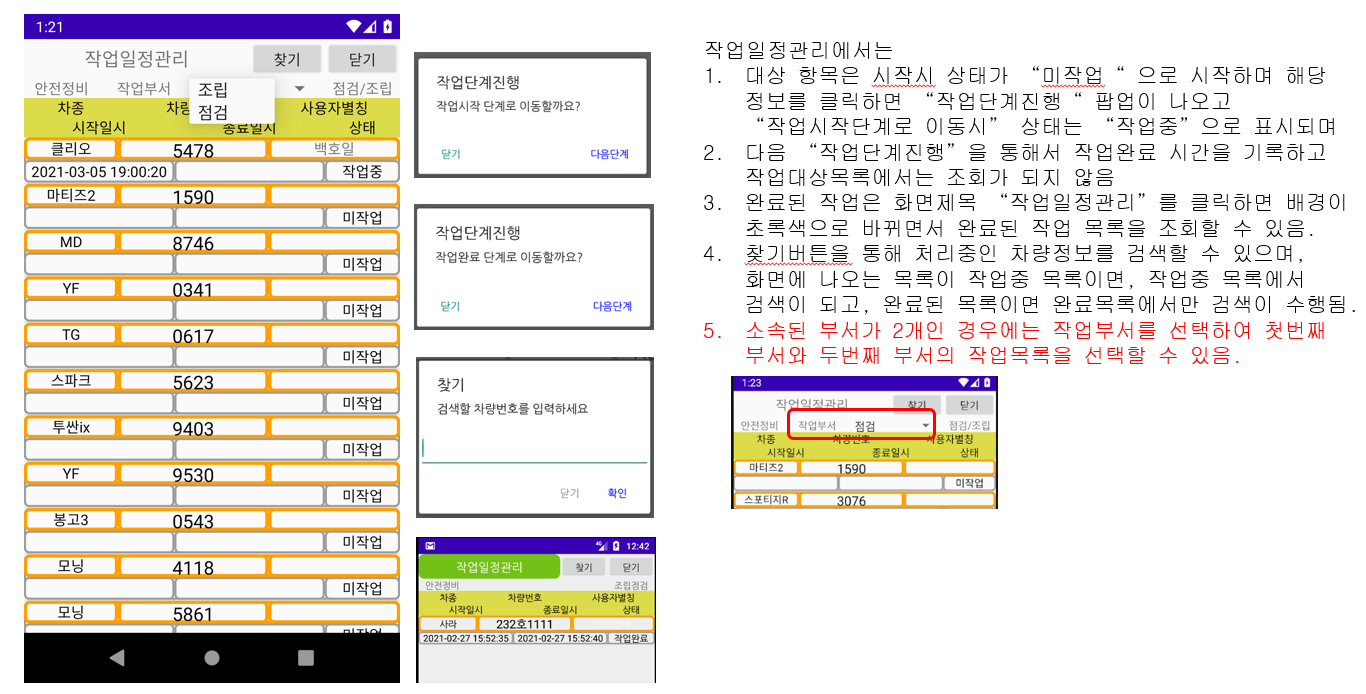
2. Work schedule management: Search the list of work targets by department and register the progress of work steps
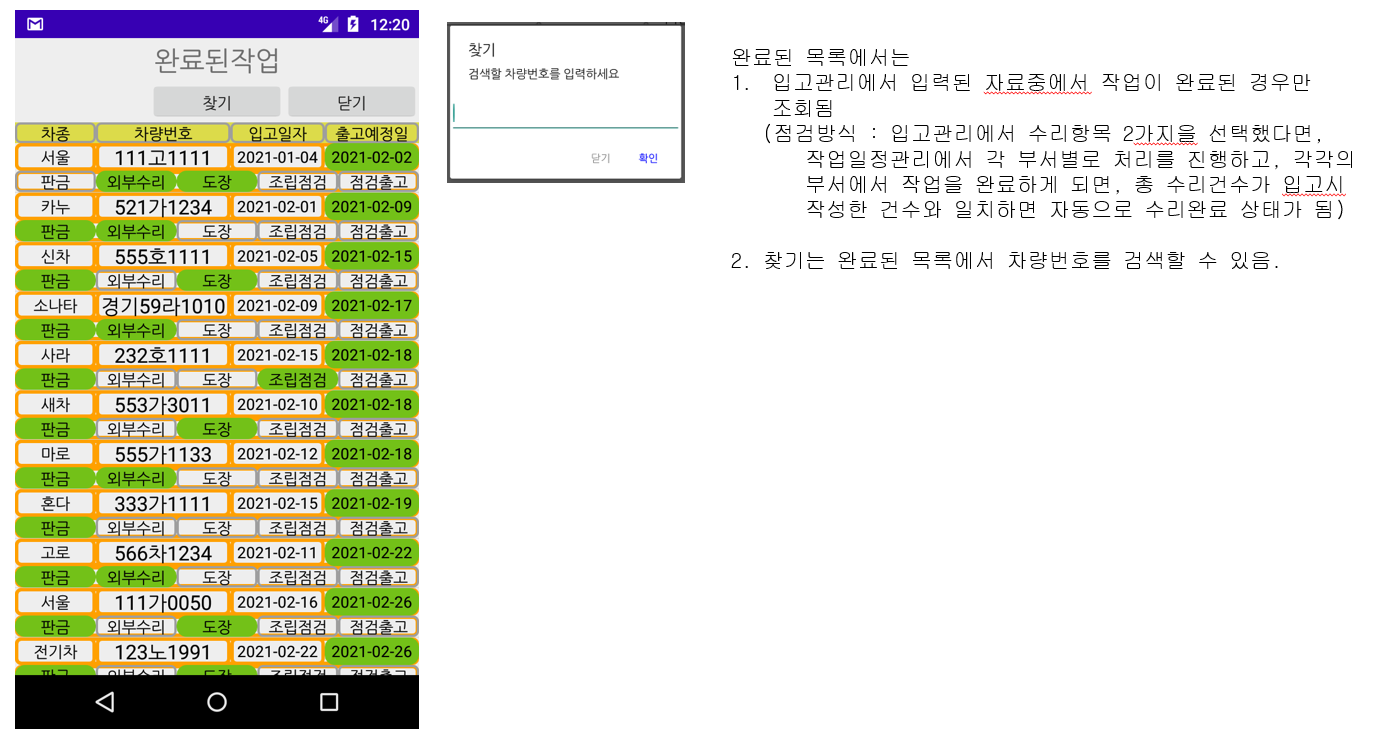
3.Completed work: Search for completed targets from the work target list registered in warehousing management
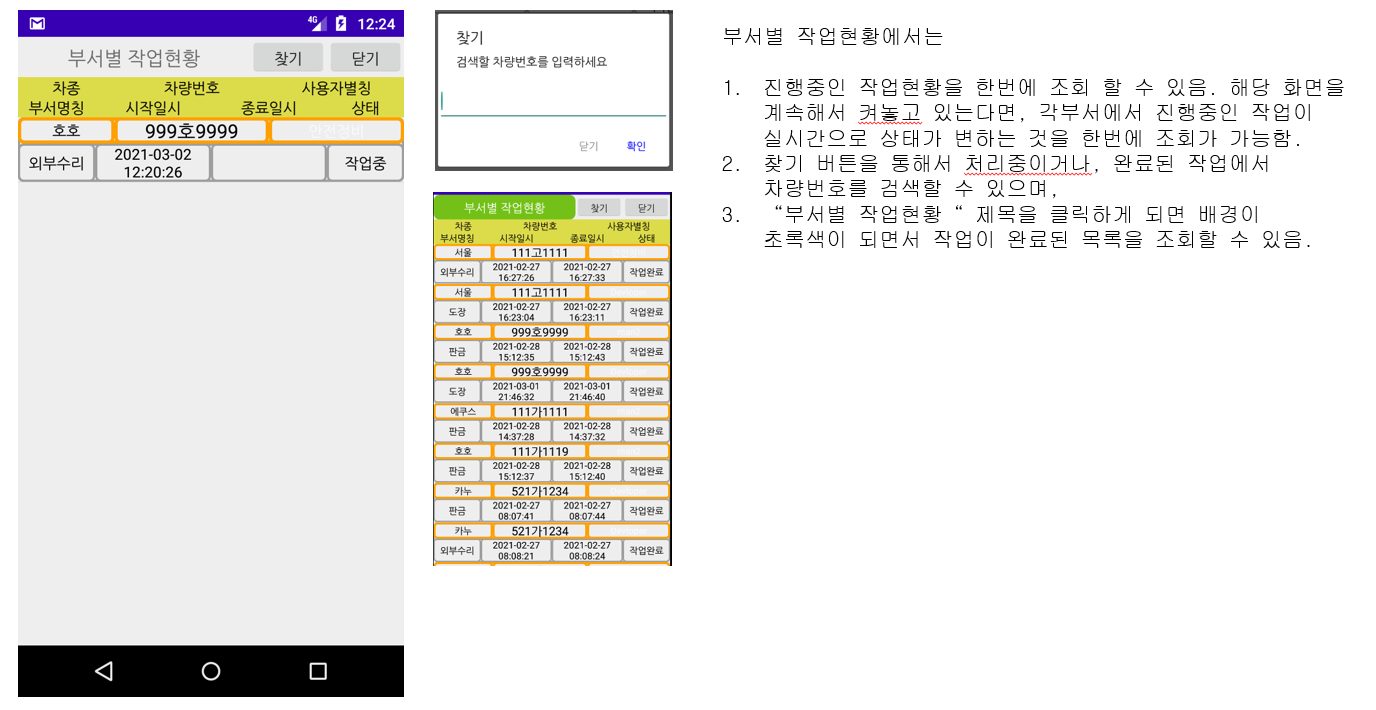
4. Job status by department: Inquiry of job status by department and list of completed jobs by department
5. User registration: Approval processing for users logged in with Google account and change of the user's department
6. Administrator login: Administrators can only use the account designated by default, and manage department codes and names.
7. Logout: Log out of this app and close the app
After login is completed using your Google account,
As shown in the following figure
If you select Administrator Login on the menu screen,


1. A Google login button appears, and login starts with the Google account you are using.
2. From the next time, you can select a registered account.
3. Only when logged in as an administrator
   * Yellow background appears in email and user alias
   * Save button is activated (If you are not an administrator, the save button is disabled)
4. You can add the department code by clicking the Add button, and the order of registration here
   Since the work list is organized to match with, the department code
   Must be registered by granting (Code value is not important, but if possible
    It is given so that the order can be sorted using numbers)
5. When modifying the department code, click the column with the corresponding code to modify the department.
   The screen appears.
After the user registration screen is switched through Google login,


1. User alias can be entered and saved, and departments can be selected, and the department name entered from the department name appears on the administrator screen.


2. You can choose to save or delete. (If you delete it, you will be logged out, so you need to log in again to save the user information)


3. Up to 2 department codes can be selected, and the second department must be blank if not selected.


4. When a user is saved, it is displayed on a gray background as shown in the figure below. In this case, the administrator must click the user on the screen and approve it to process the work.
5. In the case of an approved user, the approval can be canceled by selecting as shown in the left figure. Upon cancellation of approval, it should be checked whether the background is gray.


The order of business processing is
1. Registration of new vehicle information in stock management management


2. Work schedule management manages the work schedule for each department using the department code information of the logged-in user for each department.
(If you click a work target in the list, it proceeds to the next step, and the completed work disappears from the list)


3. In the completed work, depending on the number of repair parts selected at the time of initial registration on the warehousing management screen, when the work is completed, it disappears from warehousing management and information of the vehicle is displayed only in the completed work.


4. The work status of each department can be checked in real time when each department starts work.


If you are curious or need improvement, please let us know by e-mail and we will improve it.


6k2emg@gmail.com.


Thank You !!!


오늘의 이야기


#스하리1000명프로젝트,
韓国で迷子になりましたか?韓国語が話せなくても、このアプリを使えば簡単に移動できます。
あなたの言語で話すだけで、翻訳、検索が行われ、結果があなたの言語で表示されます。
旅行者に最適!英語、日本語、中国語、ベトナム語などを含む 10 以上の言語をサポートします。
今すぐ試してみましょう!
https://play.google.com/store/apps/details?id=com.billcoreatech.opdgang1127


2026/02/12

오늘의 이야기


이 앱은  작은 정비업소등에서 사용할 수 있도록 개발된 앱입니다.


1. 이앱은 5가지 정도의 공정을 가지고 있는 정비업소에서 각 공정별로 입고되는 수리대상 품목(이하 수리차량이라 명칭)을 입고, 도장, 하부, 판금, 점검 등의 구분에 따라 관리할 수 있도록 지원하는 앱입니다.


2. 데이터는 Firebase Realtime Database 을 기반으로 하고 있기 때문에 실시간 작업현황을 공유 할 수 있습니다. 


3. 사용자는 일정기간 동안 무상으로 사용해 보면서 업무 적용여부를 판단할 수 있으며, 계속해서 사용하고자 하는 경우에는 매월 정기결제를 통해 사용을 유지할 수 있습니다. (관리자는 해당 데이터가 많아지거나 해서 백업이 필요한 경우 정기결제 수입으로 백업등을 관리합니다.)


4. 이앱에서는 구글계정 이메일을 기반으로 사용자 관리를 하고 있으나, 사용자의 이메일 계정은 사용자 확인을 위해서만 사용 되며,  외부로의 제공은 허용하지 않습니다. (사용자 등록시 사용자 이름은 별칭을 사용하여도 무방합니다.)


5. 초기 등록시 사용되는 이메일계정은 데이터 관리자의 계정으로 사용 되므로 신중하게 입력해 주시고, 추후 앱을 삭제한 경우 사용자 이메일 계정을 다시 등록할 경우 기존 데이터가 없어질 수 있으므로 관리자 이메일 계정은 잘 기억하고 있어야 합니다.  (필요시 요청에 의해 확인후 알려 드릴 수는 있습니다.)


위 화면과 같이 초기 실행시 관리자 이메일 계정과 사용자의 회사명칭을 입력하면 화면에 표시 됩니다.


이앱의 기본 메뉴 구성은 다음과 같습니다.


1.입고관리 : 신규 차량 등록 화면


2.작업일정관리 : 부서별 작업대상 목록을 조회 하고, 작업 단계의 진행을 등록


3.완료된작업 : 입고관리에서 등록된 작업대상목록 중에서 처리가 완료된 대상 조회


4.부서별 작업현황 : 부서별 작업현황 조회 및 완료된 부서별작업 리스트 조회


5.사용자등록 : 구글계정으로 로그인한 사용자에 대한 승인 처리 및 사용자의 소속부서 변경


6.관리자로그인 : 관리자는 기본지정된 계정만 사용이 가능하며, 부서코드 및 명칭관리


7.로그아웃 : 이 앱에서 로그아웃 하고 앱을 종료함


구글 계정을 이용하여 로그인이 완료된 이후에는


다음 그림의 내용과 같이


메뉴화면에서 관리자로그인을 선택하면


1.구글로그인 버튼이 나오며, 사용하는 구글계정으로 로그인시작


2.다음부터는 등록된 계정을 선택할 수 있음


3.관리자로 로그인된 경우만


   * 이메일 및 사용자별칭에 노란색 배경이 나옴


   * 저장버튼 활성화됨 (관리자 아닌경우 저장 버튼은 비활성화)


4. 추가 버튼으로 부서코드를 추가할 수 있으며, 여기 등록된 순서


   와 일치하도록 작업목록이 구성되므로, 작업순서에 맞게 부서코드


   를 부여하여 등록 하여야 함. (코드값은 중요하지 않으나 가급적


    숫자를 이용하여 순서 정렬이 될 수 있도록 부여함)


5. 부서코드 수정시에는 해당 코드가 있는 열을 클릭하면 부서 수정


   화면이 나옴.


구글 로그인을 통해서 사용자등록 화면 전환된 이후에는


1.사용자별칭을 입력 저장할 수 있고,  소속부서를 선택할 수 있으며, 여기서 나오는 부서명칭은 관리자 화면에서 입력한 부서 명칭이 나옴.


2.저장 또는 삭제를 선택할 수 있음. (삭제를 하게 되면, 로그아웃 상태로 나가기 때문에 다시 로그인을 해서 사용자 정보를 저장해야함)


3.부서코드를 2개까지 선택할 수 있으며, 두번째 부서는 선택하지 않을 경우 공백이 되어야 함.


4.사용자가 저장되면 아래 그림 처럼 회색 바탕으로 표시 되고 이 때는 관리자 이 화면에서 해당 사용자를 클릭 하여 승인을 해야 업무를 처리할 수 있음.


5. 승인되었던 사용자의 경우도 왼쪽 그림과 같이 선택하면 승인을 취소할 수 있음. 승인 취소시 배경이 회색이 되는 지 확인되어야 함.


업무처리순서는


1.입고관리 관리에서 새로운 차량 정보 등록


2.작업일정관리는 각 부서별로 로그인한 사용자의 부서코드 정보를 이용하여 부서별 작업일정을 관리함


(리스트에 작업대상을 클릭하면 다음단계로 진행되며 완료된 작업은 리스트에서 없어짐)


3.완료된 작업에서는 입고관리 화면에서 처음 등록시 선택한 수리부분의 개수에 따라 작업이 완료되면 입고관리에서는 사라지고 해당 차량의 정보가 완료된 작업에서만 나타남


4.부서별 작업현황은 각 부서에서 작업을 시작하게 되면 각부서의 작업중인 현황을 실시간으로 확인할 수 있음


1. 입고관리


2. 작업일정관리


3.완료된 작업


4.  부서별 작업현황


그외 궁금하거나 기능 개선이 필요한 경우는  이메일로 알려 주시면 개선을 진행해 드립니다. 


메일수신처 6k2emg@gmail.com 입니다.


감사합니다.


오늘의 이야기


#스치니1000프로젝트 #재미 #행운기원 #Compose #Firebase

🎯 야 너 토요일마다 로또 확인하냐?
나도 맨날 "혹시나~" 하면서 봤거든 ㅋㅋ

근데 이제는 그냥 안 해
AI한테 맡겼어 🤖✨

그것도 구글 Gemini로다가!

그래서 앱 하나 만들었지
👉 "로또 예상번호 by Gemini" 🎱

AI가 분석해서 번호 딱! 뽑아줌
그냥 보고 참고만 하면 됨

재미로 해도 좋고…
혹시 모르는 거잖아? 😏


https://play.google.com/store/apps/details?id=com.billcorea.gptlotto1127


오늘의 이야기

온라인으로 동시에 여러사람이 사용할 앱을 만들고 싶다. 그런데 동시에 데이터를 볼 수 있어야 한다면


내가 운영할 서버를 만들어야 한다. 


방법으로는 호스팅 서비스를 이용해서 업무를 주고 받을 서버를 구축하고 사용하거나, 


내가 관리할 수 있는 위치에 서버을 구성하는 방법이 있을 것 같다.


그러나, 이렇게 운영하기에는 해야할 일이 많고, 관리할 수 있는 여력이 안될 수 도 있다.


그떄 나오는 것이 Firebase 가 아닐까 싶은데...


이번에 Firebase 을 이용한 앱을 만들면서  사용했던 부분에 대한 정리를 해 둘까 ?


1. record 의 구성


Sqlite 을 사용할 때도 table 을 구성해야 하기 떄문에 반드시 데이터로 들어갈 항목에 대한 설계는 필요하다.


이와 마찬가지로 Firebase 을 사용하고자 할 떄도 항목은 정해야 한다.  예을 들면 아래 처럼


public class UserBean {

String userEmail ;
String userPassword ;
String userName ;
String userDept ;
String userDept1 ;
String deptCode ;
String deptCode1 ;
String masterTy ;
String useYn ;


public void Userbean() {

}

public void setUserEmail(String userEmail) {
this.userEmail = userEmail;
}

public String getUserEmail() {
return userEmail;
}

public void setUserPassword(String userPassword) {
// 패스워드는 암호화해서 기록하기
this.userPassword = StringUtil.makeSHA256(userPassword);
}

public String getUserPassword() {
return userPassword;
}

public void setUserName(String userName) {
this.userName = userName;
}

public String getUserName() {
return userName;
}

public void setUserDept(String userDept) {
this.userDept = userDept;
}

public String getUserDept() {
return userDept;
}

public void setDeptCode(String deptCode) {
this.deptCode = deptCode;
}

public String getDeptCode() {
return deptCode;
}

public void setUserDept1(String userDept1) {
this.userDept1 = userDept1;
}

public String getUserDept1() {
return userDept1;
}

public void setDeptCode1(String deptCode1) {
this.deptCode1 = deptCode1;
}

public String getDeptCode1() {
return deptCode1;
}
public void setMasterTy(String masterTy) {
this.masterTy = masterTy;
}

public String getMasterTy() {
return masterTy;
}

public void setUseYn(String useYn) {
this.useYn = useYn;
}

public String getUseYn() {
return useYn;
}
}

2 이제 데이터를 조회해 볼까 하는 데


Sqlite 라고 하다면...


	public Cursor selectUserInfo() {
StringBuffer sb = new StringBuffer() ;
sb.append(" select userEmail, userPassword, userName, userDept, userDept1, deptCode, deptCode1, masterTy, useYn ");
sb.append(" from userInfo ");
sb.append(" order by userEmail ") ;
Cursor cursor = db.rawQuery(sb.toString(), null) ;
return cursor ;
}

이렇게 구현을 해서 MainActivity 안에서 Cursor 을 활용해서 데이터를 조회한다고 할 수 있다.


그럼 Firebase 의 ReailTime Database 는 어떻게 ?


DatabaseReference mDatabase;


@Override
protected void onCreate(Bundle savedInstanceState) {

...

mDatabase = FirebaseDatabase.getInstance().getReference("users");

...

}


public void getDisplayData() {

mDatabase.orderByChild("userEmail").addListenerForSingleValueEvent(new ValueEventListener() {
@Override
public void onDataChange(@NonNull DataSnapshot snapshot) {
userBeanListArray.clear();
for(DataSnapshot dataSnapshot : snapshot.getChildren()) {
userBeanListArray.add(dataSnapshot.getValue(UserBean.class));
Log.i(TAG, dataSnapshot.getValue(UserBean.class).getUserEmail());
}
}

@Override
public void onCancelled(@NonNull DatabaseError error) {

}
}) ;
}

이런 모양으로 구성이 될 수 있다.


여기서 한가지 알고 가야할 것은 


addListenerForSingleValueEvent() 와 addValueEventListener() 의 차이가 아닐까 하는 생각이 든다. 


어떤게 더 유리하게 동작을 할 지는 알 수 없지만.


addValueEventListener() 을 이용하는 경우는 항목이 변화되는 경우(추가/삭제/수정) 실시간으로 데이터가 반영되는 역활을 하고 있고, addListenerForSingleValueEvent() 을 이용하게 되면, 조회를 시도하는 경우에만 새로운 데이터를 가지고 온다는 것이다. 


addValueEventListener()는 이벤트가 생길떄 마다 다시 데이터를 갱신하기 때문에 데이터 조회하는 양이 많아지게 되는 단점이 있기는 하지만, 장점은 실시간으로 변하는 데이터를 화면에 보여주는 등의 기능을 구현할 수 있기 때문에 여려사용자가 동시에 같은 내용을 보고 있다면 도움이 될 수 있을 것으로 보인다.


addListenerForSingleValueEvent() 는 실시간 갱신이 되지 않고 조회시마다만 갱신을 하기 때문에 데이터 조회하는 양은 조절이 될 수 있다, 단점으로는 사용자가 데이터 갱신여부를 계속해서 확인을 해야 한다는 것이다.


두 가지 차이점에 대해서는 적용하기에 따라 달라 질 수 있으니 개발시에 주의가 되어야 할 것 같다.


오늘의 이야기

자료출처 : dev.re.kr/2


[Tip] 항상 흐르는 텍스트 뷰 만들기 (무한 marquee)


안드로이드에서 흐르는 텍스트를 만드는 방법은 무척 간단하다. Layout 리소스 XML 의 TextView (또는 TextView 가 들어간 위젯) 속성에 다음과 같이 세 줄만 추가해 주면 된다. android:ellipsize="marquee" a..


dev.re.kr


앱을 만들다 보니... 화면의 크기는 한계가 있고 나타날 글짜는 많고...


그래서 또 구글링~~~  그러다가 찾은 것이 위에 있는 링크에서 도움을 받았다.


저 링크에 있는 소스 예제는 android 빌드 버전에 예전꺼 일 때 만든 것 같고...


build 버전 28.0.0 이후 부터는 androidx 로 이전을 해야 하는데, 조금의 설정 수정이 필요해서 수정했다.


androidx.appcompat.widget.AppCompatTextView만 수정한 것 같은 생각이... ㅋㅋㅋ


import android.content.Context;
import android.graphics.Rect;
import android.util.AttributeSet;

public class MarqueeTextView extends androidx.appcompat.widget.AppCompatTextView {

String TAG = "MarqueeTextView" ;

public MarqueeTextView(Context context) {
super(context);
}

public MarqueeTextView(Context context, AttributeSet attributeSet) {
super(context, attributeSet);
}

@Override
protected void onFocusChanged(boolean focused, int direction, Rect
previouslyFocusedRect) {

//Log.d(TAG, "getMarqueeRepeatLimit onFocusChanged(" + this.getMarqueeRepeatLimit() + ")") ;

if(focused)
super.onFocusChanged(focused, direction, previouslyFocusedRect);

}

@Override
public void onWindowFocusChanged(boolean focused) {

//Log.d(TAG, "getMarqueeRepeatLimit onWindowFocusChanged (" + this.getMarqueeRepeatLimit() + ")") ;

if(focused)
super.onWindowFocusChanged(focused);
}

@Override
public boolean isFocused() {
return true;
}
}


위와 같이 수정하고 나서, layout 에서는 


<MarqueeTextView
android:id="@+id/tv1"
android:layout_width="match_parent"
android:layout_height="0dp"
android:layout_weight="1"
android:ellipsize="marquee"
android:fontFamily="@font/noto_sans_bold"
android:gravity="center_horizontal|center_vertical"
android:includeFontPadding="false"
android:marqueeRepeatLimit="marquee_forever"
android:singleLine="true"
android:textSize="12sp" />

와 같이 TextView 을 추가하고 그 안에 값을 넣어주면 흐르는 글씨를 만들 수 있다.


기본 제공되는 TextView 에서도


android:ellipsize="marquee"


android:marqueeRepeatLimit="marquee_forever"


위 2개 항목을 넣어주면 같은 처리가 되기는 하지만, 해당 TextView 에 포커스가 가 있는 경우만 글자가 흐르기 때문에


위에서 보여준 것 처럼 나만의 TextView 로 수정을 해서 사용하게 되면 항상 흐르는 글짜를 볼 수 있다.


다만, ListView 에 넣어 사용하게 되는 경우는 좀 헛짓를 하는 경우가 있기는 했다.


오늘의 이야기


#스하리1000명프로젝트

스치니들!
내가 만든 이 앱은, 내 폰에 오는 알림 중에서 중요한 키워드가 있는 경우
등록해둔 친구에게 자동으로 전달해주는 앱이야 📲

예를 들어, 카드 결제 알림을 와이프나 자녀에게 보내주거나
이번 달 지출을 달력처럼 확인할 수도 있어!

앱을 함께 쓰려면 친구도 설치 & 로그인해줘야 해.
그래야 친구 목록에서 서로 선택할 수 있으니까~
서로 써보고 불편한 점 있으면 알려줘 🙏

👉 https://play.google.com/store/apps/details?id=com.nari.notify2kakao


오늘의 이야기

자료출처 : stackoverflow.com/questions/26533347/format-currency-string-using-edittext-in-android


Format currency string using EditText in Android


I'm trying to format the input value of an EditText in Android, I want to format the input in currency value, I' ve tried the following: EditText minimo = (EditText) view.findViewById(R.id.


stackoverflow.com


어느 분의 요청으로 앱에 숫자 입력을 마치 계산기 처럼 숫자를 입력하면 3자리 마다 콤마가 나오게 하는 방법을 찾아 보다가 위의 링크를 보게 되었다.


import android.text.Editable;
import android.text.TextWatcher;
import android.widget.EditText;

import java.text.DecimalFormat;
import java.text.ParseException;

public class NumberTextWatcher implements TextWatcher {
private DecimalFormat df;
private DecimalFormat dfnd;
private boolean hasFractionalPart;

private EditText et;

public NumberTextWatcher(EditText et)
{
df = new DecimalFormat("#,###.##");
df.setDecimalSeparatorAlwaysShown(true); // 소숫점 이하를 표시할 까 ?
dfnd = new DecimalFormat("#,###");
this.et = et;
hasFractionalPart = false; // 분수여부 ?
}

@SuppressWarnings("unused")
private static final String TAG = "NumberTextWatcher";

public void afterTextChanged(Editable s)
{
et.removeTextChangedListener(this);

try {
int inilen, endlen;
inilen = et.getText().length();

// 입력된 값에서 숫자만 추출
String v = s.toString().replace(String.valueOf(df.getDecimalFormatSymbols().getGroupingSeparator()), "");
Number n = df.parse(v);
int cp = et.getSelectionStart();
// 소숫점 입력 여부에 따라서
if (hasFractionalPart) {
et.setText(df.format(n));
} else {
et.setText(dfnd.format(n));
}

// 전체 입력된 길이를 기준으로 해서
endlen = et.getText().length();
int sel = (cp + (endlen - inilen));
// 한글짜씩 추가 하는 형식으로 처리
if (sel > 0 && sel <= et.getText().length()) {
et.setSelection(sel);
} else {
// place cursor at the end?
et.setSelection(et.getText().length() - 1);
}
} catch (NumberFormatException nfe) {
// do nothing?
} catch (ParseException e) {
// do nothing?
}

et.addTextChangedListener(this);
}

public void beforeTextChanged(CharSequence s, int start, int count, int after)
{
}

public void onTextChanged(CharSequence s, int start, int before, int count)
{
// 소숫점이 입력 되는 지를 체크
if (s.toString().contains(String.valueOf(df.getDecimalFormatSymbols().getDecimalSeparator())))
{
hasFractionalPart = true;
} else {
hasFractionalPart = false;
}
}
}


대강 필요한 부분의 기능을 살펴 보면 위에 소스에 달아 놓은 코멘트와 같지 않을 까 싶다.


그리고 layout 에서 주의할 것은 EditText 의 gravity 을 end 로 설정해서 입력하는 숫자가 오른쪽 끝에서 입력이 되도록 설정을 해야 내가 만든 앱에서 입력이 계산기 처럼 숫자가 입력될 때 표시가 되는 효과를 느낄 수 있다.


오늘의 이야기

developer.android.com/topic/libraries/view-binding?hl=ko


뷰 결합  |  Android 개발자  |  Android Developers


뷰 결합 기능을 사용하면 뷰와 상호작용하는 코드를 쉽게 작성할 수 있습니다. 모듈에서 사용 설정된 뷰 결합은 모듈에 있는 각 XML 레이아웃 파일의 결합 클래스를 생성합니다. 바인딩 클래스의


developer.android.com


이건 뭔가 하는 생각이 들때 한번 해보면 편하게 적용할 수 있다는 것을 알게 된다.


예전 처음 안드로이드를 배울때 부터... 여태것  layout 에 버튼을 하나 달면 꼭 activity 내에서 다시 선언을 하고 나서야 


그 버튼을 활용할 수 있었다.


 Android Studio 3.6 Canary 11 이상에서만 적용이 된다고 나와 있기는 하지만, 그 이후에서 부터는 저기 기술된 것처럼


view binding 을 이용해 한줄 이라도 덜 코딩하는 마법(?)이 생겨난다.


이걸 구현 하기 위해서는 build.gradle 에 아래 예시 처럼 선언이 필요하다.


android {
       
...
        viewBinding
{
            enabled = true
        }

   
}


activity 소스 내에서는 layout 파일이름으로 바인딩을 먼저 선언하고


실제 사용에는 아래 예시와 같이 작성한 후 해당 layout 안에 있는 것들을 사용하면 된다.


    ActivityMainBinding binding ;
@Override
protected void onCreate(Bundle savedInstanceState) {
super.onCreate(savedInstanceState);
binding = ActivityMainBinding.inflate(getLayoutInflater());
View view = binding.getRoot() ;
setContentView(view);
setSupportActionBar(binding.toolbar);

binding.fabMenuSetting.setOnClickListener(new View.OnClickListener() {
@Override
public void onClick(View v) {
Toast.makeText(getApplicationContext(), "Mesg", Toast.LENGTH_LONG).show();
}
});

}


이렇게 코딩을 함으로 해서 조금은 편하게 코딩을 할 수 있게 되는 것이다.


이보다 더 낮은 방법이 있을 수 도 있는데, 아직은 여기 까지...


오늘의 이야기


#스하리1000명프로젝트,
Soms is het moeilijk om met buitenlandse werknemers te praten, toch?
Ik heb een eenvoudige app gemaakt die helpt! Jij schrijft in jouw taal, en anderen zien het in hun taal.
Het vertaalt automatisch op basis van instellingen.
Superhandig voor makkelijke chats. Neem eens een kijkje als je de kans krijgt!
https://play.google.com/store/apps/details?id=com.billcoreatech.multichat416


오늘의 이야기

이번에 새로운 앱을 만들면서 적용해 보았던... Fab 에 대한 이해를 위해서


이걸 적용하게된 이유는 액션바를 제거해 달라는 요구가 있었기 때문에 액션바 때문에 화면의 일부를 사용할 수 없다는 게 불편하기도 하고 해서 다른 방법으로 메뉴를 구성해 보아야 했는데, google에 제공하는 Fab 보다는 쉽게 구현이 가능한 방법을 찾아보다가 아래 링크를 찾았다.


nambicompany.github.io/expandable-fab/


ExpandableFab


A highly customizable Android widget that displays the available actions of a UI via an expandable set of floating action buttons - with optional labels and fluid animations.


nambicompany.github.io


이걸 적용하기 위한 간단한 설명을 해 두고자 한다. 물론 위 링크를 따라다녀 보면 알 수 있는 내용이기는 하겠지만, 


한번 찾았던 것을 다시 찾는 것도 힘든 일이기도 하고... 물론 그 사이에 추가 개선된 내용이 있어도 모르고 지나가는 불운(?)이 있을 지 모르지만...


일단 적용을 위해서는 build.gradle에 아래 한줄을 추가했다.


dependencies {

implementation 'androidx.appcompat:appcompat:1.2.0'
implementation 'com.google.android.material:material:1.3.0'
implementation 'androidx.constraintlayout:constraintlayout:2.0.4'
implementation 'androidx.navigation:navigation-fragment:2.3.3'
implementation 'androidx.navigation:navigation-ui:2.3.3'
testImplementation 'junit:junit:4.13.2'
androidTestImplementation 'androidx.test.ext:junit:1.1.2'
androidTestImplementation 'androidx.test.espresso:espresso-core:3.3.0'
implementation 'com.nambimobile.widgets:expandable-fab:1.0.2'
}


다른 것들은 기본적으로 생성되는 gradle 내용이고 빨간색 한줄만 추가해 주면 된다. 그리고 나서 gradle sync 실행으로 준비는 끝이다.  (2021.2.16현재까지 제공된 버전은 1.0.2 인데.. 나중에는 업데이트가 될까 ?)


layout.xml 에 추가하는 내용은 아래와 같다...  


구조는 ExpandableFabLayout 안에


          Overlay  : 화면 overlay을 위해서 필요하고 아래 예시 처럼 overlay_alpha 의 값을 지정하면


                       Fab 가 동작하는 동안 아래 화면을 흐리게 만들어 준다.  그런게 필요 없다면 없어도 무방~


          ExpandableFab : 기본표시 되어야 하는 것 


                                efab_iconAnimationRotationDeg 값을 조정하면 메뉴가 움직일떄 표시되는 + 기호의


                                움직임이 달라짐


          FabOption : 이것은 메뉴로 나타나는 버튼을 추가할 수 있다. 몇개를 넣어도 되므로 화면에 나오는


                           구조에 따라서 여러개를 사용할 수 있다.


    <com.nambimobile.widgets.efab.ExpandableFabLayout
android:id="@+id/expandable_fab_layout"
android:layout_width="match_parent"
android:layout_height="match_parent">

<com.nambimobile.widgets.efab.Overlay
android:layout_width="match_parent"
android:layout_height="match_parent"
app:overlay_alpha="0.75"
app:overlay_color="#000000"
app:overlay_openingAnimationDurationMs="1000" />

<com.nambimobile.widgets.efab.ExpandableFab
android:id="@+id/expandable_fab"
android:layout_width="wrap_content"
android:layout_height="wrap_content"
android:layout_gravity="bottom|end"
android:layout_marginBottom="@dimen/ui_margin_medium"
android:layout_marginEnd="@dimen/ui_margin_medium"
app:efab_color="#9374DE"
app:efab_iconAnimationRotationDeg="-225"
app:efab_closingAnticipateTension="0"
app:label_text="@string/app_name"/>

<com.nambimobile.widgets.efab.FabOption
android:id="@+id/fab_menu_setting"
android:layout_width="wrap_content"
android:layout_height="wrap_content"
app:fab_color="#FF8800"
app:fab_icon="@drawable/ic_launcher_foreground"
app:label_backgroundColor="#808080"
app:label_text="@string/action_settings"
app:label_textColor="#FFC0CB" />

</com.nambimobile.widgets.efab.ExpandableFabLayout


activity 내에서 사용은 아래 예시와 같이 간단하게 구현할 수 있다.


    ActivityMainBinding binding ;
@Override
protected void onCreate(Bundle savedInstanceState) {
super.onCreate(savedInstanceState);
binding = ActivityMainBinding.inflate(getLayoutInflater());
View view = binding.getRoot() ;
setContentView(view);
setSupportActionBar(binding.toolbar);

binding.fabMenuSetting.setOnClickListener(new View.OnClickListener() {
@Override
public void onClick(View v) {
Toast.makeText(getApplicationContext(), "Mesg", Toast.LENGTH_LONG).show();
}
});

}


view binding 에 대해서는 나중에 또...


그럼~


오늘의 이야기

안드로이드 폰에서 Restful 호출을 위해서 StringRequest 을 사용해 보기도 했지만, Retrofit 을 알고 나서는 간편하게 잘 쓰게 되었다.   data.go.kr 에서 제공하는 공공데이터를 이용해서 앱을 만들어 보고자 했던 건데......